
ShurePlus MOTIV Video
ShurePlus MOTIV Video Recording App
™
The ShurePlus MOTIV video app user guide.
Version: 6.0 (2023-C)

Shure Incorporated
2/16
Table of Contents
ShurePlus MOTIV Video ShurePlus MOTIV™ Video
Recording App 3
General Description 3
Standby Mode 3
Visual Settings 4
Record Mode 4
Using the ShurePlus MOTIV App with the MV88 micro
phone 5
Aiming the Microphone 5
Connecting Headphones with Inline Mics 6
Device Setup 7
Preset Modes 8
Custom Presets 9
Advanced Mic Settings 9
Limiter 9
Compressor 9
Wind Noise Reduction 9
Left-Right Channel Swap 10
Equalizer 10
Using MultiLens in iOS 10
Using the Apple Watch with ShurePlus MOTIV 10
Connect your Apple Watch to the MOTIV recording app. 1
0
Controls and Navigation 11
Recording Tips 11
Turn Off Notifications 11
Adjust your Sample Rate 11
Get the Best-looking Video Image 11
Record in Mono 11
Record in Stereo 12
Capture the Complete Performance 12
Record with Confidence with Automatic Save 12
View and Share Videos Using the Video Gallery 12
Return to Camera 13
Gallery Sort 13
Troubleshooting 13
System Requirements 14
System Requirements and Compatibility: iOS 14
System Requirements and Compatibility: Android 14
Specifications 14
Certifications 15
Information to the user 16
Shure Incorporated
3/16
•
•
•
•
•
•
•
•
ShurePlus MOTIV Video
ShurePlus MOTIV Video Recording App
General Description
The ShurePlus MOTIV Video recording app provides instant video recording with uncompressed audio for your mobile device.
Customize the sound with digital signal processing (DSP) preset modes, adjustable gain, and stereo width control.
Features
Plug-and-Play Operation supporting landscape and portrait recording
Flexible Recording Control includes gain adjustment settings
Support for mono and stereo audio devices
When used with MOTIV microphones, there are preset modes available for a variety of recording situations.
Tip: Turn on Airplane Mode and Do Not Disturb to prevent interruptions to the recording caused by phone calls, text messages, or alerts.
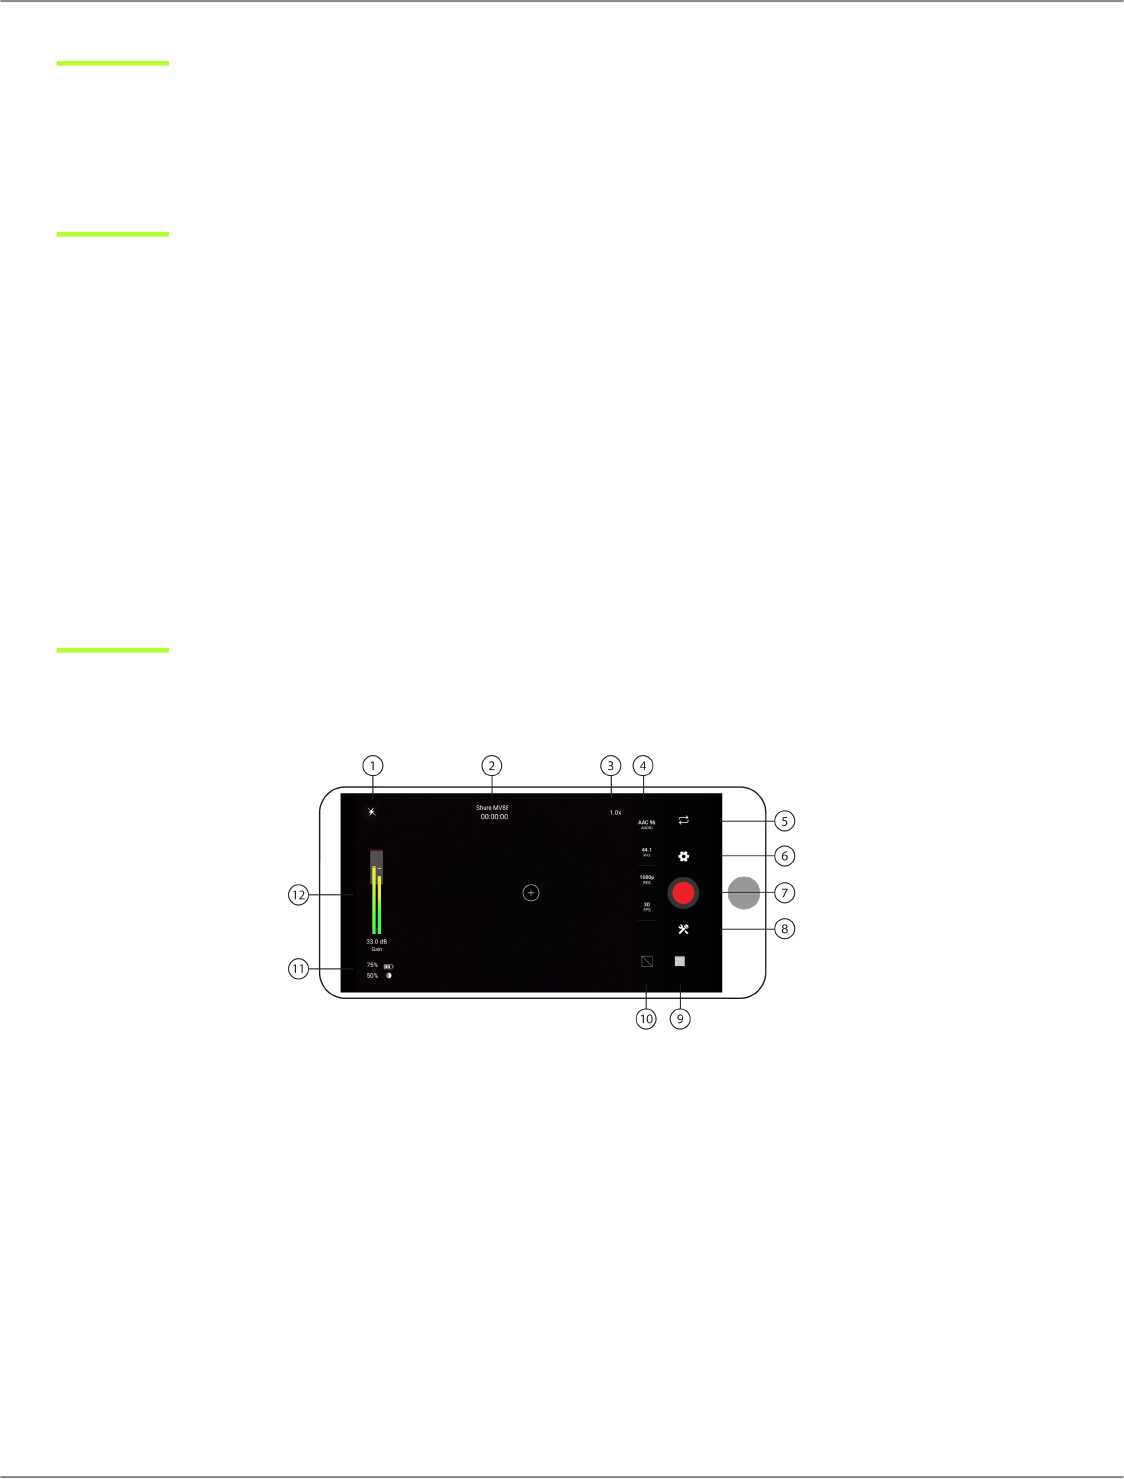
Standby Mode
① Flash Use the flash when recording in low light situations.
② Connected Device Status/Recording Length/Focus Lock Device status will display the model name of the connected
MOTIVdevice.Recordinglengthisdisplayedinhours,minutes,andseconds.SeetheVisualSettingstopicformoreinforma
tion on setting focus and exposure.
③ Zoom Level Pinch the screen to adjust your zoom level for a closer view of your subject.
④ File Information Displays available video format options.
Note: Option availability may vary based on your mobile device specifications.
Audio file formats: (iOS) WAV, ALAC, AAC 96, AAC 128, AAC 256 (Android) AAC 96, AAC 128, AAC 256
Sample rate: 44.1 kHz, 48 kHz
Video resolution: 720p, 1080p, 4K
Frame rate: 24 fps, 30 fps, 60 fps
™

Shure Incorporated
4/16
⑤ Reverse Camera Use the front-facing camera to shoot selfie videos.
⑥ Settings Tap the app settings sprocket to select light or dark theme appearance, to find version information, help materials,
and to send feedback.
⑦ Record/Stop Button
⑧ Device Setup Access advanced settings for your audio device. See Device Setup section for more information.
⑨ Video Gallery Tap to view your gallery of recorded videos. See Video Gallery section for more information.
⑩ Grid/Level/Off Display Tap through to display grid lines or a level for easy image composition. Or turn this feature off if you
prefer a clean display.
⑪ Device Status Displays remaining battery life and available storage space for your recording device.
⑫ Input Meter/Microphone Gain Tap the input meter to bring up the mic gain slider. Tap to adjust microphone gain during
recording to match the volume of the sound source. Make live adjustments to ensure levels are in the target range (indicated
by the shaded region of the input meter). Displays the strength of the mono or stereo input signal.
Note: Display will read AGC when using the app with the built-in microphone. Automatic Gain Control (AGC) adjusts levels to ensure consistent volume.
Weaker signals are boosted and stronger signals are attenuated to control gain. The dynamic range is decreased but the result is a more even recording.
Visual Settings
Be sure to adjust your visual settings to get the best-looking video image. We recommend making adjustments in this order.
Zoom: Pinch to zoom in or out and frame your shot.
Brightness: Swipe up and down to set brightness level.
Focus: Tap to focus or tap and hold to lock brightness and focus. Tap again to release the lock.
Record Mode
① Flash Use the flash when recording in low light situations.
② Connected Device Status/Recording Length/Focus Lock Status will display the model name of the connected MOTIV
device. Recording length is displayed in hours, minutes, and seconds. The red dot will flash when video is recording. See the
Visual Settings topic for more information on focus and exposure.

Shure Incorporated
5/16
③ Zoom Level Pinch the screen to adjust your zoom level for a closer view of your subject.
④ Record/Stop Button Start and stop video recording.
Note: Video files are saved to the Photos app on your mobile device.
⑤ Audio Recording The MOTIV Video app displays the audio waveform as it is being recorded.
⑥ Grid Use the grid lines to assist in composing your image.
⑦ Device Status Displays remaining battery life and available storage space for your recording device.
⑧ Input Meter Displays the strength of the mono or stereo input signal. Tap to adjust microphone gain during recording. The
loudest peaks should reach within the target range (indicated by the shaded region of the input meter).
Note: The maximum file size for a recording is 2GB, which will result in approximately 2 hours of record time. This limitation was put in place to maximize app
performance. Continuous recording for more than 2 hours will generate a second file.
Using the ShurePlus MOTIV App with the MV88 microphone
The MOTIV app controls microphone settings to optimize performance for specific uses. The MV88 stores the previously used
settings for quick setup each time you record.
Aiming the Microphone
This section suggests placement for typical use cases. Keep in mind that there are many effective ways to record a given
source. Experiment with horizontal or landscape orientation, microphone placement and settings to find what works best.
Tip: To ensure that left and right sides are facing the appropriate directions, check to see if the Shure name is clearly visible on
the top of the microphone. If the name is not visible, turn the barrel 90°.
Portrait (Vertical)
Aim the front of the microphone toward the source. The microphone can be mounted in either orientation of the MV88 with the
Lightning connector, so ensure that the left and right sides are facing the appropriate directions.
Landscape (Horizontal)
Aim the front of the microphone toward the source. The microphone can be connected in either orientation with the Lightning
connector, so ensure that the left and right sides of the MV88 are facing the appropriate directions.
Shure Incorporated
6/16
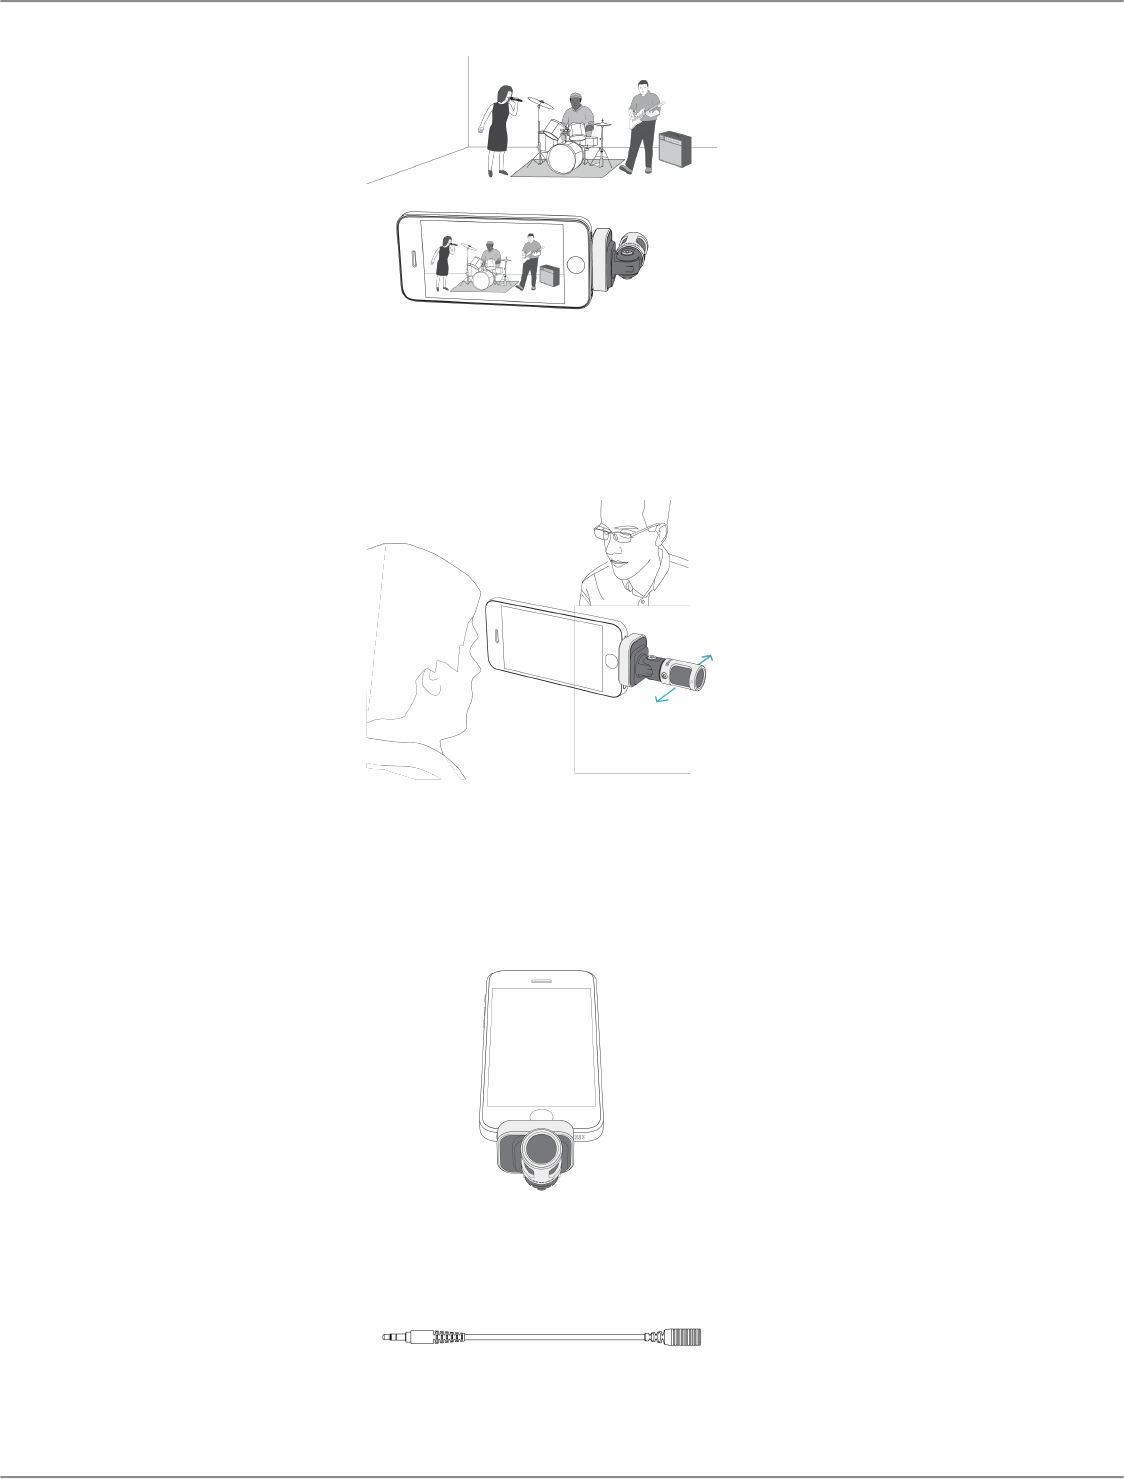
Video Interview
To capture the voices of both the subject (on-camera) and the interviewer (off-camera), select the MONO BIDIRECTIONAL
preset in the Shure MOTIV app. Position the microphone with the left and right sides facing each person.
Self-Recording (Video Streaming)
Set the device on a flat surface and angle the microphone toward your mouth. Select the MONO CARDIOID preset in the
Shure MOTIV app to reduce ambient noise.
Connecting Headphones with Inline Mics
Headphone Monitor Adapting Cable
Shure Incorporated
7/16
•
•
Use the included headphone monitor adapting cable for the following reasons:
Yourequireaslimmerconnectiontotheheadphoneinputonyourrecordingdevice.Thecableaccommodateshead
phones and earphones with larger connectors.
You want to disable the inline microphone on your headphones. The cable ensures that the recorded sound comes solely
from the MV88 and not the headphone inline microphone.
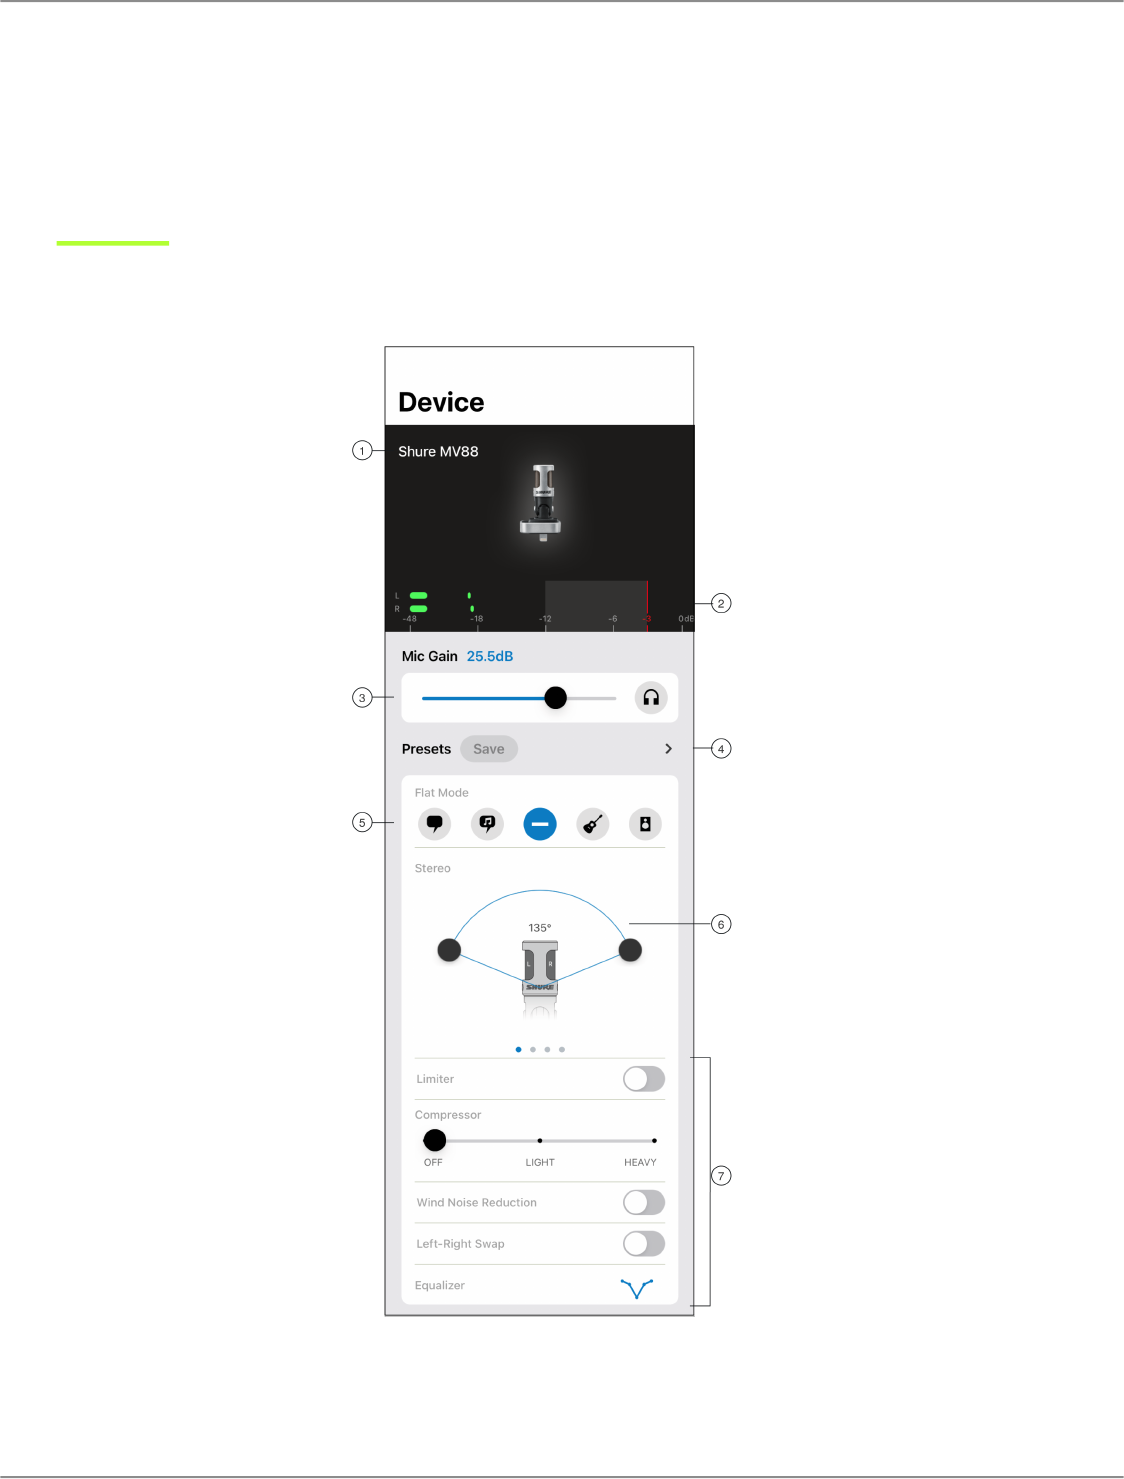
Device Setup
Microphone Settings
① Connected Mic Status Displays the name of the connected MOTIV microphone.

Shure Incorporated
8/16
② Input Meter Displays the strength of the input signal and whether that signal is mono or stereo. The loudest peaks should
reach within the target range (indicated by the shaded region between -12 and 0 dB).
③ Microphone Gain/Monitoring Adjust the gain slider to match the volume of the sound source. Tap the headphone icon to
turn on the input monitor when making adjustments.
④ Custom Presets Tap the caret to quickly access your saved presets. Or tap the Save button to save current settings as a
new custom preset. See Custom Presets for more information.
⑤ Preset Modes Selectamodetosetstereowidth,equalization,andcompressionforspecificapplications.Refertothe"Pre
set Modes" topic for more details.
⑥ Polar Pattern Selection Swipe to choose between Stereo, Mono Cardioid, Mono Bidirectional or Raw MidSidepickuppat
terns. Then adjust the width of the stereo microphone pickup area.
Tip: Consider the location of the microphone and the size of the sound source when adjusting the width. For example, a large
orchestra or ensemble recording will benefit from a wide stereo image to achieve increased separation between instruments.
Other applications, such as speech, benefit from a narrow width for improved clarity with rejection of ambient (room) sound.
⑦ Advanced Features First select a preset mode, then use the advanced controls to fine tune your audio recording and dial in
your sound. Your settings will be retained in the microphone. See "Advanced Features," "Wind Noise Reduction" and "Left-
Right Channel Swap" for more information on how these features work.
Preset Modes
Five selectable modes optimize settings for gain, stereo width, equalization, and compression. Set the microphone level and try
the modes to find which sounds best. Preset modes can affect the strength of the input signal, so adjust the microphone level
as needed after changing presets.
Mode Application Characteristics
Speech
speech
Narrow stereo width to reject background noise, equalization that emphasizes
clarity and fullness, and gentle compression.
Singing
soloorgroupvocalper
formances
Medium stereo width with subtle equalization to add richness and clarity for a
natural sound.
Flat
any
An unprocessed signal (no equalization or compression settings used). Adds
flexibility when processing the audio after recording.
acoustic instruments and
quiet music
Medium stereo width with transparent compression to smooth out volume spikes
and bring out quiet passages. The equalizer setting emphasizes detail and an
overall natural sound.

Shure Incorporated
9/16
1.
2.
3.
4.
1.
2.
Mode Application Characteristics
Acousti
c
Loud
live performance and
louder sources
Widestereotoincreaseseparationbetweensources.Equalizationfurtherim
proves definition by reducing frequencies that can make the instrumentation
sound crowded.
Custom Presets
Create and save custom presets to quickly access frequently used mic settings.
Start with the preset mode that best suits your application needs.
Adjust advanced settings, like compression, for clarity and consistency.
Tap Save to rename and save your new custom preset. The original preset will remain available.
The new custom preset is added to your list.
To access saved presets:
Tap the caret (arrow) in the Preset row to view your list of available presets.
Tap custom preset and Apply Preset to instantly apply gain, equalization, compression and stereo preferences. Stereo
preferences apply if you are using a stereo microphone for recording.
Tip: You can save a custom preset at any point by tapping Save.
Advanced Mic Settings
After you have selected the preset mode for your application, fine tune the sound of your recording with limiter, compressor,
andequalizercontrols.Yoursettingswillberetainedinthemicrophonewhenusingotheraudioandvideorecordingapplica
tions.
Limiter
Toggle the limiter on to set an input threshold and prevent distortion from volume peaks in your recordings.
Compressor
Choosenocompression,orselectlightorheavycompressiontocontrolvolumewhenyoursoundsourceisdynamic.Thecom
pressor will narrow the dynamic range, which means that quiet signals are boosted and loud signals are lowered.
Wind Noise Reduction

Shure Incorporated
10/16
1.
2.
WindNoiseReductionengagesalowfrequencycutofffilterthatreducesrumblecausedbyenvironmentalnoise.Usethein
cludedfoamwindscreenincombinationwithwindreductiontocounteractrumbleandplosives(burstsofairhittingthemicro
phone).
To further reduce wind noise, use the optional Rycote Windjammer, which fits over the included foam windscreen.
Left-Right Channel Swap
For stereo recordings, use Left Right Swap to flip the left and right audio channels to match the stereo image to the video. For
example, when using video to record yourself.
Tip: Use the L and R indicators on the microphone barrel. This way you can set Left Right Swap before you start to record.
Equalizer
ChangethepresetmodestoheartheDSPchanges,andthenusetheequalizertoboostorcutbandsoffrequenciestoim
prove sound clarity.
Note:Equalizationwithinpresetswillnotbedisplayed.However,theequalizergraphicintheadvancedsettingsstatusbardisplaystheuserselectedequaliza
tion.
Tap to access the MOTIV equalizer. Equalization changes are displayed in the equalizer image.
EQ persists between preset mode changes.
Using MultiLens in iOS
Some iOS devices allow for MultiLens recording. Wide-angle, Ultra wide-angle, Telephoto, Dual, Dual wide, and Triple cameras
Using the Apple Watch with ShurePlus MOTIV
The ShurePlus MOTIV Apple Watch app allows greater recording flexibility when using it as a remote control for the ShurePlus
MOTIV Audio and Video Recording Apps.
Connect your Apple Watch to the MOTIV recording app.
Open the Watch App on your iPhone, then tap the My Watch tab
Apps that are available to install will appear in the Available Apps section
™

Shure Incorporated
11/16
3.
4.
5.
6.
Find the MOTIV Watch app and tap Install
Note: See the Apple support page with additional instructions on Apple watch app installation.
TheApplewatchwillrecognizewhenyourMOTIVmicisconnectedtoyourphone.Themicrophonenamewillbedis
played in the upper left corner when the connection is made.
Placement of the microphone depends on the size of the room, number of people, and instrument volume. If possible,
walk around the room and listen to find where it sounds best.
Select the correct preset mode for your recording application. Adjust the microphone level and other settings in the app
and place the microphone near your source.
Note: Advanced settings should be set up before microphone is in place. The Apple Watch app will only allow you to control record, pause recording,
complete recording, make bookmarks and set and lock gain control.
Controls and Navigation
Start recording: Tap the red record button
Pause recording: Tap the pause icon. You can continue recording from a paused state
Create bookmark: Tap the bookmark icon
Stop recording: Tap the Done button
Adjust gain: Use the digital crown on the Apple Watch
Lock mic gain: Tap the lock icon
Recording Tips
Turn Off Notifications
When you open the MOTIV app, a message prompts you to enable airplane mode and do not disturb mode. It's important to do
thistoavoidrecordinginterferencefromphonecalls,messages,andvariousnotificationswhichcanaddstatictoyourrecord
ings.
Note: Enable airplane mode and then turn Wi-Fi back on to add geolocation information to your audio file.
Adjust your Sample Rate
Selectalowersampleratewhenitisusefultohaveasmallerfile,forexample,whenrecordingspeechorapodcastfordown
load. Select a higher sample rate for music and dynamic recordings.
Get the Best-looking Video Image
Pinchtozoominoroutandframeyourshot.Swipeupanddowntosetbrightness.Taptofocusortapandholdtolockbright
ness and focus. Tap again to release the lock.
Record in Mono
Record in mono to increase your available record time or when recording a single source, like vocals, that would benefit from
less ambient noise. Select the Mono Cardioid or Mono Bidirectional polar pattern and audio from all capsules are summed to a
single channel. The input meter will indicate mono recording by displaying the top half of the waveform. MOTIV supports third-
party microphones with mono recording.

Shure Incorporated
12/16
•
•
•
Record in Stereo
The MV88 barrel pivots forward on a hinge and rotates 45 degrees to accommodate portrait or landscape recording. L and R
are labeled to show stereo orientation of the microphone. The stereo image is accurate if the Shure logo is facing upward.
Capture the Complete Performance
To ensure that you capture the entire sound source, start your recording before the performance starts and edit the recording
later to trim any silence.
Note: If your microphone accidentally becomes disconnected during recording, MOTIV will automatically stop the recording. The save file dialog will appear,
prompting you to name and save your audio.
Record with Confidence with Automatic Save
If your microphone accidentally becomes disconnected during recording, MOTIV will automatically stop the recording. The
save file dialog will appear, prompting you to name and save your audio.
View and Share Videos Using the Video Gallery
Tap the video thumbnail on the standby screen to view the gallery of videos that are saved on your mobile device. Here you
can view information about each video including the video length, resolution, sample rate and the date and time that the video
was originally recorded.
Share your videos by selecting the video you'd like to share. Tap the share icon to view available sharing options.
Note: You can use the Share option to save the video to your device Photos app.
Rewind or fast forward to view the next video in the list.
Delete the video to make room for more recordings.

Shure Incorporated
13/16
Return to Camera
Tap the camera icon to return to the video recording app camera mode.
Gallery Sort
Tapthesorticontoviewoptionsforsortingthevideogallery.Optionsincludeviewingyourrecordedvideosbylist,inathumb
nail grid or by card which displays a full screen view of the thumbnail.
Troubleshooting
Issue Solution
Microphone is plugged in, but
the volume meter does not
register a signal.
Edit the privacy setting for your recording device under SETTINGS > PRIVACY > MICRO
PHONE to give the MOTIV app permission to use the microphone.
Microphone is plugged in, but
not detected.
Unplug and reconnect the cable connections so that the app recognizes the microphone.
You'll know that the connection is secure when you see the microphone name visible in
the status bar.
Audio sounds bad or distant.
ToensurethatyouarereceivingaudiofromtheMOTIVmicrophoneandnotabuiltinmi
crophone,unplugandreconnectthemicrophone.You'llknowthattheconnectionisse
cure when you see the microphone name visible in the status bar.
Audio quality changes when
a headset is plugged in
Headsets with inline microphones can override the connected audio device. Make sure
that you plug in your headset first and your MOTIV microphone last.
Audio is distorted
Use the audio meter to ensure that volume peaks are within the target range (the gray
area). If the level reaches the red peak indicator of the input meter, turn the gain down.
Left/right stereo channels do
not match video
Depending on the orientation of the recording device, it may be necessary to engage the
Left-Right swap in MOTIV settings. If the audio has already been recorded, you can
switch the left and right channels in most audio editing software.
Audio is not in sync with
video
Switch to a lower frame rate or resolution size. You might achieve better performance with
a less system intensive frame rate.
Recording stops due to over
heating
MOTIV Video app responds to device overheating by disabling the meter and waveform
display. If device continues to overheat, MOTIV will save your recording and shut down
the app. Ensure that your device has cooled down before starting a new recording.

Shure Incorporated
14/16
•
•
•
•
•
•
Issue Solution
Unable to share file.
If a file is too large to be shared, there are a couple options for reducing file size.
Connectyourmobiledevicetoyourcomputerandusefiletransfer,likeiTunes,todown
load the file to your desktop.
Split your track in two, export both files and recombine them using audio editing software.
General troubleshooting
Ensure that your app is updated to the most current version.
Make sure that your phone's operating system is updated to the most current version.
Check to see how the microphone works using a different connection cable or different
device.
Close and restart the application.
Powering down and rebooting the device will clear the cache and can sometimes help
with software performance.
System Requirements
System Requirements and Compatibility: iOS
iOS: iOS 14 and higher
iPhone: iPhone 6s and higher
iPod Touch: 7th gen
Note: iPad Pro (USB-C) is not supported.
Using iPad with USB-C
It is possible to record into an iPad with MOTIV microphones using a USB-C cable. However, you will only be able to adjust the
mic gain. In order to use all the features that MOTIV has to offer, connect the MOTIV mic to a second device (not an iPad) that
isusingtheShurePlusMOTIVapp.Withthisseconddeviceyoucanadjustmicsettingsforyourrecordingsituation.Theset
tings are retained in the MOTIV mic and when you reconnect to the iPad, you will be able to record using the settings you have
selected.
Remember: TheiPad(USBC)willonlysupportgainadjustmentforMOTIVmicrophones.Foraccesstothefullrangeoffea
tures, connect your mic to a compatible device and configure settings in the MOTIV app. The mic will retain settings to work
with the iPad.
System Requirements and Compatibility: Android
Will work with any Android device that has:
Android Pie 9.0 and higher
USBHostPowerRequirementof≥100mA
USB Audio Class 1.1 support and higher
Android is a trademark of Google Inc.
Note: See https://www.shure.com/en-US/motiv-compatibility for information on supportive Android devices.

Shure Incorporated
15/16
Specifications
MFi Certified
Yes
DSP Modes (Presets)
Speech/Singing/Acoustic/Loud/Flat
Polar Pattern
Adjustable Width Stereo/Mono Bidirectional/Mono Cardioid/Mid-Side
Stereo Principle
Mid-Side
Supported Audio Format
iOS
WAV, AAC (Up to 256 KHz)
Supported Audio Format
Android
AAC (Up to 256 KHz)
Frequency Response
20Hzto20,000Hz
Adjustable Gain Range
0to+36dB
Sensitivity
37dBFS/Paat1kHz[1][2]
Maximum SPL
120dBSPL[2]
Limiter
Yes
Compressor
Yes
Equalizer
5-band
[1]1Pa=94dBSPL
[2]At Minimum Gain, Flat Mode

Shure Incorporated
16/16
•
•
•
•
1.
2.
Certifications
Information to the user
This equipment has been tested and found to comply with the limits for a Class B digital device, pursuant to part 15 of the FCC
Rules. This equipment generates, uses, and can radiate radio frequency energy and, if not installed and used in accordance
with the manufacturer's instruction manual, may cause interference with radio and television reception.
Notice: The FCC regulations provide that changes or modifications not expressly approved by Shure Incorporated could void
your authority to operate this equipment.
Theselimitsaredesignedtoprovidereasonableprotectionagainstharmfulinterferenceinaresidentialinstallation.Thisequip
mentgenerates,uses,andcanradiateradiofrequencyenergyand,ifnotinstalledandusedinaccordancewiththeinstruc
tions, may cause harmful interference to radio communications. However, there is no guarantee that interference will not occur
inaparticularinstallation.Ifthisequipmentdoescauseharmfulinterferencetoradioortelevisionreception,whichcanbede
termined by turning the equipment off and on, the user is encouraged to try to correct the interference by one or more of the
following measures:
Reorient or relocate the receiving antenna.
Increase the separation between the equipment and the receiver.
Connect the equipment to an outlet on a circuit different from that to which the receiver is connected.
Consult the dealer or an experienced radio/TV technician for help.
This device complies with part 15 of the FCC Rules. Operation is subject to the following two conditions:
This device may not cause harmful interference.
This device must accept any interference received, including interference that may cause undesired operation.
Industry Canada ICES-003 Compliance Label: CAN ICES-3 (B)/NMB-3(B)
Note: Testingisbasedontheuseofsuppliedandrecommendedcabletypes.Theuseofotherthanshielded(screened)cabletypesmaydegradeEMCper
formance.
This product meets the Essential Requirements of all relevant European directives and is eligible for CE marking.
The CE Declaration of Conformity can be obtained from: www.shure.com/europe/compliance
Authorized European representative:
Shure Europe GmbH
Global Compliance
Jakob-Dieffenbacher-Str. 12
75031 Eppingen, Germany
Phone: +49-7262-92 49 0
Email: [email protected]
www.shure.com
Made for iPad (5th generation), iPad (6th generation, iPad (7th generation, iPad (8th generation), iPad Air 2, iPad Air 3, iPad
Mini4,iPadMini5,iPadPro9.7inch(1stgeneration),iPadPro(12.9inch)1stgeneration,iPadPro10.5inch2017(2ndgen
eration), iPad Pro 12.9-inch 2017 (2nd generation), iPhone 6s, iPhone 6s Plus, iPhone SE, iPhone 7, iPhone 7 Plus, iPhone 8,
iPhone 8 Plus, iPhone X, iPhone Xs, iPhone Xs Max, iPhone XR, iPhone 11, iPhone 11 Pro, iPhone 11 Pro Max, iPhone 12,
iPhone 12 Mini, iPhone 12 Pro, iPhone 12 Pro Max, iPhone SE 2, iPod Touch (7th generation).
iPad, iPhone, iPod and iPod touch are trademarks of Apple Inc., registered in the U.S. and other countries. iPad Air, iPad mini,
andLightningaretrademarksofAppleInc.Thetrademark“iPhone”isusedinJapanwithalicensefromAiphoneK.K.
Mac and Lightning are registered trademarks of Apple Inc.
® ®
