
Zebra Enterprise
Messaging Service
Workcloud Communication
Client User Guide
MN-004512-08EN Rev A

Copyright
2024/09/05
ZEBRA and the stylized Zebra head are trademarks of Zebra Technologies Corporation, registered in many
jurisdictions worldwide. All other trademarks are the property of their respective owners. ©2024 Zebra
Technologies Corporation and/or its affiliates. All rights reserved.
Information in this document is subject to change without notice. The software described in this document
is furnished under a license agreement or nondisclosure agreement. The software may be used or copied
only in accordance with the terms of those agreements.
For further information regarding legal and proprietary statements, please go to:
SOFTWARE: zebra.com/informationpolicy.
COPYRIGHTS: zebra.com/copyright.
PATENTS: ip.zebra.com.
WARRANTY: zebra.com/warranty.
END USER LICENSE AGREEMENT: zebra.com/eula.
Terms of Use
Proprietary Statement
This manual contains proprietary information of Zebra Technologies Corporation and its subsidiaries
(“Zebra Technologies”). It is intended solely for the information and use of parties operating and
maintaining the equipment described herein. Such proprietary information may not be used, reproduced,
or disclosed to any other parties for any other purpose without the express, written permission of Zebra
Technologies.
Product Improvements
Continuous improvement of products is a policy of Zebra Technologies. All specifications and designs are
subject to change without notice.
Liability Disclaimer
Zebra Technologies takes steps to ensure that its published Engineering specifications and manuals are
correct; however, errors do occur. Zebra Technologies reserves the right to correct any such errors and
disclaims liability resulting therefrom.
Limitation of Liability
In no event shall Zebra Technologies or anyone else involved in the creation, production, or delivery of the
accompanying product (including hardware and software) be liable for any damages whatsoever (including,
without limitation, consequential damages including loss of business profits, business interruption, or loss
of business information) arising out of the use of, the results of use of, or inability to use such product, even
if Zebra Technologies has been advised of the possibility of such damages. Some jurisdictions do not allow
the exclusion or limitation of incidental or consequential damages, so the above limitation or exclusion may
not apply to you.

Contents
About this Guide.............................................................................................................................................. 5
Chapter Descriptions..............................................................................................................................5
Notational Conventions......................................................................................................................... 5
Related Documents................................................................................................................................ 6
Icon Conventions.....................................................................................................................................6
Service Information................................................................................................................................. 6
Revision History........................................................................................................................................7
Supported PTT Pro Clients.............................................................................................................................8
Broadcast Messages.............................................................................................................................. 8
Using ZEMS with PTT Pro for Android....................................................................................................... 10
About Screen for Zebra PTT Pro for Android................................................................................ 11
Messaging Contacts..............................................................................................................................12
Searching for a Contact............................................................................................................... 15
Messaging to Groups............................................................................................................................17
Sending a Message to a Webhook..................................................................................................18
Sending a Prioritized Message..........................................................................................................19
Priority Message Descriptions....................................................................................................21
Urgent Message Parameters..................................................................................................... 24
Responding to Messages...................................................................................................................25
Recent View....................................................................................................................................27
Supported Message Attachments............................................................................................29
Accessing Broadcast Messaging..................................................................................................... 30
Composing a Broadcast Message...................................................................................................32
3

Contents
Scheduling a Broadcast Message................................................................................................... 36
Using ZEMS with PTT Pro for iOS...............................................................................................................41
About Screen for PTT Pro for iOS...................................................................................................42
Sending a Message to One or More Contacts............................................................................ 42
Sending a Message to a Group....................................................................................................... 44
Sending a Message to a Webhook................................................................................................. 44
Responding to Messages...................................................................................................................46
Recent View....................................................................................................................................47
Accessing Broadcast Messaging......................................................................................................49
Composing a Broadcast Message...................................................................................................52
Creating a Favorite.......................................................................................................................54
Removing a Favorite.................................................................................................................... 57
Deleting a Sent Broadcast Message.......................................................................................58
Scheduling a Broadcast Message................................................................................................... 60
Using ZEMS Messaging with the ZEMS Web Client................................................................................64
Accessing the ZEMS Web Client..................................................................................................... 64
ZEMS Web Client User Interface..................................................................................................... 66
History View....................................................................................................................................67
Conversation View........................................................................................................................68
Messaging Contacts and Groups.....................................................................................................69
Sending a Prioritized Message......................................................................................................... 70
Priority Messages in the Web Client........................................................................................ 71
Sending a Message to a Webhook................................................................................................. 72
Composing a Broadcast Message................................................................................................... 73
Scheduling a Broadcast Message....................................................................................................74
4

About this Guide
About this Guide
This guide describes how to use the Workcloud Communication PTT Pro apps with the Zebra Enterprise
Messaging Service (ZEMS). ZEMS provides text messaging across sites and includes broadcast messaging.
The configuration of the clients is described in the Zebra Enterprise Messaging Service Customer
Administrator Guide.
NOTE: The screensand windows pictured in this guide are samples and can differ from actual
screens.
Chapter Descriptions
Topics covered in this guide are as follows:
• About this Guide—Describes this document.
• Enterprise Messaging—Describes the functions and features of the Zebra Enterprise Messaging
Service, including broadcast messaging.
• ZEMS Messaging with ZebraPro for Android—Provides information about using PTT Pro for Android
with ZEMS.
• ZEMS Messaging with ZebraPTT Pro for iOS—Provides information about usingPTT Pro for iOS with
ZEMS.
• ZEMS Messagingwith the Zebra Web Client—Provides information about using the web interface for
ZEMS.
Notational Conventions
The following notational conventions make the content of this document easy to navigate.
• Bold text is used to highlight the following:
• Dialog box, window, and screen names
• Dropdown list and list box names
• Checkbox and radio button names
• Icons on a screen
• Key names on a keypad
• Button names on a screen
5

About this Guide
• Bullets (•) indicate:
• Action items
• List of alternatives
• Lists of required steps that are not necessarily sequential.
• Sequential lists (for example, those that describe step-by-step procedures) appear as numbered lists.
Related Documents
• Workcloud Communication PTT Pro Installation Guide—Describes the installation and activation of all
Workcloud Communication PTT Pro applications.
• Workcloud Communication PTT Pro for Android User Guide—Describes PTT Pro for Android features
and operation.
• Workcloud Communication PTT Pro for iOS User Guide—Describes PTT Pro for iOS features and
operation.
• Zebra Enterprise Messaging Service Customer Administrator Guide—Describes the configuration of
Workcloud Communication PTT Pro clients to use ZEMS.
Icon Conventions
The documentation set is designed to give the reader more visual clues. The following visual indicators are
used throughout the documentation set.
NOTE: The text here indicates information that is supplemental for the user to know and that is
not required to complete a task.
IMPORTANT: The text here indicates information that is important for the user to know.
CAUTION: If the precaution is not heeded, the user could receive a minor or moderate injury.
WARNING: If danger is not avoided, the user CAN be seriously injured or killed.
DANGER: If danger is not avoided, the user WILL be seriously injured or killed.
Service Information
If you have a problem with your equipment, contact Zebra Global Customer Support for your region.
Contact information is available at: zebra.com/support.
When contacting support, please have the following information available:
• Serial number of the unit
• Model number or product name
• Software type and version number
Zebra responds to calls by email, telephone, or fax within the time limits set forth in support agreements.
6

About this Guide
If your problem cannot be solved by Zebra Customer Support, you may need to return your equipment for
servicing and will be given specific directions. Zebra is not responsible for any damages incurred during
shipment if the approved shipping container is not used. Shipping the units improperly can possibly void
the warranty.
If you purchased your Zebra business product from a Zebra business partner, contact that business partner
for support.
Revision History
Change Date Description
MN-004512-01 Rev A May 2022 First version is for early access.
MN-004512-02 Rev A June 2022 Internal release.
MN-004512-03 Rev A September 2022 GA release. Added description of ZEMS
Customer Administrator Console.
MN-004512-04 Rev A December 2022 Updated new client versions and icons for
messages from external applications.
MN-004512-05 Rev A March 2023 Updated screenshots to reflect changes in PTT
Pro for Android.
MN-004512-06 Rev A October 2023 Added steps for sending urgent messages using
PTT Pro for Android and theZEMS Web Client.
MN-004512-07EN Rev A April 2024 Rebranded to Workcloud Communication.
MN-004512-08EN Rev A August 2024 Updated for the Expiry Days option in MOTD and
other broadcast messages.
7

Supported PTT Pro Clients
Supported PTT Pro Clients
The Zebra Enterprise Messaging Service (ZEMS)includes text messaging with the ability to send video,
audio, and images to one or more contacts and groups.Users with the manager role can send broadcast
messages to regions, child regions, and departments (sites).
The following PTT Pro clients support ZEMS messaging:
• PTT Pro for Android version 3.3.10196 or later
• PTT Pro for iOS version 1.0.11088 or later
• ZEMS Web Client version 2.1.22307 or later
NOTE: The PTT Pro PC Client does not support ZEMS.
NOTE: Workcloud Communication PTT Pro clients can use ZEMS messaging or legacy
messaging but not both at the same time.
NOTE: The PTT Pro client versions listed above are required for ZEMS version2.1.22309 or later.
Broadcast Messages
Broadcast messages enable managers to send one-way messages to specific groups of users. Managers
are Workcloud Communication PTT Pro users configured with the manager role in the ZEMSserver.
The organizational hierarchy and the managers are defined in ZEMS, and each ZEMS user must have a
Workcloud Communication PTT Pro user account.
Refer to the Zebra Enterprise Messaging Customer Administrator Guide for information about creating
regions and assigning managers.
Regions Example
In this example, an enterprisehas divided its operations into East and West regions. Each region has a
manager who runs the operation. The East and West regions are further divided into child regions and
sites.
8

Supported PTT Pro Clients
Figure 1Regions in a ZEMS Deployment
Site-1, highlighted in green, belongs to the West region, but it also belongs to the D1 child region. PTT Pro
users in Site-1 receive broadcast messages sent to either the West region or the D1 child region.
9

Using ZEMS with PTT Pro
for Android
Using ZEMS with PTT Pro for Android
PTT Pro for Android supports ZEMS messaging features such as sending and scheduling broadcast
messages, messaging to users and groups, and sending messages through webhooks.
10

Using ZEMS with PTT Pro for Android
About Screen for Zebra PTT Pro for Android
The About screen describes what messaging service the user is configured to use.
Figure 2User Configured for ZEMS Messaging Service
11

Using ZEMS with PTT Pro for Android
Messaging Contacts
Select one or more contacts to send a message. Your message can include a photo, video, or audio.
1. Select a contact:
• from the Contacts tab,
• from the Contacts in the navigation drawer,
• or by search for a contact.
2.
Tap Message .
3. Enter the message text.
12

Using ZEMS with PTT Pro for Android
4. (Optional) Select additional message recipients by tapping the additional name(s) desired.
13

Using ZEMS with PTT Pro for Android
5.
(Optional) Add a photo, image, video, audio, speech-to-text, or priority to the message by selecting .
• Select Take Photo to take a picture using the device camera.
• Select Upload an Image and select an image from the device.
•
Tap to rotate right or to rotate left.
•
Tap to remove changes made to the image.
•
Tap to remove the image.
• Select Record Video to record video using the device camera.
• Select Record Audio to record audio using the device microphone.
14

Using ZEMS with PTT Pro for Android
• Select Speech to Text to record a message. This option requires that the Voice Command setting is
enabled.
• Select Set Priority to change the priority of the message to Important or Urgent.
6. Tap Send.
Searching for a Contact
You can search the device and the PTT Pro server to locate a contact.
1.
Tap the magnifying glass icon ( )to search for a contact on the device.
15

Using ZEMS with PTT Pro for Android
2. Begin entering a contact name.
As each letter is entered, the relevant matches are displayed in the contact list.
3. Keep entering letters until you find a match.
The contact search string is a sticky search, meaning the letters entered remain in the search field until
cleared. Entering a string without a match will cause no contacts to be displayed.
4. If the search does not find a contact, you can search the server.
Tap the magnifying glass with an arrow ( ).
5.
Tap to cancel the search and return to the list of contacts.
16

Using ZEMS with PTT Pro for Android
Messaging to Groups
Send a text message with an optional attachment to a group.
1. Tap the Groups tab.
2.
Select the desired group, and then tap the Message icon.
17

Using ZEMS with PTT Pro for Android
3.
(Optional) Add video, audio, image, photo, or speech-to-text to the message by selecting .
• Select Take Photo to take a picture using the device camera.
• Select Upload an Image and select an image from the device.
•
Tap to rotate right or to rotate left.
•
Tap to remove changes made to the image.
•
Tap to remove the image.
• Select Record Video to record video using the device camera.
• Select Record Audio to record audio using the device microphone.
• Select Speech to Text to record a message. This option requires that the Voice Command setting is
enabled.
• Select Set Priority to change the priority of the message to Important or Urgent.
4. Tap Send.
Sending a Message to a Webhook
Webhooks are an optional feature of ZEMS that enables communication between Workcloud
Communication PTT Pro clients and an external application. Refer to the Zebra Enterprise Messaging
Service Customer Administrator Guide for information about creating webhooks.
1. Select a contact or group.
A contact or group must be selected to send a message through a webhook.
18

Using ZEMS with PTT Pro for Android
2. Enter a @ in the message field to display the list of available webhooks.
3. Select a webhook and enter a message.
The message is sent to the contact or group and the webhook.
Sending a Prioritized Message
You can send an important or urgent message to contacts or a group. If you are a manager, you can send
an important or urgent broadcast message.
1. Select one or more contacts or a group.
2. Enter the message text.
19

Using ZEMS with PTT Pro for Android
3.
Tap the ellipsis next to the message field.
4. Select Set Priority to display the priority options.
5. Select the appropriate priority for the message.
Standard is the default priority for messages. Important and Urgent increase the priority of the
message.
6. Tap Send.
A manager can follow a similar process to send a broadcast message from the Compose screen from
the broadcast message interface.
20

Using ZEMS with PTT Pro for Android
Priority Message Descriptions
Youcan add a priority to messages sent through PTT Pro for Android. Priority can be assigned to
messages to contacts and messages to groups. If you are a manager, you assign a priority to broadcast
messages.Sending priority messages requires PTT Pro for Android version 3.3.1023 or later.
Messages marked as Important or Urgent include a banner in the message view and an icon in the Recent
and message views.The icons and banners are displayed on the lock screen, in the Recent view, and in
the message. After the messages are read, the banners and iconsno longer display in the Recent view.
The notification for an urgent message repeats every two minutes for a period of 10 minutes. These
intervals can be configured using JSON parameters.
Priority Description
A normal message.
A message marked as important.
A message marked as urgent. When a user receives an urgent message, an alert
sound occurs every two minutes until the message is marked read. The urgent
message alert is repeated for a specified interval. The default interval for PTT
Pro for Android is 10 minutes. The default interval for the ZEMS Web Client is 20
minutes.
Table 1ZEMS Message Priorities
21

Using ZEMS with PTT Pro for Android
Examples
Figure 3Urgent Message on the Lock Screen
22

Using ZEMS with PTT Pro for Android
Figure 4Recent View Displays Priority Icons
23

Using ZEMS with PTT Pro for Android
Figure 5Messages with a Priority Banner and Icon
Urgent Message Parameters
Use configuration parameters to control how often the notification for an urgent message displays and the
duration over which thenotifications continue to display. The notifications for an urgent message stop after
the user reads the message.
Requires PTT Pro 3.3.10233 or later.
24

Using ZEMS with PTT Pro for Android
Parameter Description Type Default
value
Configurable
Value
zems_urgent_msg_notify_interval Determines how
often, in minutes,
the urgent message
notification occurs.
int 2 minutes An integer
between 2
and 60.
zems_urgent_msg_notify_iteration Determines the
number of minutes
the urgent message
notification is active.
int 10 minutes Any integer.
Table 2Urgent Message Parameters
Responding to Messages
Messages are organized into conversations, with the most recent conversations at the top of the screen.
To read messages, tap theconversation.
1. Tap a message to select.
25

Using ZEMS with PTT Pro for Android
2.
You can reply( ), forward ( ), or delete the message( ).
3. Replying to a message behaves differently for one-to-one and one-to-many messages.
•
Ina one-to-one message, you select a message, tap ,and enter a reply.
• In a one-to-many message,select a message and use the icons in the top panel to reply, forward, or
delete the message.
26

Using ZEMS with PTT Pro for Android
Recent View
The Recent view displays incoming and outgoing calls and messages. You manage messages and calls
through the Recent view.
Recent View Elements
The Recent view organizes messages by conversation. All messages from a contact or group are listed
under the conversation.
Figure 6Recent View for PTT Pro for Android
27

Using ZEMS with PTT Pro for Android
1 Icon indicates a broadcast message. You cannot reply to a broadcast message.
2 Icon indicates a message from an external source.
3 Icon indicates a Workcloud Communication PTT Pro user conversation or group conversation.
4 Filter that enables you to list all messages and calls (the default), list recent calls and messages,
list broadcast messages, or list messages from external applications.
5 Search messages by sender or recipient.
6 Paperclip icon indicates a message with an attachment.
Message View Elements
When you select a contact or group from the Recent view, all of the messages and calls to and from that
user or group display.
1 Incoming messages are left-aligned.A blue bar on the left edge indicates a read message, and a
red bar indicates an unread message.
2 Tap the information icon to see the recipients of an outgoing message or the sender of an
incoming message.
28

Using ZEMS with PTT Pro for Android
3 For conversations, the ellipsis provides Remove All and Mark All As Seen for messages in the
conversation. For individual messages, the ellipsis provides Reply, Forward, Delete Message, and
Copy..
4 Outgoing messages are right-aligned.
5 Message icon. Tap to reply to the message.
Supported Message Attachments
Zebra PTT for Android supports sending and receiving audio, video, and data files attached to ZEMS
messages.
PTT Pro for Androidcan send, receive, and display or play the following mediatypes:
• audio/ogg and audio/mpeg for audio
• video/mp4 for video
• image/png, image/jpeg, and image/jpg for images
In addition, PTT Pro for Android can download and view the following file types:
• application/pdf for Adobe Acrobat files
• text/vcard forvirtual contact files
PTT for Android does not support the viewing of file types such as .doc (Microsoft Word) or .ppt
(Microsoft PowerPoint). For the file types listed below, a viewer application is required to view the file
content:
• application/msword for Microsoft Word
• application/vndopenxmlformats-officedocument.presentationml.presentation for
Microsoft PowerPoint
• text/csv for comma-separated value files
• application/vnd.ms-excel for Microsoft Excel
29

Using ZEMS with PTT Pro for Android
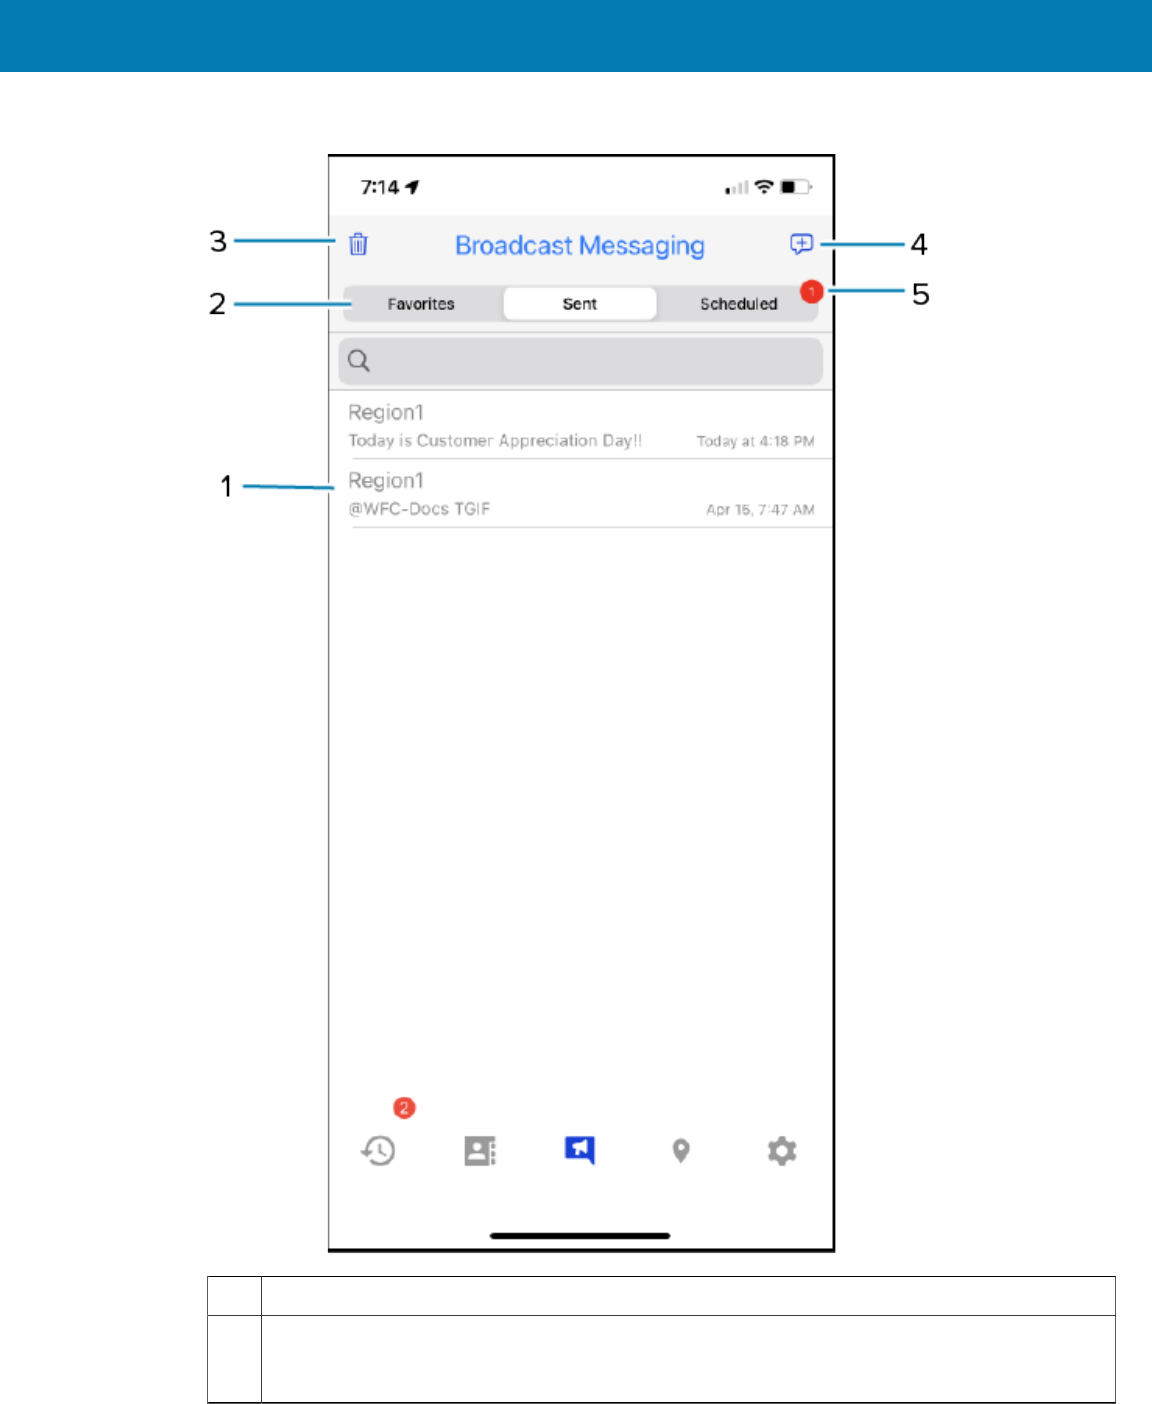
Accessing Broadcast Messaging
Users with permission to send broadcast messages can open the ZEMS screens in the PTT Pro for Android
app to create and schedule broadcast messages.
1.
Tap the ellipses in the tab barto reveal the Broadcast Messaging icon.
30

Using ZEMS with PTT Pro for Android
2. Tap Broadcast Messaging to open the SENT messages screen.
Broadcast messages sent as important or urgent include the priority icon in the SENT screen.
31

Using ZEMS with PTT Pro for Android
Composing a Broadcast Message
Sending a broadcast message requires selecting the recipients and composing the message.Your
message can include photos, images, video, and audio. You can also choose to schedule the message to
be delivered at a specific time.
1. Tap Compose to select the message recipients.
Select the regions, districts, and sites for the message. Select All to send the message to all users or
expand the districts or sites to target a specific group of recipients. Selected recipients are displayed at
the top of the screen.
32

Using ZEMS with PTT Pro for Android
2. Tap Compose to enter a message.
To send the broadcast message to a webhook, type @ in the message window to display the list of
available webhooks.
33

Using ZEMS with PTT Pro for Android
3.
(Optional) Tap the ellipsis to Take Photo, Upload an Image, Record Video, Record Audio, or Set
Priority.
34

Using ZEMS with PTT Pro for Android
35

Using ZEMS with PTT Pro for Android
4. Tap Send.
A dialog box message displays the number of users who willreceive the message and asks for
confirmation before sending it.
5. Tap Proceed to send the broadcast message.
Scheduling a Broadcast Message
You can schedule a broadcast message to be sent at a specified date and time. Scheduled messages are
listed under the Scheduled tab on the BroadcastMessaging screen.
1. Open Broadcast Message and select recipients for the broadcast message.
2. Tap Compose to enter a message.
36

Using ZEMS with PTT Pro for Android
3.
(Optional) Tap the ellipsis to Take Photo, Upload an Image, Record Video, Record Audio, or Set
Priority.
4.
Tap to hide the keyboard.
37

Using ZEMS with PTT Pro for Android
5. Swipe the Schedule slider to enable the scheduling option.
The Send button changes to Schedule.
6. Specify the time and date of the broadcast message.
38

Using ZEMS with PTT Pro for Android
7. Tap Schedule and then PROCEED to schedule the message.
The message is listed in the Scheduled list.
8. Tap the scheduled message to cancel or update the message.
The scheduled broadcast message is listed under the Scheduled tab.
39

Using ZEMS with PTT Pro for Android
40

Using ZEMS with PTT Pro
for iOS
Using ZEMS with PTT Pro for iOS
PTT Pro for iOS supports ZEMS messaging features such as sending and scheduling broadcast messages,
messaging to users and groups, and sending messages through webhooks.
41

Using ZEMS with PTT Pro for iOS
About Screen for PTT Pro for iOS
The About screendescribes what messaging servicethe user is configured to use.
Sending a Message to One or More Contacts
You can send amessage to one or more contacts. Messages can include photos or images.
1. Tap Contacts.
2. Locate and select the recipients.
3. Tap Message.
4. Enter the message.
42

Using ZEMS with PTT Pro for iOS
5. (Optional) Add an attachment to your message.
• Tap Camera to take a photo.
• Tap Image to choose an image.
• Tap Microphone to record audio.
• Tap Video to record a video.
1 Tap a multimedia icon to take a photo, upload an image, record audio, or record a video and
attach it to the message.
2 Selected message recipients.
3 Count of selected recipients.
4 Tap to send the message.
5 Tap to cancel the message.
6. Tap Send.
43

Using ZEMS with PTT Pro for iOS
Sending a Message to a Group
You can send a message to a group.
1. Tap Contacts and select the Groups tab.
2. Select a group.
You can send a message to a single group.
3. Enter the message.
4. (Optional) Add an attachment to your message.
• Tap Camera to take a photo.
• Tap Image to choose an image.
• Tap Microphone to record audio.
• Tap Video to record a video.
5. Tap Send.
Sending a Message to a Webhook
Webhooks are an optional feature of ZEMS that enables communication between Workcloud
Communication PTT Pro clients and an external application. Refer to the Zebra Enterprise Messaging
Service Customer Administrator Guide for information about creating webhooks.
1. Select a contact or group.
A contact or group must be selected to send a message through a webhook.
44

Using ZEMS with PTT Pro for iOS
2. Enter a @ in the message field to display the list of available webhooks.
45

Using ZEMS with PTT Pro for iOS
3. Select a webhook and enter a message.
The message is sent to the contact or group and to the webhook.
Responding to Messages
Missed messages are listed under the Missed tab of the Recent screen. You can also respond to
messages under the All tab by locating the sender.
1. Tap Recent and select Missed.
Messages that you have not read are listed under Missed.
2. Select the message. PTT Pro for iOS displays all of the previous messages and calls with that contact or
group.
• Tap Message to respond to the sender.
• Tap the arrow under the message to forward the message and any attachment to another contact or
group.
• Tap the paperclip to view an attachment.
3. Enter a response.
46

Using ZEMS with PTT Pro for iOS
4. (Optional) Add an attachment to your message.
• Tap the Camera to take a photo.
• Tap Image to choose an image.
• Tap the Microphone to record audio.
• Tap Video to record a video.
5. Tap Send.
Recent View
The Recent view displays incoming and outgoing calls and messages. You manage messages and calls
through the Recent view.
The Recent view organizes messages by sender. All of the messages from a contact or group are listed
under the contact or group name.
1 Broadcast Message icon. Only appears for users with permission to send broadcast messages.
2 Missed incoming PTT call.
3 Outgoing PTT call.
4 Incoming broadcast message.
47

Using ZEMS with PTT Pro for iOS
5 Outgoing broadcast message.
6 Incoming message.
7 Outgoing group message.
48

Using ZEMS with PTT Pro for iOS
Accessing Broadcast Messaging
Users with permission to send broadcast messages can open the ZEMS screens in the PTT Pro for iOS app
to create and schedule broadcast messages.
1. Tap the Broadcast Message icon in the tab bar to access the broadcast messaging screens.
The app opens to the Sent screen for Broadcast Messaging.
49

Using ZEMS with PTT Pro for iOS
50
Using ZEMS with PTT Pro for iOS
2. Use the controls to enter, send, or schedule a broadcast message.
1 Sent broadcast messages.
2 Favorites, Sent, and Scheduled tabs. Use Scheduled to send a broadcast message at a
specified time. Use Favorites to save regions or sites to which you often send broadcast
messages.
51

Using ZEMS with PTT Pro for iOS
3 Delete sent broadcast messages.
4 Compose a broadcast message. Tap to select recipients and enter a broadcast message.
5 The number of scheduled broadcast messages.
Composing a Broadcast Message
Sending a broadcast message requires selecting the recipients and composing the message.Your
message can include photos, images, video, and audio. You can also choose to schedule the message to
be delivered at a specific time.
1. Tap Compose to select the message recipients.
All districts are automatically selected when you choose the regions.Tap a region or district to view
sites or departments.
52

Using ZEMS with PTT Pro for iOS
2. Use the slidersto select a specific site for the broadcast message. Optionally, enter a webhook
address.
To send the broadcast message to a webhook, type @ in the message field to display the list of
available webhooks.
3. Enter the broadcast message in the message field.
4. (Optional)Tap the camera, photo, audio, or video icon to add media to the broadcast message.
53

Using ZEMS with PTT Pro for iOS
5. Tap Send.
A pop-up message displays the number of users who willreceive the message and asks for
confirmation before sending it.
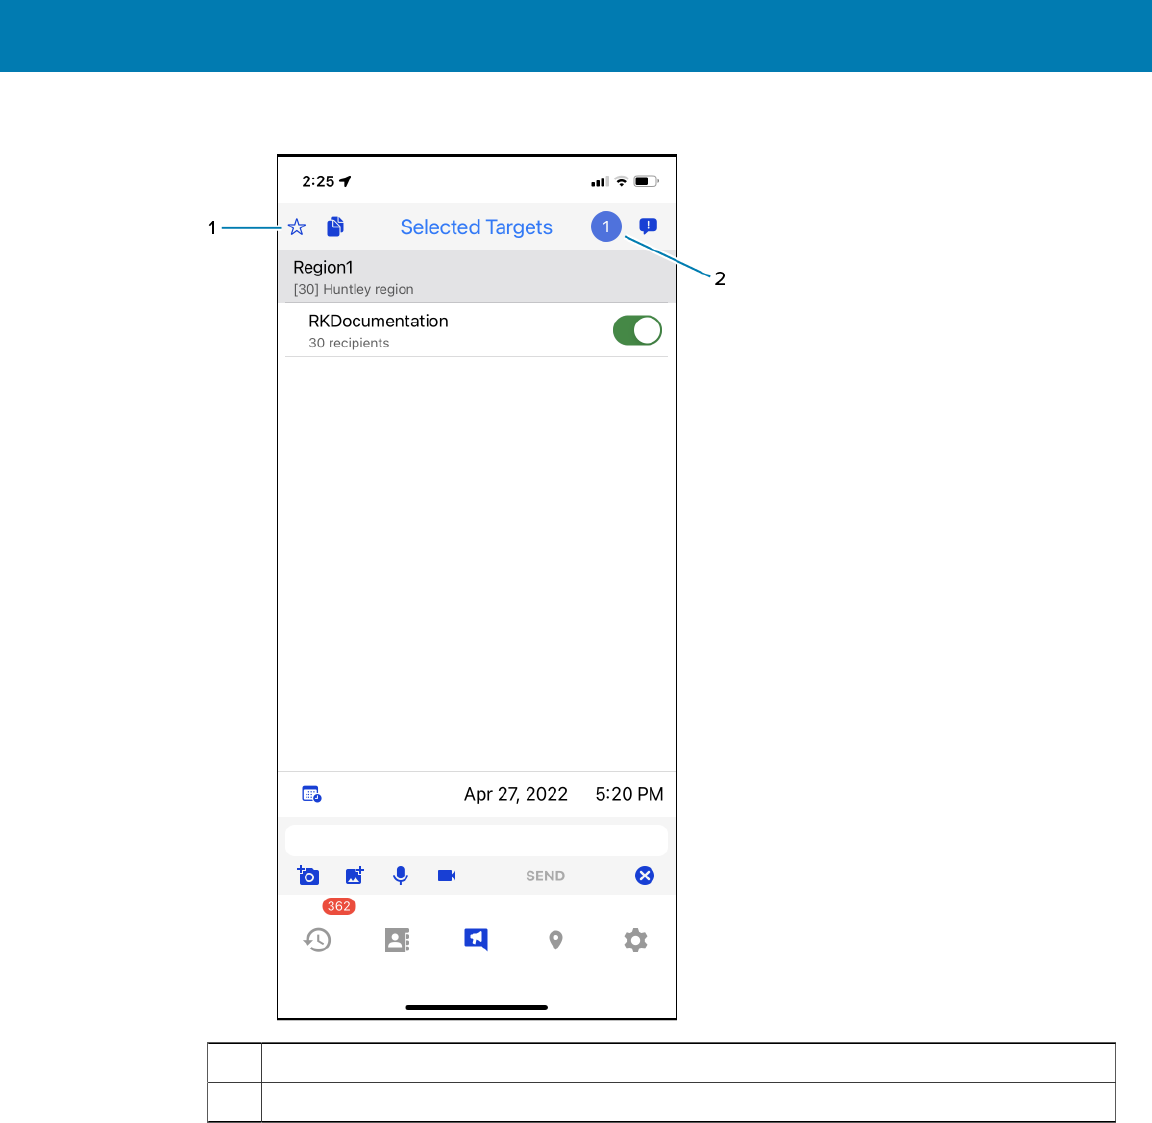
Creating a Favorite
You can create favorites for the regions and sites that you frequently message. The option to create a
favorite is available when you select the recipients for a broadcast message. If you compose a broadcast
message to multiple regions or sites, you can save the collection of regions and sites as a favorite.
1. Tap Compose and select one or more broadcast message recipients.
54
Using ZEMS with PTT Pro for iOS
2. Tap the icon with the number of recipients and the favorites icon displays.
1 Tap the Favorites icon to create a favorite of the selected recipients.
2 Tap the number of recipients to display the Favorites icon.
55

Using ZEMS with PTT Pro for iOS
3. Tap the Favorites icon and the Favorites name pop-up appears.
56

Using ZEMS with PTT Pro for iOS
4. Enter a name and an optional description and tap Create.
After you create the favorite, the Favorites icon is a solid color and the name of the favorite is displayed
at the top of the screen. The favorite is also listedunder the Favorites tab on the Broadcast Messaging
screen.
5. Enter a message and click SEND.
Removing a Favorite
You can remove broadcast message favorites.
1. Tap Broadcast Message.
2. Tap the Favorites tab.
57

Using ZEMS with PTT Pro for iOS
3. Select the favorite you want to remove and swipe left to display the Delete button.
4. Tap Delete to remove the favorite.
Deleting a Sent Broadcast Message
You can delete sent broadcast messages.
1. Tap Broadcast Messages.
2. Tap the Sent tab.
58

Using ZEMS with PTT Pro for iOS
3. Select the message you want to delete and swipe leftto display the Delete button.
4. Tap Delete to remove the message.
59

Using ZEMS with PTT Pro for iOS
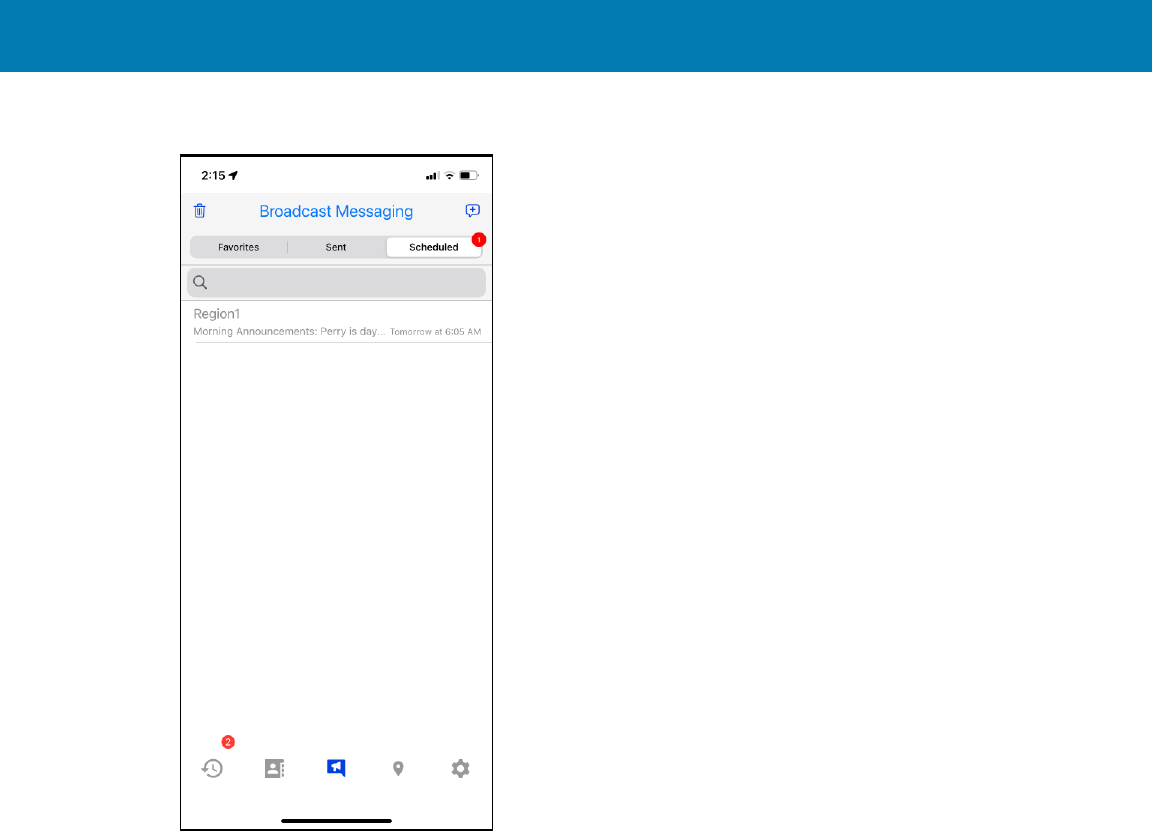
Scheduling a Broadcast Message
You can schedule a broadcast message to be sent at a specified date and time. Scheduled messages are
listed under the Scheduled tab on the Broadcast Messaging screen.
1. Tap Compose to select the message recipients.
Select the regions, child regions, and sites for the message.
1 Calendar icon. Tap to enable the date and time controls to schedule the broadcast message.
The SEND button changes to SCHEDULE.
2 Tap to return to the Broadcast Messaging screen.
3 Tap the Compose icon to create a broadcast message. The number indicates the number of
message recipients such as regions, sites, and groups.
4 Selected recipients for the broadcast message.
5 Select the time when the broadcast message should be sent.
6 Select the day when the broadcast message should be sent.
2. Enter the broadcast message in the message field.
To send the broadcast message to a webhook, type @ in the message window to display the list of
available webhooks.
60

Using ZEMS with PTT Pro for iOS
3. Tap the calendar icon to schedule the message.
A broadcast message cannot be sent within 10 minutes after it is created.
4. (Optional) Tap the camera, image, audio, or video to add media to the broadcast message.
5. Tap SCHEDULE.
61
Using ZEMS with PTT Pro for iOS
The message is listed in the Scheduled list.
62

Using ZEMS with PTT Pro for iOS
6. Tap the scheduled message to return to the Compose screen to update the list of recipients or the
message.
63

Using ZEMS Messaging with
the ZEMS Web Client
Using ZEMS Messaging with the ZEMS Web Client
The ZEMS Web Client provides a browser-based interface to ZEMS. Users can access the ZEMS Web
Client from a browser on a desktop PC, laptop, or mobile device.
The ZEMS Web Client supports the following features:
• One-to-one messages
• Group messages
• Broadcast messages for managers
• Message history
• Contacts
• Users can send and receive ZEMS messages with the ZEMS Web Client while also logged into a mobile
device with ZEMS messaging.
NOTE: The ZEMS Web Client requires OAuth. To use the ZEMS Web Client, the PTT Prouser
account must be configured to use OAuth. The user can also log in to their PTT Pro for Android
and PTT Pro for iOS clients using their OAuth credentials.
NOTE: The ZEMS Web Client does not report the presence status of a contact. You can send a
message to a contact with an offline presence status, and ZEMS will deliver the message when
the contact is online.
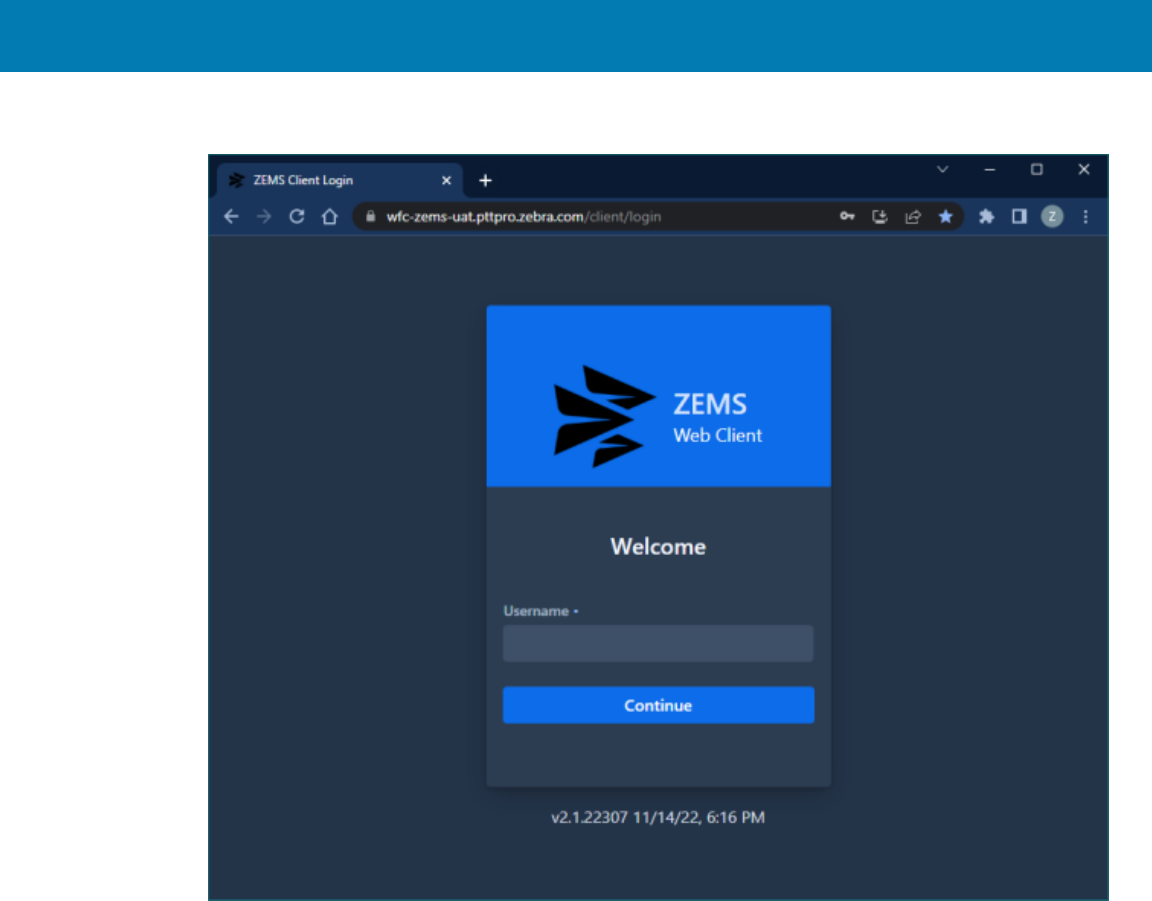
Accessing the ZEMS Web Client
Accessing the ZEMS Web Client through a web browser is a two-step process. You must first enter your
Oauth2 user name and then authorize your Oauth2 user name and password.
Ask your administrator for the URL to ZEMS Web Client
64
Using ZEMS Messaging with the ZEMS Web Client
1. Open the ZEMS Web Client in your web browser.
65

Using ZEMS Messaging with the ZEMS Web Client
2. Enter your Oauth2 user name in the Username field and click Continue.
The OAuth2 login page is displayed.
3. Enter your OAuth2 user name and your OAuth2 password.
The OAuth2 domain must be appended to your user name. In the following example, pttpro is the
OAuth2 domain: Jerry.Bloom@pttpro.
4. Click Sign in to openthe ZEMS Web Client
ZEMS Web Client User Interface
The ZEMS Web Client supports one-to-one, one-to-many, one-to-group, and broadcast messaging. You
can access your message history, contacts, and, if you are a manager, broadcast messaging.The History
view is the default view when you access the web client.
The ZEMS Web Client view includes the following options:
History
Displays the message and call history. The ZEMS Web Client shows your call history but does not
provide the ability to make PTT calls.
66

Using ZEMS Messaging with the ZEMS Web Client
Contacts
Displays contacts and groups. You can select a contact or group from the list and send a message.
The list of contacts and groups is from the PTT Pro Server and is identical to the list of contacts and
groups visible in the Workcloud Communication PTT Pro apps.
Broadcast
Displays sent or scheduled broadcast messages or to compose a new broadcast message. This is
visible only to users defined as managers in ZEMS.
History View
The History view displays when you log in to the ZEMS Web Client. By default, the view lists all
conversationsand messages.Use this view to open conversations, read and respond to messages, and
delete messages and conversations.
Figure 7History View in the ZEMS Web Client
Click to collapse the left navigation pane.
Click to refresh message data from the PTT Pro Server.
Click to delete all of the conversations in the History view or select a conversation
to delete individual messages.
Click to mark all conversations as read. Open a conversation to mark individual
messages as read.
PTT message.
Table 3History View Interface Icons
67

Using ZEMS Messaging with the ZEMS Web Client
Message from an external source.
Broadcast message. The paperclip icon indicates an attachment.
Table 3History View Interface Icons(Continued)
Conversation View
When you select a conversation, the messages in the conversation display. The most recent message is
at the top. You can respond to individual messages, respond to the conversation, forward messages, and
delete messages.
Figure 8Messages in a Conversation
1 Click to return to the History view.
2 Users or groups in the conversation.
3 Click to forward the message to another user or group.
4 Click to delete the message.
5 Search the conversation for a user name or group name.
6 Click to list the recipients of the conversation.
68

Using ZEMS Messaging with the ZEMS Web Client
7 Icons indicate the total number of recipients, the number of recipients who have received the
message, and the number of recipients who have read the message.
8 Enter text to respond to all recipients in the conversation.
9 Click to attach media or a file to the message.
Messaging Contacts and Groups
You can message your PTT Pro contacts and groups using the ZEMS Web Client.Create a new message
from the Contacts view or reply to a message from the History view.
The ZEMS Web Client does not display the presence of contacts and groups. When a contact is offline,
ZEMS delivers the message when the contact is back online.
1. Click on Contacts.
2. Click on the Users or Groups tab.
You can message one or more contacts or one or more groups, but you cannot send a message to both
contacts and groups.
3. Choose one or more contacts or select one or more groups.
You can choose contacts and groups by clicking the select box or clicking on the row. Use the refresh
to clear all of your selections.
4. Enter a message in the text field at the bottom.
69

Using ZEMS Messaging with the ZEMS Web Client
5.
(Optional) Click the ellipsis to set the priority or add a file.
The ZEMS Web Client supports the following media formats:
• Image: jpeg, png, gif
• Audio: mp3, ogg, wav, webm
• Video: mp4, mkv, mov, webm
6. Click Send.
Sending a Prioritized Message
You can use the ZEMS Web Client to send important or urgent messages to contacts and groups. If you are
a manager, you can send an important or urgent broadcast message to regions and sites.
1. Click Contacts.
2. Select Users or Groups to choose the recipient.
Use the History view to reply to a message.
3.
Click the ellipsis to display the Set Priority and Upload Attachment options.
If you do not choose a priority, the message issent as a standard message.
4. Click Set Priority and choose a priority.
5. Enter the message and click Send.
70

Using ZEMS Messaging with the ZEMS Web Client
Priority Messages in the Web Client
Important and urgent messages are displayed with an icon to indicate their importance. Conversations
that contain a prioritized message display the appropriate icon. After the message is read, the icons are
removed from the Conversation view.
Priority Description
A normal message.
A message marked as important.
A message marked as urgent. When a user receives an urgent message, an alert
sound occurs every two minutes until the message is marked read. The urgent
message alert is repeated for a specified interval. The default interval for PTT
Pro for Android is 10 minutes. The default interval for the ZEMS Web Client is 20
minutes.
Table 4ZEMS Message Priorities
Urgent and important messages display icons when you view the messages in a conversation. The History
view displays icons for each conversation that contains an important or urgent message. After the user
reads the important or urgent message, the icons are removed from the History view.
Figure 9Messages with Important and Urgent Messages
71

Using ZEMS Messaging with the ZEMS Web Client
Sending a Message to a Webhook
Webhooks are an optional feature of ZEMS that enables communication between Workcloud
Communication PTT Pro clients and an external application. Refer to the Zebra Enterprise Messaging
Service Customer Administrator Guide for information about creating webhooks.
You must first select a contact or a group tosend a message through a webhook using the ZEMS Web
Client.
1. Select Contacts.
2. Select one or more contacts or groups.
3. Enter an @ in the message field to display the list of available webhooks.
4. Select a webhook.
5. Enter your message after the webhook name.
6. (Optional) Click the attachment icon to include an attachment with your message.
NOTE: An application connected through a webhook might not be able to receive an
attachment.
7. Click Send.
72

Using ZEMS Messaging with the ZEMS Web Client
Composing a Broadcast Message
You send a broadcast message by selecting recipients and composing the message. A broadcast message
can include attachments and priority. You can also schedule the message to be sent at a specific time.
1. Click Broadcast.
The ZEMS Web Client opens a view that includes your history of sent broadcast messages and the
Scheduled tab.
2. Click Compose to select the recipients of the broadcast message.
NOTE:
Important:
• You can also create a broadcast message from the Sent tab if the message is intended for
the same recipients.
73

Using ZEMS Messaging with the ZEMS Web Client
• Now you can select Expiry Days for MOTD (Message Of The Day) voice broadcast
messages and all other messages with a lapse time between 1 to 30 days, with 1 being the
default.
3. Select the broadcast message recipients using one of the following methods:
• Click Expand All to reveal all of the regions, child regions, and sites.
• Click the expansion arrows toreveal each level of the hierarchy.
• Use Search to find a specific recipient. Enter a search string and click Expand All to display
matching regions, child regions, and sites.
4. (Optional) Enter an @ to display the list of webhooks and add a webhook recipient.
5.
(Optional) Click the ellipsis to set the priority or include an attachment with your broadcast message.
6. Enter a message.
7. Click Send.
Scheduling a Broadcast Message
You can schedule a broadcast message to be sent at a specific date and time, but you should schedule it
within the year. Scheduled messages are listed under the Scheduled tab.
1. You schedule messages from the Compose screen.
74

Using ZEMS Messaging with the ZEMS Web Client
2. Select Schedule tochoose a date and time for the broadcast message.
3. Click Send to schedule the message.
The ZEMS Web Client displays a message asking you to confirm the scheduled message.
75

Using ZEMS Messaging with the ZEMS Web Client
4. Click Yes to confirm the schedule.
The ZEMS Web Client opens the Scheduled viewthat lists the scheduled message and its delivery time.
5. (Optional) You can select the scheduled message and click Compose to edit the message or change
the delivery date and time.
76

www.zebra.com
