
Lasernet
Connector for
Microsoft
Dynamics 365 for
Operations
Test Manual


Page 3
Index
Index ................................................................................................................................................... 3
Introduction ....................................................................................................................................... 4
Purpose ............................................................................................................................... 4
Overview ............................................................................................................................. 4
Appsource Test guide ........................................................................................................................ 5
Lasernet Print buttons....................................................................................................... 5
Manually Lasernet Screen or Email ................................................................................. 5
Reprint from the Lasernet archive ................................................................................... 6
How to use the Lasernet print options ............................................................................................. 7
Lasernet Screen ................................................................................................................. 7
Lasernet .............................................................................................................................. 8
Destination Type - Print ......................................................................................... 8
Destination Type - Email ..................................................................................... 10
Destination Type - Fax .......................................................................................... 11
Destination Type – Custom ................................................................................. 14
Predefined Destinations ....................................................................................... 15
Lasernet Journal .............................................................................................................................. 17
Lasernet button ................................................................................................................ 18
Lasernet Archive .............................................................................................................. 18
Resend or view report..................................................................................................... 20
View the report .................................................................................................... 20
Resend the report via printer ............................................................................... 22
Resend the report via e-mail ................................................................................ 23
Resend the report via fax ..................................................................................... 24
Resend the report to Predefined Destinations .................................................... 25
Resend the report to screen ................................................................................. 26

Page 4
Introduction
Purpose
The purpose of the guide is to instruct how to use the Lasernet Connector for Microsoft Dynamics
365 for Operations. Lasernet Connector for Microsoft Dynamics 365 for Operations is an
integrated solution that enables the Lasernet functionality within Microsoft Dynamics 365 for
Operations.
The purpose of this guide is to provide instructions for using the Lasernet Connector for Microsoft
Dynamics 365 for Operations.
Overview
With the help of the Lasernet Connector for Microsoft Dynamics 365 for Operations, the user can
redirect Microsoft Dynamics AX reports output to an xml format that is compatible with Lasernet.
The layout and the destination (printer/e-mail/fax/archive) of the documents are then handled by
Lasernet. The user can enable or disable this feature for any report that has printable layout.
The XML file generated during the report execution is placed into a folder specified during the
setup process within Axapta. After that, the XML file is picked up by Lasernet converted into the
right format CSV, OIOUBL XML, EDI, PDF etc. and archived. If “Print to Lasernet screen” is selected,
then the PDF is placed into another folder where Microsoft Dynamics AX picks it up and shows it
to the user.
This Configuration Manual will go through how you use the Lasernet Connector for Microsoft
Dynamics 365 for Operations. We will use the SalesConfirm (Order Confirmation) report as an
example on how you use Lasernet Connector for Microsoft Dynamics 365 for Operations in the
daily life.

Page 5
Appsource Test guide
1. Go to Accounts receivable > Orders > All sales orders.
2. In the list, mark the selected row.
3. On the Action Pane, click Sell.
4. Click Pro forma confirmation.
5. Select Yes in the Print confirmation field.
Now you have 3 options. You can choose between printing to screen or email manually, like you
normally will do with D365FO or use one of the 2 Lasernet Print Buttons, Lasernet Screen or Show
EDI.
Lasernet Print buttons
Print buttons are created to make the print or distribution of the document much easier than
standard AX. With print buttons, you can create a button that does a range of actions for you just like
macros in word or excel.
Improve the users’ way of handling the various output possibilities within Axapta, as the Print
buttons supports both Standard AX and Standard AX with Lasernet Connector.
Print buttons generates buttons at user or group level. The buttons will fulfill exactly the needs a
company has for optimizing workflows. It is possible to decide the content for each button and who is
allowed to use the buttons predefined. The buttons can be used for Emails, print, fax or filers in PDF,
Tiff, CSV or MS file-standards.
Using predefined buttons minimizes the risk for error in the process generating output. A predefined
button can prevent paychecks from being printed on wrong printers or sent on wrong email
addresses. Predefined buttons also prevents invoices being sent to wrong recipients.
6. Simply click on Lasernet Screen and Lasernet will close the form and show a PDF on the
screen with just one click.
7. Simply click on Show EDI and Lasernet will close the form and show an EDI file on the
screen with just one click. If you have trouble in viewing the file, please try to save it to
your local machine and then open it with Notepad.
Manually Lasernet Screen or Email
8. Click Printer setup.
9. Click Confirmation.
10. In the list, select Lasernet Screen.
11. Click OK.
12. Click OK.
13. Close the preview Tab.

Page 6
14. In the list, mark the selected row.
15. On the Action Pane, click Sell.
16. Click Pro forma confirmation.
17. Click Printer Setup.
18. Click Confirmation.
19. Click Lasernet.
20. In the list, find and select Email
21. In the To field, type a value.
22. In the Subject field, type a value.
23. In the Body field, type a value.
24. Click OK.
25. Click OK.
26. Close the page.
27. You should now receive an email.
Reprint from the Lasernet archive
28. Go to Lasernet > Common > Archive.
29. Click Preview.
30. Click Show.
31. Close the Preview Tab.
32. Click Resend.
33. In the Subject field, type a value.
34. In the Body field, type a value.
35. Click OK.
36. Close the page.
Page 7
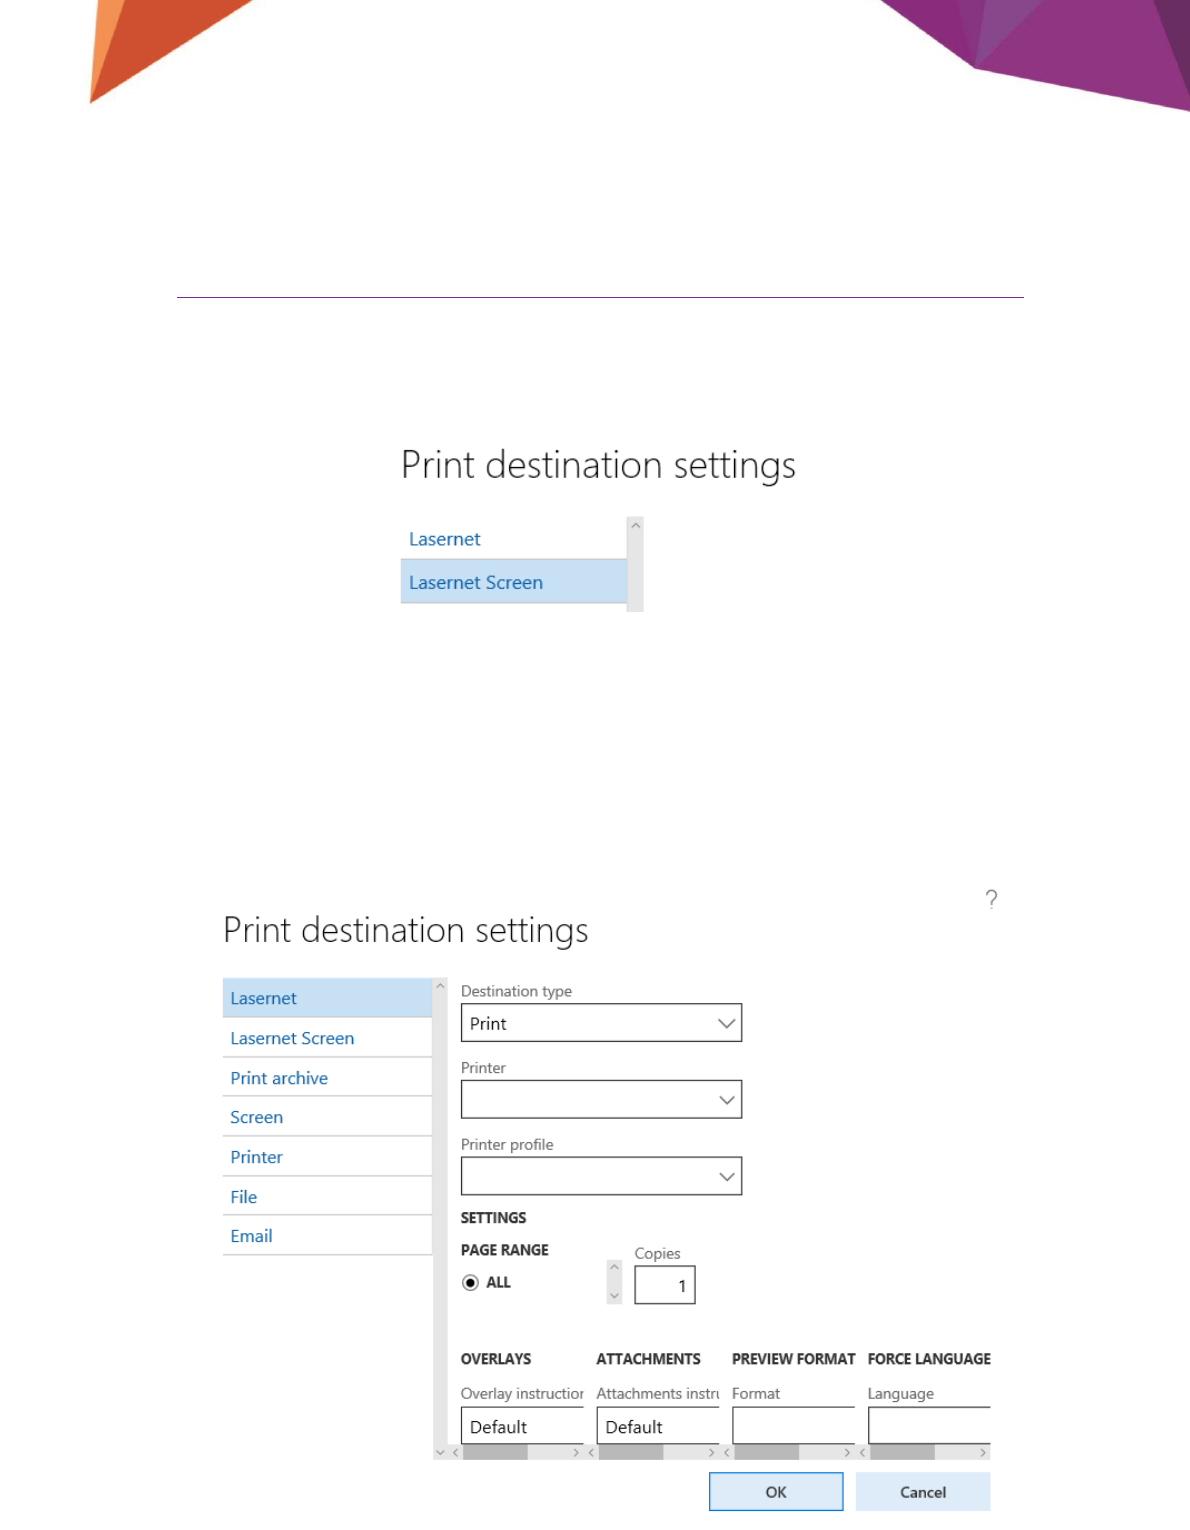
How to use the Lasernet print options
When you want to print, or post a Sales Confirmation, you have to choose the Print Option button.
In here you should now select either the Lasernet Screen or Lasernet depending on if you want
to print the report or show it on the screen within AX.
Within the Print Option you have 2 new menus:
Lasernet Screen
The Lasernet Screen function is similar to AX Screen. This menu will send an XML file with all the
data from the Sales Confirmation, to the Lasernet server. The Lasernet server will then create a
PDF and send it back to the users AX screen.

Page 8
Lasernet Screen does have the option to overwrite the Overlays, Attachments, Preview format
and Force language that you have defined on a report level.
Lasernet
The Lasernet menu is used for distributing the document manually. You have 5 options that you
can choose from, Print, Email, Fax, Custom and Use predefined destinations. This can be
selected from the drop down list in Destination type.
Below is an overview of the different types.
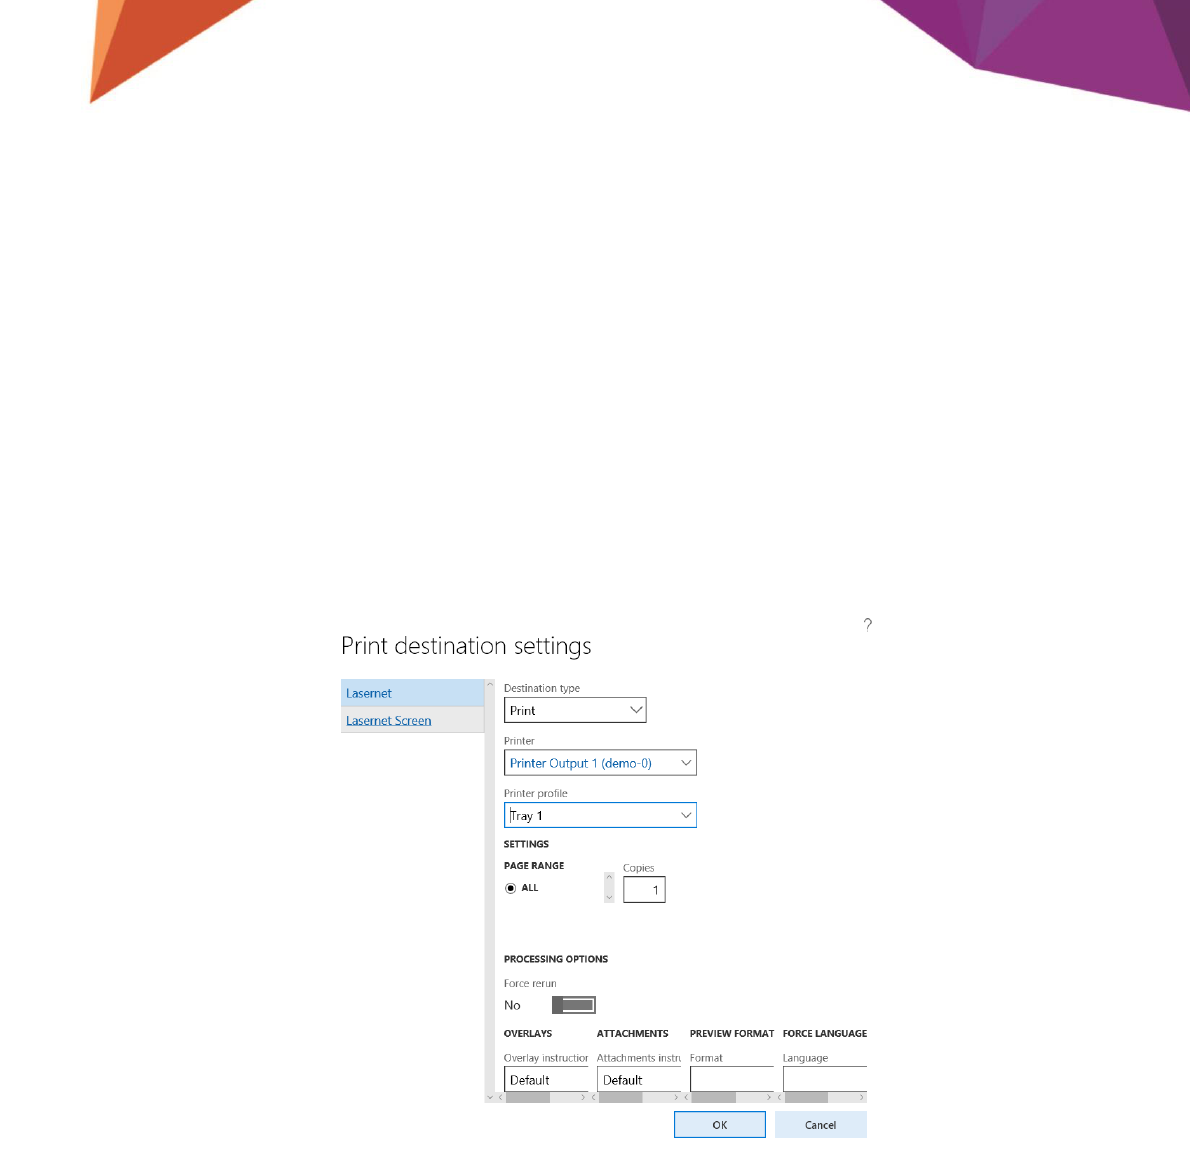
Destination Type - Print

Page 9
Field name
Description
Destination type
Print is selected.
Printer
Choose a printer from the drop down list. If you cannot find your
printer, please contact your AX administrator.
Printer profile
Select a Printer Profile. Ex. Tray 1.
Processing options
Description
Force rerun
A check mark will generate the XML file with all parameters and
send it to Lasernet. The corresponding information will be
displayed within Journals. Force rerun can always be used if
necessary.
Overlays
Description
Overlay instruction
Default (Report setting are in control), Disable, Append or
Overwrite.
Overlay Id
Choose the wanted overlay from the list.
Attachments
Description
Attachments instruction
Default (Report setting are in control), Disable, Append or
Overwrite.
Restriction
External or Internal document
Type
What type of attachment you want to Append or Overwrite
Preview format
Description
Format
What format you want to print (Doesn’t makes sense to choose on
a Print destination)

Page 10
Force language
Description
Language
Language that is printed no matter what LanguageId that is
defined in AX.
Page range
This does not work with Lasernet.
Copies
Number of copies that will be printed.
Destination Type - Email
This will email the document and not look for any other destination rules.
Field name
Description
Destination type
Email is selected.

Page 11
To
Who should receive the email
CC
Who should receive a copy of the email
BCC
Who should receive a blind copy
Subject
Type in a mail subject
Body
Type the email content
Processing options
Description
Force rerun
A check mark will generate the XML file with all parameters and
send it to Lasernet. The corresponding information will be
displayed within Journals. Force rerun can always be used if
necessary.
Overlays
Description
Overlay instruction
Default (Report setting are in control), Disable, Append or
Overwrite.
Overlay Id
Choose the wanted overlay from the list.
Attachments
Description
Attachments instruction
Default (Report setting are in control), Disable, Append or
Overwrite.
Restriction
External or Internal document
Type
What type of attachment you want to Append or Overwrite
Preview format
Description
Format
What format you want to email
Force language
Description
Language
Language that is in the document no matter what LanguageId
that is defined in AX.
Page range
This does not work with Lasernet.
Copies
Number of copies that will be printed.
Destination Type - Fax
This will Fax the document and not look for any other destination rules.

Page 12
Field name
Description
Destination type
Fax is selected.
Fax
Type in the fax number
Processing options
Description
Force rerun
A check mark will generate the XML file with all parameters and
send it to Lasernet. The corresponding information will be
displayed within Journals. Force rerun can always be used if
necessary.
Overlays
Description
Overlay instruction
Default (Report setting are in control), Disable, Append or
Overwrite.
Overlay Id
Choose the wanted overlay from the list.
Attachments
Description
Attachments instruction
Default (Report setting are in control), Disable, Append or
Overwrite.
Restriction
External or Internal document
Type
What type of attachment you want to Append or Overwrite
Preview format
Description
Format
What format you want to email
Force language
Description
Language
Language that is in the document no matter what LanguageId
that is defined in AX.

Page 13
Page range
This does not work with Lasernet.
Copies
Number of copies that will be printed.

Page 14
Destination Type – Custom
This will send the document to the selected custom port and not look for any other destination
rules.
Field name
Description
Destination type
Custom is selected.
Custom port
Select the custom port.
Processing options
Force rerun
A check mark will generate the XML file with all parameters and
send it to Lasernet. The corresponding information will be
displayed within Journals. Force rerun can always be used if
necessary.
Overlays
Overlay instruction
Default (Report setting are in control), Disable, Append or
Overwrite.
Overlay Id
Choose the wanted overlay from the list.
Attachments
Attachments instruction
Default (Report setting are in control), Disable, Append or
Overwrite.
Restriction
External or Internal document
Type
What type of attachment you want to Append or Overwrite
Preview format
Description
Format
What format you want to send

Page 15
Force language
Description
Language
Language that is in the document no matter what LanguageId
that is defined in AX.
Page range
This does not work with Lasernet.
Copies
Number of copies that will be printed.
Custom ports could be defined as ftp, http etc.
Predefined Destinations
This option is normally used with batch jobs. If the user doesn’t know how the customer or vendor
wants to receive the document and in what format they will choose this and Lasernet will look
through the distribution rules and see if there is a match. If no match is found, Lasernet will use
the Default Destination as a “fallback” destination.
Field name
Description
Destination type
Use predefined destinations is selected.

Page 16
Default destination
Here you can select a “fallback” destination if Lasernet do not
find any matching Destination rules. In the picture, above if will
fall back to a printer called Printer Output 1 (demo-0) and use
the Printer profile Tray 1. Print, Email or Fax can be selected.
Processing options
Force rerun
A check mark will generate the XML file with all parameters and
send it to Lasernet. The corresponding information will be
displayed within Journals. Force rerun can always be used if
necessary.
Overlays
Overlay instruction
Default (Report setting are in control), Disable, Append or
Overwrite.
Overlay Id
Choose the wanted overlay from the list.
Attachments
Attachments instruction
Default (Report setting are in control), Disable, Append or
Overwrite.
Restriction
External or Internal document
Type
What type of attachment you want to Append or Overwrite
Preview format
Description
Format
What format you want to send
Force language
Description
Language
Language that is in the document no matter what LanguageId that
is defined in AX.
Page range
This does not work with Lasernet.
Copies
Number of copies that will be printed.

Page 17
Lasernet Journal
You can view and manage the reports that were created using the Lasernet functionality. All
reports will be displayed in the AX Journal if wanted.
See the Enable Reports To Lasernet in the Lasernet Connector for Microsoft Dynamics AX
Configuration Manual for further information.
If you have selected to archive a report, Lasernet will create a file. In the Journal you can see a PDF
of the printed report, the XML file sent to Lasernet (if wanted), reprint, fax or email the PDF.
Furthermore you can see information about who printed the report and when and how the report
was distributed, Fax or Email etc.
You will not see the reports where you have selected Lasernet Screen.
The Journal can be reached from many different places in AX Ex. on the Customers, Vendors,
Sales order, Purchase order, Receipt list, Packing slip, Invoice, Confirmation, Picking list
form.
Look for the Journal buttons:
If you look into the e.g. The Invoice Journal menu on a Customer, you will see all the invoices that
have been posted or resend by Lasernet on this specific customer.
If you look into Lasernet Journal on a sales order, you will see the reports that is related to the
sales order and have been posted or reprinted by Lasernet.
If you want to see all the reports that have been posted or resend by Lasernet, you can select
Journal from the Lasernet Menu.

Page 18
Lasernet button
Within the Journals you find the Lasernet button, but only if the administrator has enabled that.
Overview
Description
Lasernet Copy
Reruns the reports and create a copy
Lasernet Original preview
Preview the archive PDF. If no PDF are, archived Lasernet will
rerun the report. It works exactly like the standard AX function,
so if you select confirmation-3 then you get confirmation-3
Resend
Allow you the resend the PDF from archive on Print, Fax or
Email. See the Resend section for more info
Archive
Open the Lasernet Archive. See the Lasernet Archive section for
more info
Lasernet Archive
You can view and manage the reports that were created using the Lasernet functionality. For these
purposes the Lasernet Archive form can be used.
To open this form, use the Journal button then select the Lasernet and Archive.

Page 19
Note: Only the reports with the selected Archive check box will be displayed in the Lasernet Log
form.
Overview
Description
Report name
The name of the AX report
Archive name
The name of the PDF file
Destination
The chosen Lasernet destination
Order ID
The order number the report is assigned to
Document ID
The document number the report is assigned to
Account number
The Customer or Vendor account number for which the report was
sent.

Page 20
Save in
Document saved in either database or file folder
Resend
Check mark states the document has previously been resend from
the archive
General - System
Archive name
The report archive name
Report name
The name of the report
Created date and time
The date and time of the report creation
Created by
The ID of the person the report was created by
Destination type
The destination address, Email, Fax, Print, Custom port or
Predefined destination
Resend
Check mark states the document has previously been resend from
the archive
Copy
Check mark states that the PDF saved in this log line is a copy
Save in
Document saved in either database or file folder
General – Reference
Account number
The Customer or Vendor account number for which the report was
sent
Document IDF
The document number the report is assigned to
Order ID
The order number the report is assigned to
General - File
File name
Displays the PDF file name + archive path
XML Archive
Display the XML name send to Lasernet server + archive path
Document file name
Display the Document name + archive path
Destination
Destination
Displays the information for the destination used, Email, Fax, Print,
Custom port or Predefined destination
Reference
Additional information
Information about a link
Go to
Link to a journal
Resend or view report
In Lasernet you have 2 options that can be used for viewing or reprint / resend the document:
View the report
To review the archived PDF or XML files, click the Preview menu button. In here there are two
options:

Page 21
Show PDF – displays the report in the PDF format on the screen.
Show document – displays the document on the screen if possible.
Show XML - displays the report in the XML format that was send to Lasernet on the screen.
To resend the report, click Print, E-mail, Fax. The report is not regenerated. An XML file with
destination parameters and path to archived pdf file is created and sent to the Lasernet Server.
When the resend process is completed, the journal will be created to store info with resend
parameters and with a Resend flag selected.
Page 22
Resend the report via printer
To resend the report via the printer:
1. In the Journal form, select the report you need to resend.
2. Click Resend.
3. Select Lasernet and in the Destination type choose Print.
4. Select the printer you want to print to. Selecting a Printer Profile here doesn’t work.
5. Click Ok.
If the journal was never sent to Lasernet, using the Force rerun check mark will generate the XML
file with all parameters and send it to Lasernet. The corresponding information will be displayed
in the Journal. Force rerun can always be used if necessary.

Page 23
Resend the report via e-mail
To resend the report via e-mail:
1. In the Journal form, select the report you need to resend.
2. Click Resend.
3. Select Lasernet and in the Destination type choose Email.
4. Fill out the rest of the form and then click Ok.
If the journal was never sent to Lasernet, using the Force rerun check mark will generate the XML
file with all parameters and send it to Lasernet. The corresponding information will be displayed
within the Journal. Force rerun can always be used if necessary.

Page 24
Resend the report via fax
To resend the report via fax:
1. In the Journal form, select the report you need to resend.
2. Click Resend.
3. Select Lasernet and in the Destination type choose Fax.
4. Specify the fax number in the Fax field and click OK.
If the journal was never sent to Lasernet, using the Force rerun check mark will generate the XML
file with all parameters and send it to Lasernet. The corresponding information will be displayed
within the Journal. Force rerun can always be used if necessary.

Page 25
Resend the report to Predefined Destinations
!!Important!!!
This is only available if you have enabled it on the Parameters menu – See configuration for more.
If the user don’t know how the customer or vendor wants to receive the document and in what
format they will choose this and Lasernet will look through the distribution rules and see if there
is a match. If no match is found, Lasernet will use the Default Destination as a “fallback”
destination.
1. In the Journal form, select the report you need to resend.
2. Click Resend.
3. Select Lasernet and in the Destination type choose Use predefined destination.
4. In the Default destination chose a “fallback” option e.g. Print in case that Lasernet
doesn’t find any Predefined destination that match and then click Ok.

Page 26
Resend the report to screen
To resend the report to screen:
1. In the Journal form, select the report you need to resend.
2. Click Resend.
3. Select Lasernet Screen and then Ok.
If the journal was never sent to Lasernet, using the Force rerun check mark will generate the XML
file with all parameters and send it to Lasernet. The corresponding information will be within the
Journal. Force rerun can always be used if necessary.
