
PS – PowerSchool Basic Student Searching and Exporting
2016-05 v1(rb) 1
There are several different ways to search for students and student data in PowerSchool. This
document will cover some of the basic search methods to find students who meet certain criteria and to
export out student field values.
Searching for Students
On the main page, click a tab under Search to select a group to search. “Students” is the default tab. On
the Students tab, search for an individual student or groups of students. You have several ways to
search for students in PowerSchool.
Browse Students
Click one of the Browse Students links to conduct specific, single-criteria searches. Using
Browse Students, search for students by:
• First letter of the student’s last name
• Grade level (Grade_Level= )
• Gender (Gender= )
• All (Current active enrollment)
Searching by Last Name or Student Number
Search for students by last name, a portion of the last name, or by the student number. If a student is
the only one with the last name you entered, the student pages for that student appear. If the student
shares his or her last name with other students in the school, the Current Student Selection page shows
the list of students who match your search criteria.
Each student in your system is assigned a unique student number. You can search for a student using
this number. Use any letters in the Search Students field and PowerSchool searches last names
automatically. Enter numbers and PowerSchool searches student numbers.
Using Smart Searches
Smart Search makes searching for students and staff faster and easier. Once you start typing in the
Search Students field, the auto-completion feature suggests a list of possible student or staff names,
student or staff fields, and stored searches in a menu below the Search field. In most cases, you don’t
have to type the complete word. To select an item, click your choice. If you select a student’s name, his
or her student pages will appear. If you choose a field name, it will be inserted in the Search Students
box. Then you can complete the search command.
The choices in the Smart Search menu are color coded and labeled with an icon, making it easy to
identify the item you are looking for within the list of results. Search results for student and staff names
are represented in orange and labeled with an icon that looks like a person. Search results for student
and staff fields are black and labeled with a database icon. Stored searches are green and are labeled
with a magnifying glass icon.

PS – PowerSchool Basic Student Searching and Exporting
2016-05 v1(rb) 2
To turn on Smart Search:
1) From the Start Page, click the Personalize link on the left under the Setup section
2) Select Interface
3) Check the box for “Enable Smart Search”
4) Click the blue Submit button
NOTE: Another Interface option is to “Include Inactive Student/Staff Results”; however, it is not
recommended for users who primarily work with Active students. Inactive students can be included in a
search easily on an as needed basis, and as discussed in future Search topics.
Using Field/Value Search Commands
Use search commands to find students who match specific criteria and to search student fields.
A search command is a statement of search instructions and must contain three elements: a field name,
a comparator, and a search argument or value. In the following example, the field searched is
First_Name, the comparator is equals (=), and the value searched for is Maria. Thus, this search
command searches for all current students whose first name is Maria:
To see a list of the student fields available in PowerSchool, including any custom fields your
district/school created, click View Field List on the Start Page. Then, you may scroll through the list to
locate the name of the field that contains the information you want. Click the field to automatically
enter it in the Search Students field.
Search for information by using the correct comparator in your search command. Note that if a
comparator contains letters, you must include spaces between the field name, the comparator, and the
search argument. (See a list of Search Comparators on page 3)
The search argument is the specific information for which you are searching. For example, if you are
searching for all of the students with the last name Smith, then Smith is the search argument. The
search argument is always the last part of the search command.

PS – PowerSchool Basic Student Searching and Exporting
2016-05 v1(rb) 3
PowerSchool Search Comparators

PS – PowerSchool Basic Student Searching and Exporting
2016-05 v1(rb) 4
Using Compound Searches
You can search the database using multiple search commands simultaneously. When you enter more
than one search command in the Search Students field, separate the search commands with a semicolon
(;). A semicolon between search commands means and. For example, to find all the students in Mr.
Bowe’s homeroom class whose street contains Maple, enter home_room=bowe;street contains maple
in the Search Students field at Apple Grove High School, and press Enter.
Searching for Inactive Students
When you perform searches, you’re only searching active student records in your school. Students who
are currently enrolled are considered active. Occasionally, you may need to search for students who
preregistered for next year, transferred or dropped out of school midyear, or graduated early. Students
in one of these classifications are inactive. Students who have re-enrolled in another school in your
district are not considered inactive. Search for the students at their current school or the district office.
To access inactive student records, begin your search command with a forward slash (/). Preceding a
search command with a forward slash searches all student records. For example, to find all active and
inactive students with the last name Flowers, enter /last_name=flowers in the Search Students field and
press Enter.
Searching based on Enroll Status
You can use the following to search based on the student enroll status (Enroll_Status=value). For any
statuses other than Active, you must use /Enroll_Status=value to include inactive students:
Search Codes
A search code is a special type of command that searches by completing a calculation and comparing the
results. Using a search code, you can search for students who were born in the month of June, who do
not have a Period 1 class, who were active as of November 10, or who are enrolled in the Gifted and
Talented program.
Enter search codes as you would any search command in the Search Students field. For example, to find
students born on November 10, enter *birthday=11/10 in the Search Students field and press Enter.
(See Search Code examples on page 5).

PS – PowerSchool Basic Student Searching and Exporting
2016-05 v1(rb) 5
Search Code Examples
PS – PowerSchool Basic Student Searching and Exporting
2016-05 v1(rb) 6
Creating Stored Searches
If you know you will be using a set of search commands over and over, create a new group of students
for whom you and other users can search. Stored searches find preset groups of students. You can
either set up and save the searches you use most, or use a search that someone else has set up.
To create a stored search, click Stored Searches and click New. Then type the search command or
commands needed to get the results you want. For example, if you wanted to store a search for the
current day’s birthdays, you would use the command *birthday=today. Once you store the search, run it
daily without having to type in the command. Begin by clicking Stored Searches. Then next to the search
name, click Run Search.
Creating Stored Selections
If you have a group of students who you continually access and want to work with those same students
often, you can create a Stored Selection. This group of students will never change. Stored Selections
are seen only by the person who created the Stored Selection, unless it is made public to other users.
To create a stored selection, perform the search for the students with whom you wish to work or hand-
select your group of students. Choose Save Stored Selection from the functions menu. To work with
that group of students in the future, click on the Stored Selection link on the start page and click Go
Functions.
PowerSchool Advanced Search Feature
PowerSchool has the ability to add students to a previous search, to remove students from a previous
search or to further search within a selection of students.
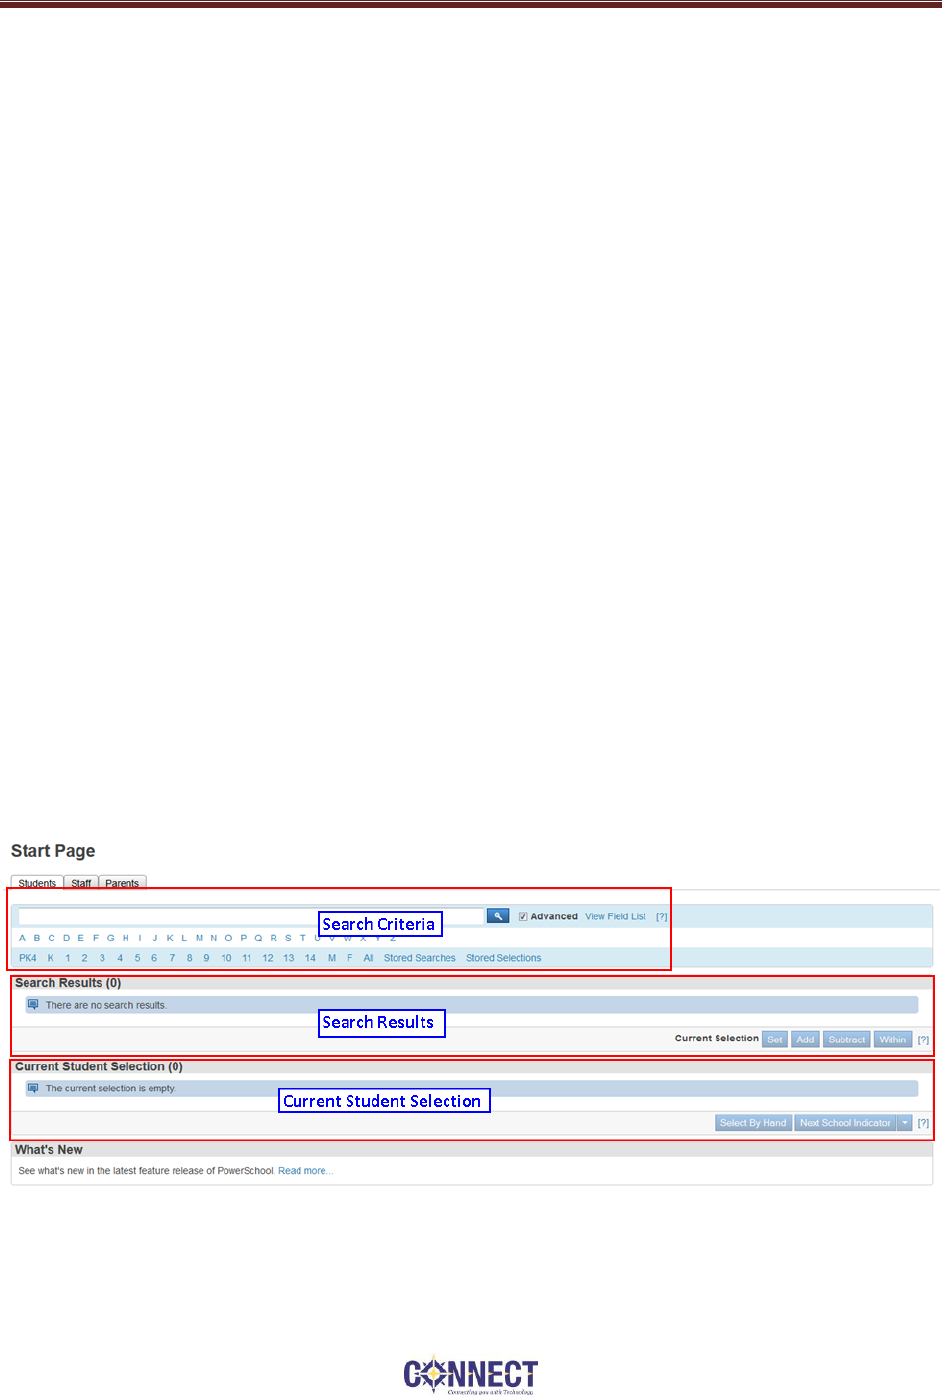
The PowerSchool Advanced Search is slightly different in its layout and in some of its functionality.
When checking the Advanced box, you will see three main areas: The Search Criteria area, the Search
Results Area, and the Current Student Selection area.
You may still search for students by clicking on the grade level.

PS – PowerSchool Basic Student Searching and Exporting
2016-05 v1(rb) 7
However, instead of automatically setting this group as your Current Selection, it will display the search
parameter in the Search bar, and your Search Results will appear in the list below.
After your initial search, you need to then set your Current Selection with the blue Set button below
your Search Results.
After you set your Current Student Selection, the selection will appear in the Current Student Selection
area, and you can then conduct further searches or choose a function to perform with that Current
Student Selection.

PS – PowerSchool Basic Student Searching and Exporting
2016-05 v1(rb) 8
After your Current Student Selection is set, you will then have to ability to conduct further searches
without affecting your Current Student Selection. Your subsequent Search Results can then be added to
or subtracted from your Current Student Selection by using the blue “Add” or “Subtract” buttons, or you
may opt to conduct the additional search within the existing Current Student Selection by using the
“Within” button.
Basic Export Functions
Once you have a student selection, you can either perform functions or you can export information
about the students you have selected. Using the Basic Export functions you can select any student field
and any related table data where there is a one-to-one relationship between the Students table.
List Students
The most basic export function that you can use is the List Students function. To use this function,
select your students and then select the List Students function. Provide a Report Title, and then select
the Student fields that you wish to export out. You can also identify how you want the page to appear,
by including Cell Padding, additional rows between student records, including gridlines, as well as
sorting by the selected fields. There is an option to export as a text tab-delimited file.
Quick Export
Quick Export provides the same functionality as the List Students with Export function; however, you do
have the ability to further format the file by including a Field Delimiter, a Record Delimiter, to include or
not include column titles on the 1
st
row and to surround fields in double quotations. To use this function,
select your students and then select the Quick Export function. List the fields that you wish to submit,
specify the other optional parameters and then click the Submit button.
Student Export Templates
If you find that you are frequently exporting out the same data for students, you can create an export
template. Export Templates are created under the Special Functions > Importing & Exporting >
Templates for Exporting. These templates can export out a simple text tab-delimited file of the selected
columns (most commonly used) or a text file where the columns are of a fixed width (which can be used
for importing into systems where the data is required to be in a specific format). To create an export
template, select Special Functions > Importing & Exporting > Templates for Exporing. Click the new
button. Name the Template and provide the configuration of the Export Template and click Submit.
Then, navigate to the created template and click the on the number in the # Columns column to identify
the desired fields and the order in which the fields should appear. To create each new Field, click the
New button, provide the Title of the column, select the desired field, a value if the student field is blank
(optional). You may also identify the Column Number, Width (for fixed-width files) and the field
alignment.
