
eDMR – Quick Start for Importing from Excel
Last Update: 10/8/2009 Page 1
Importing Data into the eDMR Application
The user has the ability to import data into eDMR using an Excel spreadsheet template.
This provides a quick and easy way to enter data into the eDMR system and performs a
validation of the data to catch errors or potential violations. All that is required is to enter
data into an Excel spreadsheet, save it as a CSV file type, then import into eDMR.
(Note: This is a quick start guide, please refer to the “eDMR Facilities Reporting Guide,
Section 3.2.2 - Importing Data into the eDMR Application and the Appendix” for additional
information on importing data into the eDMR system.)
This CSV file must conform to predefined specifications in order to import data correctly into
eDMR.
Creating CSV file using Excel Spreadsheet Template
North Carolina Division of Water Quality has developed a spreadsheet template that can be
customized by each facility and then used to produce a CSV file for importing data into
eDMR. The Excel spreadsheet template located on the “eDMR Website” under “Forms and
Reports” (
http://portal.ncdenr.org/web/wq/admin/bog/ipu/edmrforms
The Excel spreadsheet template consists of multiple worksheets:
) is available to all users.
• The first worksheet, “DMR permit # yyyy-mm”, contains both Report and Report
Page information. It is the only worksheet required if the user has only one
Outfall/Sampling location (one page) to import.
• The second worksheet, “Outfall nnn Influent”, contains Report Page information for
additional effluent and/or influent pages. It is used if there is a second Page to
import (i.e. Additional Effluents or Influent). The second worksheet can be copied to
additional worksheets and renamed in order to enter data for additional pages.
• The third worksheet, “Outfall nnn Upstream”, contains Report Page information for
the Upstream sample point.
• The fourth worksheet, “Outfall nnn Downstream”, contains Report Page information
for the Downstream sample point.
• The fifth worksheet contains lookup information which controls what can be entered
in some of the cells of worksheets 1 and 2.
This worksheet should not be
modified and has been hidden.
Do NOT modify the format or layout of this template
The spreadsheet should be filled in with the appropriate data and then saved as a CSV file
type. This CSV file can then be imported into the eDMR system to create the permit reports.
, doing so will change the CSV input
file and make it unusable.

eDMR – Quick Start for Importing from Excel
Last Update: 10/8/2009 Page 2
Excel Spreadsheet
Bring up the Excel spreadsheet template and tailor it to match your facility’s reporting
requirements. Refer to your permit to determine the information and parameters to be
included on your report.
Adding and Removing Parameters
The areas within the red borders should be updated to reflect the parameters your facility is
reporting. Verify that the PCS code, description and unit of measure for each of the
parameters is correct and change or add where appropriate. (For a complete list of PCS
codes, go to the eDMR website, http://portal.ncdenr.org/web/wq/admin/bog/ipu/edmr
, then
to the User Documentation section.)

eDMR – Quick Start for Importing from Excel
Last Update: 10/8/2009 Page 3
Spreadsheet with Data Entered
This spreadsheet below was created from this template and contains facility information and
has some useful built in calculations. The number of parameter columns can be increased
as needed.

eDMR – Quick Start for Importing from Excel
Last Update: 10/8/2009 Page 4
Creating the Excel CSV File
After daily values have been entered into the spreadsheet, save as a CSV file for importing
into eDMR. To save as a CSV file, the user should click File -> Save As ->. The “Save As”
pop up box will appear. User should select the folder where the file will be saved and
should enter a name for the file in “File name” box. The name should be meaningful, such
as “nc0024147-001-(7-2008)_eff”, which corresponds to “Permit #, Outfall #, Month-Year of
report, and Outfall & Location (Eff-effluent, Inf-Influent, Up-Upstream, Dwn-Downstream)”.
The user should then click the drop down in the “Save as Type” box. Select (1) CSV
(comma delimited) (*.csv) and then click the (2) Save button.
The resulting CSV file contains additional fields for your review containing facility information
and calculated fields. This additional information is ignored by the eDMR application. As
long as the required lines and fields are in the resulting file in the correct order, eDMR will
import the report.
(1)
(2)

eDMR – Quick Start for Importing from Excel
Last Update: 10/8/2009 Page 5
Each Outfall & Sampling Location is Saved Separately
In the Excel import template you must individually save each worksheet in which you input
data. If you have added data in the Effluent, Influent, Upstream & Downstream worksheets,
you have to go to each worksheet and save each one as a separate CSV file.
The following is an example of various file names:
nc0024147-001-(7-2008)_effluent.csv
nc0024147-001-(7-2008)_influent.csv
nc0024147-001-(7-2008)_upstream.csv
nc0024147-001-(7-2008)_downstream.csv
(Note: Feel free to use your own naming convention for identifying report files.)
Report and Page Create Process for Importing
The steps to create the new report header and page are summarized below.
Create Report
Click on the (1) Report Create menu item
(1)

eDMR – Quick Start for Importing from Excel
Last Update: 10/8/2009 Page 6
Select Permit
If there are multiple permits associated to the owner/facility, select the appropriate permit
from the drop down list. (1)
Select Date
Select the (1) Month and (2) Year of the report being created, then click on the (3) Create
Report button.
(1)
(1)
(2)
(3)

eDMR – Quick Start for Importing from Excel
Last Update: 10/8/2009 Page 7
Report Requested Message
A message will be displayed (1) indicating the report is being generated.
Create New Page From File
Click on the (1) Create New Page From File button.
(1)
(1)
(Warning – any additions or
changes to the fields on this
screen require a Save to be
performed prior to creating a
new page or they will be lost.)
eDMR – Quick Start for Importing from Excel
Last Update: 10/8/2009 Page 8
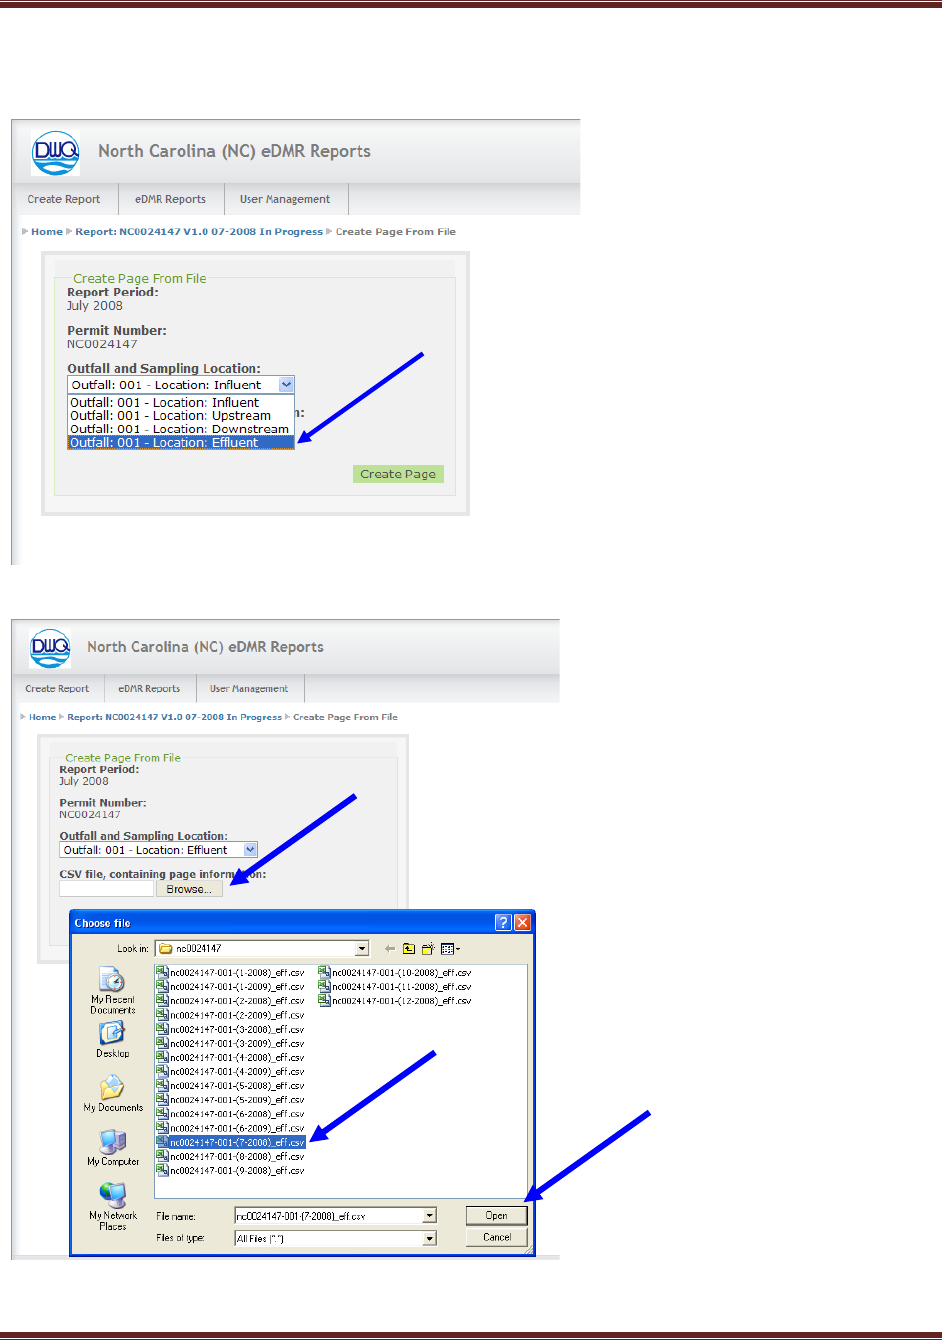
Select the Outfall and Sampling Location (1) to report on.
Browse (1) to find the previously prepared CSV file to import.
Select the appropriate report (2) and click the (3) Open button.
(1)
(1)
(2)
(3)

eDMR – Quick Start for Importing from Excel
Last Update: 10/8/2009 Page 9
Click on the (1) Create Page button to import the CSV file into eDMR.
Completed Report Page
The resulting screens display the data imported into the monitoring report.
(1)

eDMR – Quick Start for Importing from Excel
Last Update: 10/8/2009 Page 10
Verify the data imported is correct on all sections of the report, then click (1) Save to save
the report and data.
The message (1) Saved Successfully indicates the report and all data has been saved to
eDMR. Follow the standard steps of validating, certifying and submitting the report to DWQ
to complete the process (Please refer to “eDMR Facilities Reporting Guide, Section 3 –
Creating and Processing eDMR Reports” for step by step instructions).
(1)
(1)

eDMR – Quick Start for Importing from Excel
Last Update: 10/8/2009 Page 11
Import Revised Report Data
The user also has the ability to revise report data by importing the revised Excel CSV file.
Update page From File
Find and select the report to be revised.
From the (1) eDMR Reports menu, click on (2) My Reports to bring up a list of reports
stored in eDMR. Then select the report to be revised (3).
Update Page from File
Select the correct (1) Outfall and Location, then click on (2) Update Page From File
button.
(1)
(2)
(3)
(1)
(2)

eDMR – Quick Start for Importing from Excel
Last Update: 10/8/2009 Page 12
Update Page From File Screen
(Note: Use the same process that was used to import the original file described in the
section above.)
Browse (1) to find the specific CSV file previously prepared to import.
Select the appropriate report (2) and click the (3) Open button.
(1)
(2)
(3)

eDMR – Quick Start for Importing from Excel
Last Update: 10/8/2009 Page 13
Click the (1) Update Page button.
Verify the updated data is correct then click (1)Save.
(1)
(1)
