
Schlage Express™
Soware manual

ii • Schlage • Schlage Express Soware Manual
©2019 Allegion
This documentation and the software/hardware described herein, is furnished under license and may be used only in accordance
with the terms of such license. Information contained in this manual is subject to change without notice and does not represent any
commitment on the part of Allegion. Allegion assumes no responsibility or liability for any errors or inaccuracies that may appear in
this documentation.
This document supports version 4.4.5.
For additional support and advice for Schlage Express, contact technical support.
• Phone: Toll free 877-671-7011 option 2 then 2
• Web: us.allegion.com
• Email: Electronic_lock_T[email protected]

Contents
5 Introduction
5 Licensing
5 Videos
5 Technical Support
5 Locking Device Cross-Reference Table
6 System Components
7 Hardware Connection
9 HHD Setup
9 Installing Windows Mobile Device Center
10 Connecting the HHD to the Desktop PC
11 Installing and Starting Schlage Express
11 Downloading Schlage Express and supporting soware
and firmware
11 Obtain Schlage Express License
12 Installing Schlage Express
14 Obtaining and Using Unlock Key
18 Starting Schlage Express
19 Setting Up the Site/Quick Start
19 Creating a Facility
19 Setting Credentials
20 Setting the Facility Backup Location
20 Setting the Synchronization Folder
21 Adding System Operators
22 Assigning a Programming iButton Electronic Deadbolts
23 Settings
23 Program Settings
35 Mag Card Template
37 Stock List
37 Stock List iButtons
43 Monitoring
43 Start/Stop Monitoring
44 Save/Print Event List
45 Audits
45 Viewing Audits
47 Reports
47 View Saved Reports
48 View a Report
48 Delete a Report
49 SmarTime (SMT)
49 User Time Zones
50 Door AutoUnlocks
52 Door Holidays
55 Users
55 Adding a User
55 Editing a User
56 Finding a User
57 Deleting a User
58 Importing Users from Text File
61 Credentials
61 Credential Types
61 Credential Functions
61 FIPS Compatible
62 Adding a Credential
64 Using an Enrollment Reader
67 Doors
67 The Doors Window
67 Add a Door
69 Configure HandKey II Setup
70 Edit a Door
70 Copy SmarTime Functions from Door to Door
70 Delete a Door
71 Access Rights
72 Assign Access Rights
73 Copy Access Rights
75 Generating Program Files
75 Generate Program Files for Oine Doors
75 Generate Program Files for Online Doors
77 Programming a Lock
77 Selecting a System Programming Device
78 Programming a Lock Using a HHD
80 Updating Locks
81 Appendix A:
Upgrading from Previous Versions of Schlage
Express
83 Appendix B: ProxXLator
83 Overview
83 Data Input
85 Split Data
87 Index

Schlage • Schlage Express Soware Manual • 5
Introduction
Schlage Express is an access control management system that manages electronic access control devices. Schlage Express
manages and monitors oine devices. Each device has unique characteristics, which are all accessible through Schlage Express.
Licensing
Schlage Express is a single-user, single-PC license.
If you want multiple users to have access to the software, have your IT group make a “Schlage User” prole with administrative
rights to the Schlage folder.
Î Example: If Schlage Express is installed on a machine when John Smith is logged in, then the software and the HHD folder
will be accessible ONLY when John Smith is logged in.
Videos
• Using Schlage Utility Software - hand held programming device: www.youtube.com/watch?v=1dOo8F3keo4
• Programming AD200 or AD201 using Schlage Express: www.youtube.com/watch?v=BSw50gd-lYA
Î For a complete list of videos go to www.youtube.com and type “Schlage Utility Software” in the search window.
Technical Support
For additional support and advice for Schlage Express, contact technical support.
• Phone: Toll free 877-671-7011 option 2 then 2
• Web: us.allegion.com
• Email: Electronic_lock_T[email protected]
Locking Device Cross-Reference Table
The following table shows the cross-reference between installed Device, the Lock Type required to be specied on doors, and the
Programming Device needed to transfer data to the device using UpLink if applicable.
Device Lock Type Programming Device
CM 5xxx Series CM/BE367 Lock HHD plus CIP
CM 993 Trim Series
CT Controller Series
SmartExit bars
SmartMagnets
BE367 5xxx Lock
BE367 9xxx Lock
BE367 Deadbolt BE367 Deadbolt
HandKey II Handkey II Ethernet, serial
AD-200 Series AD-200 HHD
AD-201 Series AD-201
CO-200 Series CO-200
CT5000 CT500
CO-220 CO-220
6 • Schlage • Schlage Express Soware Manual
Introduction
System Components
Before you start using the Schlage Express Software, take a moment to get to know the components that you will be handling.
AD 200 Series Locks
The AD-200 Series Locks are battery powered oine locks that
can use various credentials (PIN, Prox, Smart Cards, Mag
stripe, Card + PIN). The AD-200 locks are modular and read
dierent credentials with additional hardware add-ons.
AD 201 Series Locks
The AD-201 Series Locks are battery powered oine locks that
support the FIPS 201 PIV credential.
CO-200 Series Locks
The CO-200 Series locks are battery powered oine locks that
can use various credentials.
CO-220 Series Locks
The CO-220 Series locks are battery powered oine locks that
can use various credentials. It also allows immediate local
lockdown by simply pushing the button on the remote fob from
anywhere in the classroom. An illuminated visual indicator
located on the interior side of the lock provides instant
verication that the door is secured. The CO-220 provides a
localized solution for schools that want to upgrade without the
cost or complexity of a networked system.
CT5000
The CT5000 is an oine single opening controller.
BE367 Deadbolt
The battery-powered BE367 Deadbolt is an electronically
programmable deadbolt lock. It is programmed to accept
iButtons. When an iButton is presented to the BE367 Deadbolt,
the lock reads the electronic signature of the iButton and if the
lock has been programmed to accept that signature, the lock
will operate.
Legacy KC2 5000 and 9000
The battery-powered King Cobra is an electronically
programmable lockset that can store PIN codes and iButtons.
CM993
The CM993 is a computer managed retrot trim and interfaces
with Von Duprin 98 & 99 Series Exit Devices. Models of
CM993 are available that will accommodate a variety of
credentials, i.e., mag stripe card, HID prox card, iButton and
keypad.
CT1000 Controller
The CT1000 Controller is an oine, hardwired, universal
controller that supports 1000 users and 1000 audit events The
CT1000 supports iButtons, mag stripe cards, PIN codes and
HID prox cards.
HHD
Using the HHD you can transfer information to and from the
locks without having to return multiple times to the desktop PC.
When connected together, the HHD and the desktop PC
transfer new or updated programming and audit trail
information between each other. Will connect to AD and CO
series locks with the included USB cable. Can connect to other
locks with the CIP add on. Works with all credentials.
Schlage Express Soware
Schlage Express software is an easy-to-use system that
provides access control and key management for both
multi-family residences and commercial facilities.
Backup Facility Files
Always back up your Schlage Express facility les. Back up the
les to diskette, CD, network or ash drive. The backup facility
les are a safeguard in case theft, re, computer virus, or other
disaster should strike the desktop PC that houses your
database.
User Credentials
User Credentials lets you lock or unlock a variety of locks
which have been programmed to accept the credential.
• Red iButtons are for programming.
• Black iButtons are for user access.
• All Legacy KC2 locks will also accept a Black iButton as a
programming key. You can only use a Red iButton to
program a BE367 Deadbolt.
HH-USB Cable
This cable comes with the HHD. It is used to connect the HHD
to a desktop PC and to USB enabled locks (CO and AD
series).
HH-SERIAL Cable
This is an additional cable that can be purchased separately
from the HHD that connects the HHD to the CIP.
Computer Interface Peripheral (CIP)
The CIP is used to connect to non-USB enabled locks. Use the
CIP to transfer data between the non-USB enable lock and the
HHD.

Introduction
Schlage • Schlage Express Soware Manual • 7
Hardware Connection
Î Schlage Express is a single-user, single-PC license. You must be logged into the account under which the software was
installed to use the software. See Licensing on page 5 for more information.
Prior to making facility changes in Schlage Express or programming a lock, your hardware must be connected properly. Connect
hardware as shown below.
From PC to HHD
Use the standard HHD USB cable (HH-USB) to connect the HHD to the PC.
From HHD to USB enabled Lock (AD, CO or CT series)
Use the standard HHD USB cable (HH-USB) to connect the HHD to USB enabled lock.
From HHD to non-USB enabled Lock
Use the HHD Serial cable (HH-SERIAL) to connect the HHD to the CIP then connect the CIP to the Lock.
Î NOTE: Regardless of lock model, smaller circle on CIP always plugs into smaller circle on iButton receptacle of lock being
programmed.
Schlage • Schlage Express Soware Manual • 9
HHD Setup
Installing Windows Mobile Device Center
Î Adding Microsoft Mobile Center requires Administration Rights for the PC or laptop on which you are loading it.
Windows Mobile Device Center (WMDC) is the successor to Microsoft Active Sync. WMDC is used with Windows Vista, Windows
7, Windows 8, and Windows 10. Follow the instructions below to install WMDC.
Finding the type of Operating System (OS) you have installed:
You must rst know which type of OS you have installed on your computer, the 32-bit type or the 64-bit type.
To nd out which type of OS you have installed:
1. On your computer, click the Start button.
2. In the Start Menu, click Control Panel.
3. In the Control Panel window, click System and Maintenance.
4. In the System and Maintenance window, click System.
a. In the basic system information window that appears, your type of OS is indicated to the right of System type. It will either
read, 32-bit Operating System or 64-bit Operating System.
b. Make note of your OS type. This information will be needed in a later step.
Downloading the WMDC installation file:
You must download the WMDC installation le from the download section of Microsoft’s ® website.
To download the WMDC installation le:
1. With your computer connected to the internet, open an internet browser.
2. Type the following into the browser’s address bar: microsoft.com/downloads
3. In the list of downloads:
• click on the following link if you have the 32-bit OS: Microsoft Windows Mobile Device Center (32-bit)
or
• click on the following link if you have the 64-bit OS: Microsoft Windows Mobile Device Center (64-bit)
Î Note: You might have to scroll down the page a little to see the 64-bit download.
4. Click the button labeled: Download.
5. In the File Download block that appears, click Save.
6. In the Save As block that appears, navigate to and click Desktop, then click Save.
7. If the Download Complete block is still open after download is nished, click Close.
Installing the downloaded file:
You must install the downloaded le into your computer system.
To install the downloaded le:
1. On your computer’s desktop, double-click the downloaded le.
2. When prompted, click to select one of the following options:
• Remind me Later
• Don’t Register
• Register
3. Connect the HHD to your computer.
4. In the Windows Mobile Member Center window, click Set up your device.
5. In the Set Up Windows Mobile Partnership window:
a. You can either type in a meaningful name in the Device Name block or leave the default name as is. The choice is yours.

10 • Schlage • Schlage Express Soware Manual
HHD Setup
b. Click to check the Create a shortcut on the Desktop to Windows Mobile Device Center check box.
c. Click Set Up.
d. When prompted, click to select the Files check box (you might have to scroll down some).
e. Click Next. A WMDC Partnership has now been established.
Finding the synchronization folder:
The following steps will show you where the synchronization folder is located on your computer.
To nd the synchronization folder:
1. If the WMDC is not already open, do the following:
a. Double-click the WMDC icon in the system tray.
b. In the Synchronization window, double-click the icon labeled, Administrator’s PDA. The WMDC window appears.
2. In the WMDC window, under the Mobile Device category:
a. Click Change content sync settings. The WMDC window displays a list of items that can be changed.
b. In the list of items, click to check the Files check box (If it isn’t already checked).
c. Under Files, click Sync Settings. The following statement will appear:
On this computer, synchronize the les in this folder:
• A path to a synchronization folder is shown under that statement.
3. Make note of the path to the sync. folder. This information will be needed in a later step.
Changing the Path to the Synchronization Folder:
1. In the Schlage Express main menu:
a. Click Settings.
b. In the drop-down menu, click Program Settings. A Program Settings window appears.
2. In the Program Settings window:
a. Click the Programming tab.
b. Click to select the radio button for Locks will be programmed with a Pocket PC device.
c. Click the Change Folder button associated with that eld. The Select Path window will open.
d. Navigate to and select the synchronization folder.
e. Click OK. The selection window will close and the new path appears in the synchronization folder block of the Schlage
Express Program Settings window.
f. Click Save.
Connecting the HHD to the Desktop PC
The HHD is connected to the desktop PC through a usb cable. Whenever you are not using the pocket PC away from the desktop
PC, keep it connected to the AC adapter so it will stay fully charged.
1. Plug the HHD AC adapter into a power outlet.
2. Insert the AC adapter plug to the back of the HHD.
3. Attach the HHD’s USB cable to the desktop PC.
4. Leave the Pocket PC connected to the power outlet until its battery is fully charged.
Î Note: Windows 8 does not auto detect HHD. You need to manually launch Windows Mobile Device Center (WMDC) with
WIndows 8. Windows XP & Windows 7 auto detects the HHD and launches Active Sync or WMDC automatically.
Schlage • Schlage Express Soware Manual • 11
Installing and Starting Schlage Express
Î Schlage Express is a single-user, single-PC license. You must be logged into the account under which the software was
installed to use the software. See Licensing on page 5 for more information.
Downloading Schlage Express and supporting soware and firmware
Use the links below to get the software/rmware you need. You will need all of the listed software/rmware to successfully use
Schlage Express.
Schlage Express
https://us.allegion.com/en/home/products/categories/electronic-locks/schlage-express-software.html
AD-Series firmware
Go to us.allegion.com/en/home/products/categories/electronic-locks/schlage-ad-200.html and then click on the Downloads tab.
Schlage Utility Soware (SUS)
Go to this page to nd downloads and notes.
Donwload the les and unzip them on your machine. The, have your IT professionals transfer these les to the ROOT Directory on
the Hand Held Device (HHD).
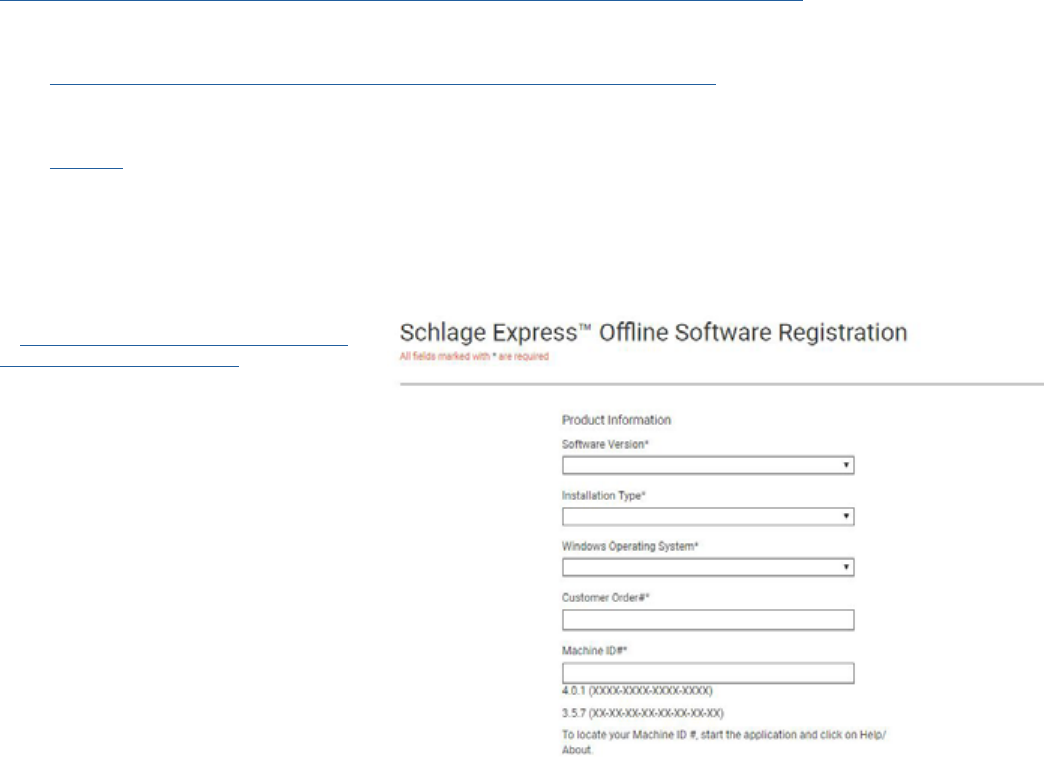
Obtain Schlage Express License
To obtain a license, complete the form located
at https://us.allegion.com/en/home/support/
register-schlage-express.html.
Before getting started, you will need to have
these handy:
• OS version
• Customer Order Number
• Machine ID.
Î Schlage Express is a Single User/Single
PC license and is not available in a Client/
Server version. All authorized users will use
the same PC or laptop to manage the
locks.

12 • Schlage • Schlage Express Soware Manual
Installing and Starting Schlage Express
Installing Schlage Express
1. Start the installation by either:
a. If you have the Schlage Express CD, insert it in
the CD-ROM drive of your computer. After a few
moments, the installation process begins
automatically. Follow the prompts on each
window.
b. If you have downloaded the installer, please
double click the le you downloaded.
2. The InstallShield Wizard will open to the Welcome
screen.
3. Click Next.
4. Click on the I accept the terms in the license
agreement button.
5. Click Next.
6. Enter a User Name and Organization in the provided
elds.
7. Click Next.

Installing and Starting Schlage Express
Schlage • Schlage Express Soware Manual • 13
8. Click Install. The installation process will begin.
9. When the process is complete the Completed screen
will open.
10. Click Finish. Schlage Express is now installed.

14 • Schlage • Schlage Express Soware Manual
Installing and Starting Schlage Express
Obtaining and Using Unlock Key
After completing the installation of Schlage Express you will need to obtain and unlock key via online form and email, and then
copy/paste it into Schlage Express. Follow the instructions below.
Î Until you receive your unlock, select “Trial basis” at startup.
Î The example images show a sample serial number, but you should use the serial number from your specic machine.
Obtaining an Unlock Key
1. Double-click on the desktop icon
to start the Schlage Express
application.
2. Enter the default Operator Name
(manager).
3. Enter the default Password
(123456) and then click OK.
4. The rst time you start the
software, the Change Password
box will appear. Enter your new
password into both boxes, and
then click OK.
5. Click Continue. The Unlock Key
Hasn’t Been Entered window will
open.
6. Click Obtain Unlock Key.

Installing and Starting Schlage Express
Schlage • Schlage Express Soware Manual • 15
7. The Select Appropriate Option
Below window will open. Click
the radio button for the I have
already purchased this
software... option to obtain an
Unlock Key.
8. Click OK.
9. The Obtain Unlock Key window
will open.
10. Follow the instructions in the
Obtain Unlock Key window to
receive your Unlock Key.
11. Make note of the Unlock Key,
you will need to enter it in the
steps below.
12. Click OK.
13. The Schlage Express Main Menu
will open.

16 • Schlage • Schlage Express Soware Manual
Installing and Starting Schlage Express
14. Exit Schlage Express by
selecting Facility>Exit.
15. Follow the steps in Entering the
Unlock Key on page 16 to
enter the Unlock Key.
Entering the Unlock Key
1. Double-click on the desktop icon
to start the Schlage Express
application.
2. Enter the Operator Name and
Password. Then click OK.
3. The Unlock Key Hasn’t Been
Entered window will open. Click
Enter Unlock Key.

Installing and Starting Schlage Express
Schlage • Schlage Express Soware Manual • 17
4. The Software Registration Form
will open.
5. Enter your Unlock Key. The
default user name will be
MANAGER in all uppercase
letters.
6. NOTE: Your Machine ID and
Unlock Key will be dierent than
that shown in the example.
7. Click Validate License.
8. If successful the main Schlage
Express window will open.
9. Follow the steps in Starting
Schlage Express on page 18
to verify the software.

18 • Schlage • Schlage Express Soware Manual
Installing and Starting Schlage Express
Starting Schlage Express
Starting Schlage Express requires an Operator Name and Password, usually obtained from the Facility Manager.
1. Double-click on the desktop icon to start the
Schlage Express application.
2. Enter the Operator Name and Password. Then
click OK.
3. The system displays the Schlage Express Main
Window. You are now ready to use the Schlage
Express software.
Î NOTE: The Facility name is in the lower left
corner. If this is not the facility for which you need
to make changes,go to Facility>Open Facility and
choose the correct Facility.

Schlage • Schlage Express Soware Manual • 19
Setting Up the Site/Quick Start
Creating a Facility
A facility is an Schlage Express database representing a physical or logical
place for door location. Schlage Express requires one facility, but can manage
multiple ones. Facilities are independent and cannot share data. When you
rst install Schlage Express a facility must be created. Follow the directions
below to create a Facility.
1. In the Main Menu, select Facility > New Facility. The Creating a New
Facility window will open.
2. Enter a name for the facility. Choose a name that describes your facility.
A facility can be a building or an entire site. It can also be a oor, an annex, or a logical group, such as all entrances or all
oce doors.
Î NOTE: The facility name cannot contain the following characters: # “ / \ . < > : | * ?
3. Click OK. The name of your facility will appear in the lower left corner of the Main Menu.
Setting Credentials
Setting credentials for a facility
consists of specifying the credential
type that the facility will use, and
setting any identifying parameters.
1. Select Settings > Program
Settings in the Main Menu.
2. In the Program Settings
window, select the Credentials
and Devices tab.
3. Change any of the default
selections according to which
credential technology your
facility will be using by
unselecting or selecting the
appropriate credential types.
The default selection when you
create a new facility will use
PIN/Codes, iButtons, and Card
credentials.
Î Note: The Keypad Device
type(s) in use (6 digits, 12
digits, or both) is
automatically displayed next to the PIN/Codes eld.
4. If changes are made to the default settings click Save. DO NOT click Close at this time.

20 • Schlage • Schlage Express Soware Manual
Setting Up the Site/Quick Start
Setting the Facility Backup Location
Always back up the facility and store
the backup le in a safe location.
Failure to back up the facility risks
complete data loss.
1. In the Program Settings
window, select the Backup tab.
2. Click the Prompt before backing
up Facility check box if you
want a reminder prompt to
appear each time you close the
facility. Otherwise, Schlage
Express backs up the facility
automatically when you close
the facility.
3. To change the location of the
backup folder, click Change
Folder. The Select Path Window
will open. The default location is
C:\Schlage Express\
4. Navigate to the new location in
the Select Path window, click
OK.
Î Note: You should always copy
your backed up databases to a
network share, another hard
drive, or external USB Drive. If
your computer fails your
databases are safe, secure, and recoverable.
5. Click Save. DO NOT click Close at this time.
Setting the Synchronization Folder
Microsoft® ActiveSync® or Windows Mobile
Device® created a synchronization folder on the
desktop PC that the HHD uses to synchronize les
with the desktop PC. Schlage Express must know
that location. The following procedure identies the
location of the synchronization folder so that
Schlage Express can use it.
1. In the Program Settings window, select the
Programming tab.
2. Click Locks will be programmed with a Pocket
PC device (the HHD).
3. Click Change Folder. The Select Path window
will open. The default location is: C:\Schlage
Express\Export
4. In the Set Path window, locate and select the
folder that you recorded during the Installing
Microsoft® ActiveSync® section.
5. Click OK. The Set Path window will close.
6. In the Program Settings window, click Save,
then click Close.

Setting Up the Site/Quick Start
Schlage • Schlage Express Soware Manual • 21
Adding System Operators
Adding system operators enables you and other sta members to have log in access to the Schlage Express software. After you
add at least one System Operator with all privileges, remember to delete the default Manager and Operator.
1. In the Main Menu, select Settings
> Operator Settings. The
Operators window will open.
2. Click Add at bottom of Manager
pane to add a System Operator
with all privileges (manager). The
Add Manager window will open.
Î NOTE: Managers have access to
all Schlage Express functionality.
3. In the Add Manager window:
• Enter the person’s name (4 to
20 characters).
• Enter a password (1 to 8
characters).
• Re-enter password.
• Click OK. The Add Manager window will close and the
person is added to the Manager pane of the Operators
window. Repeat these steps for any additional Managers.
4. Click Add at bottom of Operator pane to add a System
Operator with Door Programming privileges only (operator).
The Add Programmer window will open.
Î NOTE: Operators have restricted access; that is, they can
only open a facility and program locks.
5. In the Add Programmer window:
• Enter the person’s name (4 to 20 characters).
• Enter a password (1 to 8 characters).
• Re-enter password.
• Click OK. The Add Programmer window will close and
the person is added to the Operator pane of the
Operators window. Repeat these steps for any additional
Operators.
6. After you add all System Operators, delete the default
Manager and Operator entries.
7. Click Close.

22 • Schlage • Schlage Express Soware Manual
Setting Up the Site/Quick Start
Assigning a Programming iButton Electronic Deadbolts
This section covers how to assign a programming ibutton to both Legacy KC2 Locks and to the BE367 Schlage Programmable
Electronic Deadbolt.
BE367 Schlage Programmable Electronic Deadbolt
A red programming iButton enables you to set a lock into programming mode. BE367 locks direct from the factory do not initially
accept the Programming iButton. You can assign a Programming iButton to each BE367 lock by the following steps.
1. At any BE367 lock, press a red programming iButton to the BE367 lock’s iButton receptacle. The indicator light ashes green
and red.
2. While the indicator is ashing the BE367 is in programming mode.
3. Connect the CIP to the BE367. The lock can now be programmed.
Legacy KC2
A programming iButton enables you to set a lock into programming mode. Legacy KC2 locks direct from the factory do not initially
accept the Programming iButton. You can assign a Programming iButton to each Legacy KC2 lock by the following steps.
1. At any Legacy KC2 lock, enter the factory default programming code: 9 7 5 3 1 * The factory default code sets the KC2 lock
into programming mode.
2. When the ashing stops, enter the code: 7 *
3. Press a programming iButton to the KC2 lock’s iButton receptacle. The indicator light ashes green and red.
4. When the ashing stops, remove the iButton. The KC2 lock will now accept the iButton for programming.
• The factory default code will no longer be valid.
• All KC2 locks will accept a Black iButton as a programming key. You can only use a Red iButton to program a KC2
Deadbolt.

Schlage • Schlage Express Soware Manual • 23
Settings
You can customize certain aspects of system operation using the Settings menu.
Program Settings
You can change the program settings using the
Program Settings menu. There are six (6) tabs
in the Program Settings menu. Each tab is used
to control a dierent aspect of the system.
Credentials and Devices
You can select which credentials and devices
can be used with the system. By selecting only
the credentials and devices that you currently
use, screens and dialogs will be easier to
navigate.
Î NOTE: When you select or deselect
credential and device types in this tab, the
credential and device types that are
available on other screens will be changed.
Specifying Which Credentials and Devices are Available in the System
1. Click Settings > Program Settings. 2. Click on the Credentials and Devices tab.
3. Click to select/deselect the desired credentials and devices. Credentials and
devices with check marks next to them will be enabled in the system.
Î Note: The Keypad Device type(s) in use (6 digits, 12 digits, or both) is
automatically displayed next to the PIN/Codes eld. See How the Number of
Buttons Aects PINs on page 24 for more information.
4. OPTIONAL: If you are using any BE367 Deadbolts in your facility, and want to
enable or disable the Lock & Leave feature by default, click to check or uncheck
the check box for Enable Lock & Leave.
Î Note: If the Enable Lock & Leave check box is checked, all new BE367
Deadbolt doors will have the Lock & Leave feature enabled. You can disable
this feature later, per door.
a. If you have already created BE367 Deadbolt doors in your facility and want to
enable or disable the Lock & Leave feature on all of them, click Set all
existing locks to default. All BE367 Deadbolt doors already in the facility will
be changed to match the currently selected default.
5. Click Save.

24 • Schlage • Schlage Express Soware Manual
Settings
How the Number of Buttons Affects PINs
Some locks have only six (6) buttons while others have twelve (12) buttons. If you are using locks with only six buttons in your
facility, the number of PIN combinations is halved, since each button of a six button keypad has two numbers on it.
• Six-Button Keypad
For example, if you are using any locks with six-button
keypads in your facility, the PINs 13579 and 24680 are the
same, because the same button combination is pressed to
enter the two codes.
• Twelve-Button Keypad
If you are using only locks with twelve-button keypads in
your facility, each number has an individual key. Therefore,
the PINs 13579 and 24680 are dierent, because a dierent
button combination is pressed to enter the two codes.
Setting the Default PIN Length
1. Click Settings > Program Settings.
2. Click Credentials and Devices.
3. Select the default PIN length from the drop-down box.
4. Click Save.
Duplicate PINs
If a duplicate PIN is entered, the
system will warn the user to change
the PIN value. To manually search
for duplicate PINs in the system:
1. Go to Facility>Check for
Duplicate PINs. The Searching
for Duplicate Pins window will
open.
2. Click Start. The system will
search for duplicate PINs.

Settings
Schlage • Schlage Express Soware Manual • 25
Preferences
The Preferences tab allows you to customize the look and functionality of
some features of the system.
Change the Look of the Main Window
There are two options for the look of the main
window. The default look includes icons for Users,
Doors, Access Rights, SmarTime (SMT), Generate
Program Files and Tour with UpLink. You can
choose to disable the icons, so that the listed
functions are simple buttons, as shown.
1. Click Settings > Program Settings.
2. Click Preferences.
3. Click to check or uncheck the Use Icon
Buttons on Main Window check box.
4. Click Save.

26 • Schlage • Schlage Express Soware Manual
Settings
Enable/Disable Stock List
Î Note: See Stock List on page 52 for more information.
1. Click Settings > Program Settings.
2. Click Preferences.
3. Click to check or uncheck the Enable
Quick Loading of Stock Credentials
check box.
Î Note: When this box is unchecked,
the Stock List menu will not be
available in the menu bar.
4. Click Save.
Enable/Disable Warning Messages
1. Click Settings > Program Settings.
2. Click Preferences.
3. Click to check or uncheck the Show All
Warning Messages check box.
Î Note: When this box is unchecked,
the warning messages will not be
displayed.
4. Click Save.

Settings
Schlage • Schlage Express Soware Manual • 27
Audits
In the Audits tab, you can change
the maximum quantity of audits to
be saved, purge audits and
congure how purged audits are
handled.
Change the Maximum Quantity of Saved Audits
1. Click Settings > Program Settings.
2. Click Audits.
3. Enter the maximum quantity of audits to be saved in the box.
Î Note: This must be a number between 10 and 10,000,000.
The default value is 10,000,000.
Î Reduce the number of audits to help the program load faster.
Back up the Schlage Folder to an external drive (CD, DVD,
Flash Drive) on a weekly basis and/or after any major add or
delete. 10,000 is a good number to select as long as the
database is backed up somewhere other than inside the
Schlage Folder on the same machine.
4. The amount of disk space required for the number you have
entered will be automatically calculated. If this amount is
unacceptable, enter a lower number.
5. Click Save.

28 • Schlage • Schlage Express Soware Manual
Settings
Save Purged Audits
You can elect to save purged audits to a text le. If you elect to save purged audits, a text le with the current date as the le
name will be saved in the OldAudits folder under the Schlage Express installation folder (usually C:\Program Files\Schlage
Express\OldAudits\FacilityName -- for a 32 bit Platform or C:\Program Files (x86)\Schlage Express\OldAudits\FacilityName -- for a
64 bit Platform).
1. Click Settings > Program Settings.
2. Click Audits.
3. You can either save purged audits to a text le or elect not to
save them.
• Click the Do not save purged audits radio button to elect
not to save purged audits.
• Click the Save purged audits... radio button to elect to save
purged audits.
4. Click Save.
Purge Audits from Facility
1. Click Settings > Program Settings.
2. Click Audits.
3. Click Purge Now.
4. Click OK.
5. Click Save.

Settings
Schlage • Schlage Express Soware Manual • 29
Programming
You can specify the programming method and location for programming les in the Programming tab.
1. Click Settings > Program Settings.
2. Click Programming.
3. You can choose from four programming methods. Click the radio button next to the method you want to use.
• Program locks using a SNAP programmer -- Select this option if using one of the Legacy SNAP programmers.
• Program locks using this computer. -- Select this option if using this computer.
• Program locks using a Pocket PC. -- Select this option if using the Legacy Pocket PC or the New HHD (Hand Held
Device). The user will need to use the Change Folder option to select where program les will be saved (see instructions
below)
• Program locks using another Windows computer. -- Select this option if using another Windows PC. The user will need to
use the Change Folder option to select where program les will be saved (see instructions below)
4. If applicable, use the Change Folder option to select where program les will be saved (see instructions below).
5. Click Save.
If using the Program locks using a Pocket PC option:
1. Click Change Folder.
2. Navigate to the folder being used for synchronization by the Pocket PC.
3. Click OK.
4. Click Save.
If using the Program locks using another Windows computer option:
1. Click Change Folder.
2. Navigate to the folder being used for synchronization by the Pocket PC.
3. Click OK.
4. Click Save.

30 • Schlage • Schlage Express Soware Manual
Settings
Locating the Pocket PC Synchronization Folder
1. Make sure the Pocket PC you are using for programming
is attached to your computer and is turned on.
2. Launch Microsoft ActiveSync.
3. Double-click Files.
Î Note: The Pocket PC or HHD must be connected for
this icon to be visible. If you cannot locate this icon,
consult the help le in Microsoft ActiveSync for
information on connecting your PocketPC/HHD.
4. The File Synchronization Settings window will appear.
The location of the synchronization folder is similar to the
example shown below.
Î Note: You can copy and paste this path into the
synchronization folder box on the programming tab,
or use the Change Folder button to navigate to this
folder.
Time Defaults
You can specify time defaults in the
Time Defaults tab. By changing
these defaults, you can save time
on entries in other areas of the
system.

Settings
Schlage • Schlage Express Soware Manual • 31
Enable/Disable Adjust for Daylight Savings Time
If this option is enabled (the box is checked), the system will automatically adjust for Daylight Savings Time. You should check this
box unless the facility is located in an area that does not use Daylight Savings Time.
1. Click Settings > Program Settings.
2. Click Time Defaults.
3. Click to check or uncheck the check box
next to enable or disable Adjust for
Daylight Savings Time.
4. Click Save.
Enable/Disable First Person In by Default
The First Person In feature is used in combination with AutoUnlocks. If the First Person In feature is enabled, the lock will remain
locked until a user presents a credential to open the door. The lock will then stay unlocked until the end of the AutoUnlock period.
This feature guarantees that at least one person is present when the door is open. Not all devices are capable of this feature.
The First Person In by default option, when enabled, will make any lock that is capable of the First Person In feature to have it
enabled by default.
1. Click Settings > Program Settings.
2. Click Time Defaults.
3. Click to check or uncheck the check box
next to enable or disable First Person In
by Default.
4. Click Save.

32 • Schlage • Schlage Express Soware Manual
Settings
Enable/Disable Credential Default Activation and Expiration Date
Setting these default dates does not mean that all credentials must abide by these rules. Both activation and expiration date can
be changed in the user credential settings. The dates specied here will only be the default for new user records and will not aect
existing user records in any way.
1. Click Settings > Program Settings.
2. Click Time Defaults.
3. Click to check or uncheck the check box
next to Credential Default Activation
Date to enable or disable.
• If enabling the date, continue to step 4.
• If disabling the date, skip to step 5.
4. The default activation date can be either a xed date or a relative date.
• To set a xed date, click the xed
date radio button and choose a date
from the date drop-down box by
clicking on the date.
• To set a relative date, click the
relative date radio button and
choose a number from the number
drop-down box and a unit of time
from the unit of time drop-down box.
5. Click Save.
Settings
Schlage • Schlage Express Soware Manual • 33
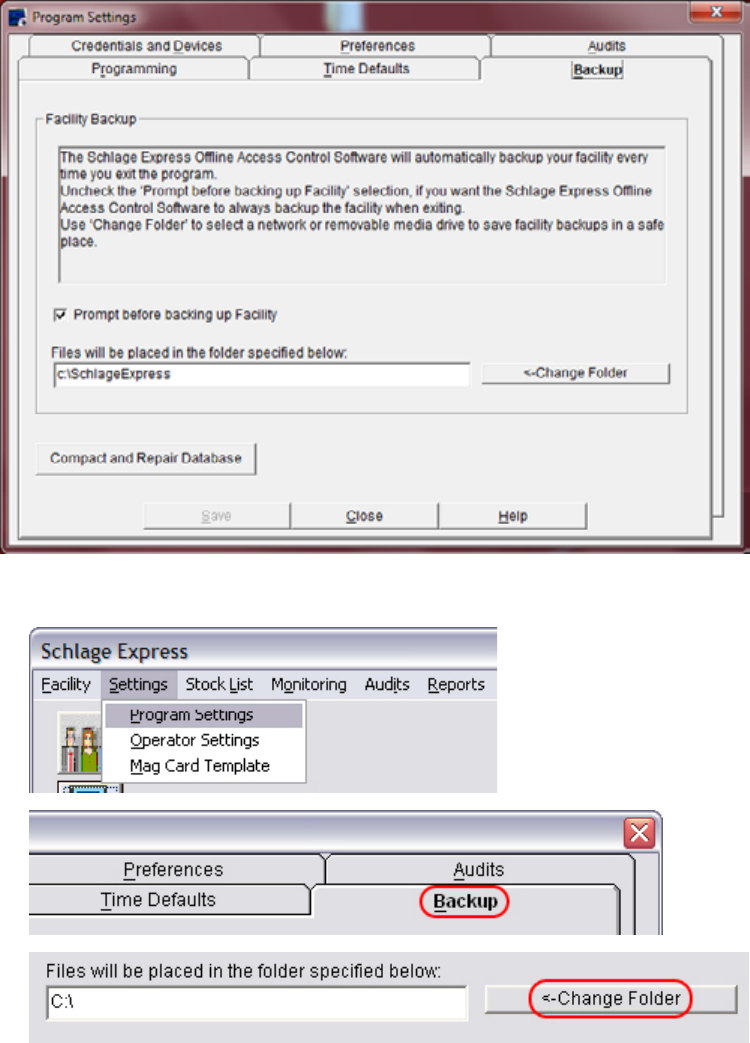
Backup
Each time a facility is closed, the
system will attempt to create a
backup of the facility. If you want to
have the option to cancel the
backup, you can set the system to
prompt you before creating the
backup.
This option is enabled by default.
Î Note: You should always copy
your backed up databases to a
network share, another hard
drive, or external USB Drive. If
your computer fails your
databases are safe, secure,
and recoverable.
Change Backup Folder Path
1. Click Settings > Program
Settings.
2. Click Backup.
3. Click <-Change Folder to browse
for the folder in which you want to
store backup les, or type the path
to the folder in the box.
Î NOTE: Permissions in Windows Vista and Windows 7 dier from those used in Windows XP. With the newer operating
systems the user may not have complete Administrative rights to certain folders. The Backup destination must be located
in a folder that the user has write permissions in order for the backup to be successful.
4. Click Save.

34 • Schlage • Schlage Express Soware Manual
Settings
Enable/Disable Prompt Before Backup
1. Click Settings > Program Settings.
2. Click Backup.
3. Click to check or uncheck the box next to
Prompt before backing up Facility to
enable or disable.
4. Click Save.
Operator Settings
Operator Settings is
used to add, delete
and edit managers
and operators.
Managers are
congured on the left
side of the screen.
Programmers are
congured are the
right side of the
screen.
Manager
Accounts
A manager has
complete access to all
features in the system. One manager account is included in the system by default. It has the following properties:
• Operator Name: Manager • Password: 123456
Î Note: Change the password on this account immediately after logging in for the rst time. Consider deleting this account after
you have created another manager account to ensure system security. The number of manager accounts should be limited for
security reasons.
Programmer Accounts
A programmer account has limited access to the system. Programmers are only allowed to generate program les and tour with
uplink (if you are using your PC to tour your doors).
One programmer account is included in the system by default. It has the following properties:
• Operator Name: Operator
• Password: 123456
Î Note: Change the password on this account immediately after logging in for the rst time. Consider deleting this account after
you have created another operator account to ensure system security.
You should create a new account for each person who will have access to the system. When each person has an individual
account, you can track the changes that were made by each system programmer.

Settings
Schlage • Schlage Express Soware Manual • 35
Mag Card Template
A mag card that is used for access
control is encoded with characters.
Only 16 of these characters can be
used by the system. Some of these
characters may be set to be the
same for all users within a facility
and some of the characters are
unique for each user. Only the
unique characters are used for
verication. The Mag Card Template
is used to specify which characters
should be used for verication.
In the example, the data in the Full
Card Data (No Template applied)
box shows that the card has been
encoded with a facility code, which is
separated from the rest of the data
by an equal sign (=). The rst ten
(10) positions have been specied in
the mag card template.
The templated card data shows only
the rst ten (10) characters of the
mag card data. The last ve (5)digits
do not need to be read by the
system because they will be
encoded to be the same for all cards in the facility. Using this technique, all cards from a particular facility can be easily identied
by a system operator.
The two numbers in the Update Data box show the numbers in positions nine (9) and ten (10). This position is specied in the 1st
Lost Card Update Character box. The update data is used for auto card replacement.
Edit the Mag Card Template
1. Click Settings > Mag Card Template.
2. Click to select/deselect the positions to
be used for the template.

36 • Schlage • Schlage Express Soware Manual
Settings
3. Choose the 1st Lost Card Update
Character from the drop-down list.
Î Note: This position and the one
immediately following it will be used
for Auto Card Replacement (ACR).
4. You can test the mag cards to be used with the facility against the template.
• If using a serial reader or a lock to read the cards, double click the box below Full Card Date (No Template applied).
Swipe the card within eight (8) seconds.
• If using a keyboard card reader, click Test and swipe the card.
5. The data will be displayed in the three
boxes.
• Full Card Data shows all the data
from the mag card.
• Templated Card Data shows the
data within the template.
• Update Data shows the data used
for lost card updates.
6. Click Save.
Auto Card Replacement
Auto Card Replacement (ACR) is a
feature used to issue a new card
when a card is lost.
In the example, ten (10) characters
have been specied in the template.
The last two (2) characters of the
template, characters nine (9) and ten
(10) have been selected for the auto
card replacement characters. This is
indicated in the 1st Lost Card
Update Character box. The data in
the Update Data box shows 11. If the
auto card replacement feature is
used on this card, the number will be
incremented to 12.
Either one (1) or two (2) characters
can be used for auto card
replacement. To use only one
character, choose the last character
in the template for the 1st Lost Card
Update Character.
Î Note: Only certain characters
are available for selection in the
1st Lost Card Update Character
box. The mag card template can be adjusted until the character you want to select is available.
Î Note: If only one (1) character is used, the number of replacement cards is limited to nine (9) cards. If two (2) characters are
used, the number of replacement cards is limited to ninety-nine (99) cards.

Schlage • Schlage Express Soware Manual • 37
Stock List
The Stock List feature is used to load iButtons and cards into the system in bulk. These credentials can then be selected and
assigned to a user.
Note: This menu is only available if Enable Quick Loading of Stock Credentials is selected in the Preferences menu. Only
credentials that have been enabled in the Preferences menu will be available in the Stock List menu.
Î For FIPS Compatible: do not use the Stock List - enroll a new credential every time. Register all credentials returned and/or
lost as LOST. The Enrollment Reader will bring in the FIPS credential information required.
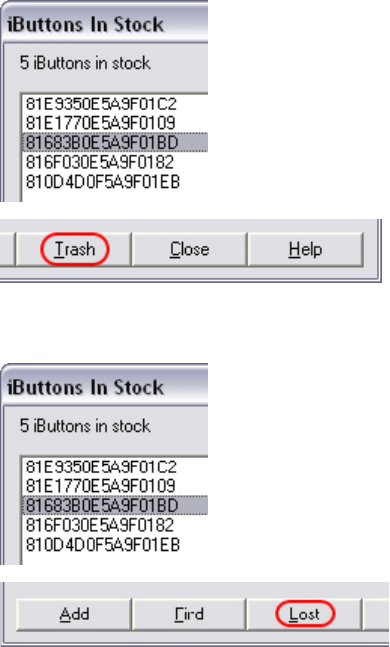
Stock List iButtons
From here the user can Add, Find, Trash and Mark as Lost any iButton credential in the system.
Î iButton is not a FIPS Compatible credential.
Add iButtons to the Stock List
1. Click Stock List > iButtons.
2. Click Add.
3. The Touch Button box will appear. While this box is visible,
touch the iButton to the iButton reader.
4. If you have more iButtons to enter, touch each iButton to the
reader until all of them are entered
5. Press the Esc key on your keyboard after all the iButtons
have been entered.
Find an iButton in the System
1. Click Stock List > iButtons.
2. Click Find.
3. When the box below appears, touch the iButton you want to
nd in the system to the iButton reader.
4. If the iButton is in use in the system, it will be displayed.
• If the iButton is assigned to a user, the following box will
appear. Click OK to close the box.
• If the iButton is in the stock list, it will be highlighted in
the stock list window.
38 • Schlage • Schlage Express Soware Manual
Stock List
Trash an iButton in the Stock List
If an iButton in the stock list stops functioning, the iButton can me marked as trashed.
1. Click Stock List > iButtons.
2. Click to select the number of the iButton you want to delete.
3. Click Trash.
4. Click Yes.
Mark an iButton as Lost
1. Click Stock List > iButtons.
2. Click to select the number of the iButton you want to mark as
lost.
3. Click Lost.
4. Click Yes.

Stock List
Schlage • Schlage Express Soware Manual • 39
Stock List Cards
From here the user can Add, Find, Trash and Mark as Lost any Card (mag/prox/smart) credential in the system.
Add Card to the Stock List
An Enrollment Reader can be used to enter cards into the Stock List.
Î For FIPS Compatible, skip this step. The MT20 enrollment reader will automatically add/remove cards to/from the stock list.
1. Click Stock List > Cards.
2. Click Add.
3. Instructions for each Enrollment Reader are included on the screen depending on the Enrollment Reader selected.
4. For Smart Card Enrollment: 5. For a Serial Enrollment Reader:
6. For a Mag Card USB Enrollment Reader 7. No Enrollment Reader (Manual)

40 • Schlage • Schlage Express Soware Manual
Stock List
8. For a Prox Card USB Enrollment Reader
9. Repeat the steps above for each additional card. If there are no more cards to be entered click Cancel in the newly opened
Card Detail window.
Find a Card in the Stock List
USB Enrollment Readers can be used to nd cards in the Stock List.
Î For FIPS Compatible, skip this step. The MT20 enrollment reader will automatically add/remove cards to/from the stock list.
If using a Serial Enrollment Reader:
1. Click Stock List > Cards.
2. Click Find.
3. When the Swipe Card box appears, swipe the card you
want to nd in the system.
4. If the card is in use in the system, it will be displayed.
• If the card is assigned to a user, the following box will
appear. Click OK to close the box.
• If the card is in the stock list, it will be highlighted in the
stock list window.

Stock List
Schlage • Schlage Express Soware Manual • 41
If using an Enrollment Reader:
Î This is the recommended method.
1. Click Stock List > Cards.
2. Click Find. The Card Detail window will open. If the card is in use in the system, it will be displayed.
3. For Smart Card Enrollment: 4. For a Serial Enrollment Reader
5. For a Mag/Prox Card USB Enrollment Reader: 6. No Enroll Reader (Manual)
7. If the card is assigned to a user, the following box will
appear. Click OK to close the box.
8. If the card is in the stock list, it will be highlighted in the stock
list window.

42 • Schlage • Schlage Express Soware Manual
Stock List
Trash Cards in the Stock List
If a Card in the stock list stops functioning, the Card can me marked as trashed.
Î For FIPS Compatible, skip this step. The MT20 enrollment reader will automatically add/remove cards to/from the stock list.
1. Click Stock List > Cards.
2. Click to select the number of the card you want to delete.
3. Click Trash.
4. Click Yes.
Mark a Card as Lost
1. Click Stock List > Cards.
2. Click to select the number of the card you want to mark as
lost.
3. Click Lost.
4. Click Yes

Schlage • Schlage Express Soware Manual • 43
Monitoring
Schlage Express can monitor all activities for the online devices. These devices are HandKey readers that are connected through
a serial connection or to an Ethernet network.
Î Note: This option will only appear if you have the Handkey option checked under Program Settings. See Program Settings on
page 33 for more information.
Start/Stop Monitoring
To Start Monitoring:
1. Click Monitoring > Start Monitoring.
2. The Monitor Running will be displayed in
the bottom right of the screen and the
monitoring screen will appear. Any new
events will be displayed in the monitoring
screen.
3. Click on the title of any column to sort the
list by that column. Click the same column
again to change the sort order.
To Stop Monitoring:
1. Click Monitoring > Stop Monitoring.
2. Monitoring Stopped will be displayed in
the bottom right of the main window.

44 • Schlage • Schlage Express Soware Manual
Monitoring
Save/Print Event List
To Save the Event List:
1. In the monitoring screen, click File > Save
As.
2. Browse to the location on your computer
to which you want to save the le.
3. Enter a name for the le into the File
Name box.
4. Click Save.
5. The le can be viewed using any text
editing software. Navigate to the location
on your computer to which you save the
le and double-click to open the le. This
is an example of a saved event list.
To Print the Event List:
1. In the monitoring screen, click File > Print.
2. Click to select the printer to which you
want to print from the list of installed
printers.
3. Click Print.
Select Audit Events to Save
Select Audit Events to Save is used to select the events that will be saved in the audit for each online door. See Audits on page
65 for more information.
1. Click Monitoring > Select Audit Events to
Save.
2. Click to check/uncheck the check boxes
next to the events you want to save in the
audit report. Click Default to automatically
select the default set of events.
3. Click Save.
4. Click Close.

Schlage • Schlage Express Soware Manual • 45
Audits
An audit is a list of events for one or more doors.
An audit event is any event that occurs at a door. Audit events are recorded in an audit.
An audit trail is a list of audit events. An audit trail can be retrieved from a locking device that is equipped with the audit trail feature
or the SmarTime feature.
Audits can be viewed using the audit viewer in Schlage Express.
Viewing Audits
To View an Audit:
1. Click Audits.
2. Then select the viewing parameter. Audits can be viewed by:
• Door and Date - The report viewer will be displayed with the audit by door and date already loaded.
• Door and User - The report viewer will be displayed with the audit by door and user already loaded.
• User and Date - The report viewer will be displayed with the audit by user and date already loaded.
• Date - The report viewer will be displayed with the audit by date already loaded.
3. The report viewer will open with the selected criteria. See Reports on page 66 for more information.
46 • Schlage • Schlage Express Soware Manual
Audits

Schlage • Schlage Express Soware Manual • 47
Reports
An audit trail from any lock in the system can be viewed using the report viewer. When a report is viewed, a new le is created
from the most recent audit trail that exists in the system.
View Saved Reports
Reports that have been previously created can be viewed using the report viewer.
1. Click Reports > View Saved Reports.
Reports can be found in three ways:
Search by File Name
1. Click the search button.
2. Click File Name.
3. Click + to expand the folder of the rst letter of the le name you want to
view.
4. Click the name of the le you want to view.
Search by Creation Date
1. Click the search button.
2. Click Creation Date.
3. Click + to expand the folder for the year you want to view.
4. Click the date of the le you want to view.
Browse for a Saved File
1. Click the open le button.
2. Browse for a le that has been saved on your system.
3. Click to select the le and click Open.

48 • Schlage • Schlage Express Soware Manual
Reports
View a Report
1. Click Reports.
2. Choose one of the following:
• User > Name Phone Address
• Door
• Holidays by Door
• AutoUnlocks by Door
• Access by User
• Access by Door
• Issued Credential History
These reports can be sorted and printed to meet your requirements.
Delete a Report
Î Note: Reports should not be deleted. Report les are regenerated after being deleted, so no disk space is saved by deleting
report les. Some problems, such as ‘le not found’ errors, may be encountered if report les are deleted.
1. Click Reports > View Saved Reports.
2. Click the search button.
3. Click File Name.
4. Click + to expand the folder of the rst letter of the le name you want to delete.
5. Click the name of the le you want to delete.
6. Click the trash can button.
7. Click Yes.

Schlage • Schlage Express Soware Manual • 49
SmarTime (SMT)
SmarTime is a collection of time-based functions that allow locks to behave dierently based on time restrictions. SmarTime
functions include User Time Zones, Door AutoUnlocks and Door Holidays.
User Time Zones
A user time zone is a dened period of time that is assigned to an access right in order to grant access to users. This is dierent
from a world time zone such as Mountain Standard Time.
The 24Hr X 7 Days (Default) user time zone is created, by default, in every facility. This user time zone cannot be deleted or
edited. It is used by every lock that supports user time zones to give 24 X 7 access. Any time an access right is assigned to a door
that supports user time zones, this user time zone is used unless another user time zone is assigned.
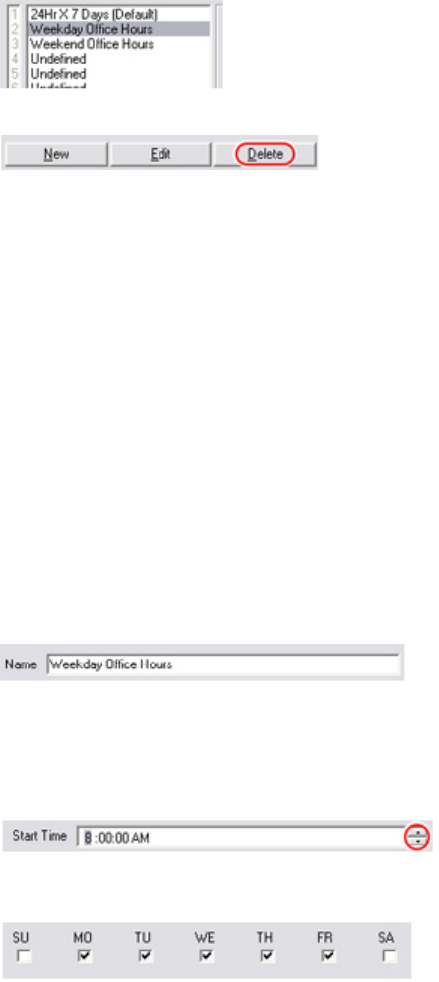
Add a User Time Zone
1. Click SmarTime (SMT).
2. Click New.
3. Enter the name in the Name box.
• A name is required and must be between one
(1) and thirty-two (32) characters long. The name cannot contain the tab character or the pound (#) sign.
4. Set the Start Time and the End Time.
• The time boxes are divided into four parts: hour,
minute, second and day part. To enter the time, click on the time part you want to change. Then either type the value or
use the arrow buttons on the right of the time box to increase or decrease the time.
5. Check the box below each day of the week for
which the user time zone will be in eect.
6. Click Save.
Edit a User Time Zone
1. Click SmarTime (SMT).
2. Click to highlight the name of the user time zone you
want to edit.
3. Click Edit.
4. Enter the name in the Name box.
• A name is required and must be between one
(1) and thirty-two (32) characters long. The
name cannot contain the tab character or the
pound (#) sign.
5. Set the Start Time and the End Time.
• The time boxes are divided into four parts: hour, minute, second and day part. To enter the time, click on the time part you
want to change. Then either type the value or
use the arrow buttons on the right of the time
box to increase or decrease the time.
6. Check the box below each day of the week for
which the user time zone will be in eect.
7. Click Save.
Î NOTE: The user time zone will not be changed on the door until the door is reprogrammed.
50 • Schlage • Schlage Express Soware Manual
SmarTime (SMT)
Delete a User Time Zone
Î NOTE: The 24Hr X 7 Days (Default) user time zone
cannot be deleted.
1. Click SmarTime (SMT).
2. Click to highlight the name of the user time zone you
want to delete.
3. Click Delete.
4. Click Yes.
Î The user time zone will still be active on the door until the door is reprogrammed.
Door AutoUnlocks
An AutoUnlock is a dened time period during which a lock is unlocked. At the end of the AutoUnlock time period, the lock will
automatically relock.
No audit events of legal access are logged during an AutoUnlock time period. Only the start and end of the AutoUnlock will be
logged.
AutoUnlocks are overridden by holidays. Up to eight (8) door AutoUnlocks can be added to a facility. Not all locks support
AutoUnlocks.
Secured Mode AutoUnlock
If an AutoUnlock has the same start and end time, the lock will be set to secure (locked) mode at that time. Using this technique,
you can make sure that a lock is locked from a specic time of day until it is unlocked by either a user, another AutoUnlock or a
holiday.
Add a Door AutoUnlock
1. Click SmarTime (SMT).
2. Click Door AutoUnlocks.
3. Click New.
4. Enter the name in the Name box.
• A name is required and must be between one (1) and thirty-two (32) characters long. The name cannot contain the tab
character or the pound (#) sign.
5. Set the Start Time and the End Time.
• The time boxes are divided into four parts: hour,
minute, second and day part. To enter the time, click on the time part you want to change. Then either type the value or
use the arrow buttons on the right of the time box to increase or decrease the time.
6. Check the box below each day of the week for
which the user time zone will be in eect.
7. Click Save.
8. If you have entered the same time for the start and end times, a window will appear to conrm the creation of a secured mode
AutoUnlock. If you intended to create this kind of AutoUnlock, click OK. If you did not intend to create this kind of AutoUnlock,
click Cancel and go back to step 5.

SmarTime (SMT)
Schlage • Schlage Express Soware Manual • 51
Edit a Door AutoUnlock
1. Click SmarTime (SMT).
2. Click Door AutoUnlocks.
3. Click to highlight the name of the door AutoUnlock
you want to edit.
4. Click Edit.
5. Enter the name in the Name box.
• A name is required and must be between one (1) and thirty-two (32) characters long. The name cannot contain the tab
character or the pound (#) sign.
6. Set the Start Time and the End Time.
• The time boxes are divided into four parts: hour,
minute, second and day part. To enter the time, click on the time part you want to change. Then either type the value or
use the arrow buttons on the right of the time box to increase or decrease the time.
• If the start time and the end time are the same, the lock will be set to secured mode (locked) at that time.
7. Check the box below each day of the week for
which the user time zone will be in eect.
8. Click Save.
9. If you have entered the same time for the start and end times, a window will appear to conrm the creation of a secured mode
AutoUnlock. If you intended to create this kind of AutoUnlock, click OK. If you did not intend to create this kind of AutoUnlock,
click Cancel and go back to step 5.
Î NOTE: The AutoUnlock will not be changed on the door until the door is reprogrammed.
Delete a Door AutoUnlock
1. Click SmarTime (SMT).
2. Click Door AutoUnlocks.
3. Click to highlight the name of the door AutoUnlock
you want to delete.
4. Click Delete.
5. Click Yes.
Î NOTE: The AutoUnlock will still be active on the door until the door is reprogrammed.

52 • Schlage • Schlage Express Soware Manual
SmarTime (SMT)
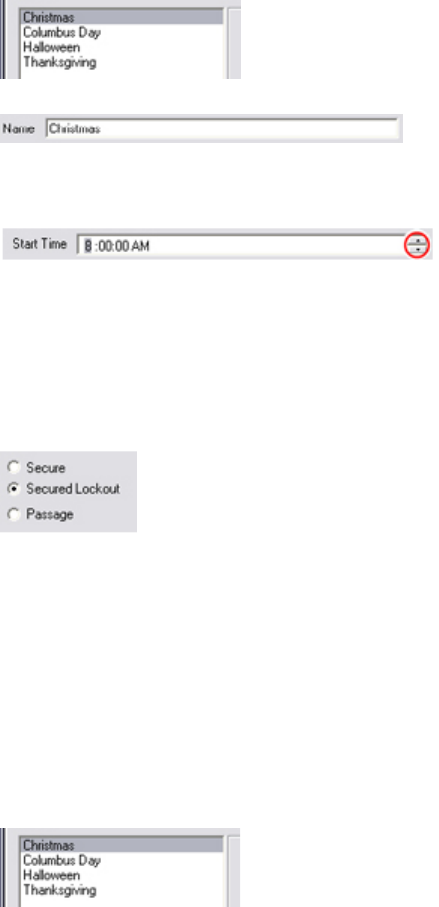
Door Holidays
A holiday is a dened time period during which a door remains in a secure, secured lockout or passage state. A holiday can span
over an unlimited amount of time and is non-repeatable.
Holidays override AutoUnlocks. Up to sixteen (16) door holidays can be added to a facility. Not all locks support holidays
Add a Door Holiday
1. Click SmarTime (SMT).
2. Click Door Holidays.
3. Click New.
4. Enter the name for the door holiday.
• A name is required and must be between one (1) and thirty-two (32) characters long. The name cannot contain the tab
character or the pound (#) sign.
5. Set the Start Time and the End Time.
• The date boxes are divided into three parts:
month, day and year. To enter the date, click on the date part you want to change and type the value.
• The date can also be chosen by clicking the down arrow on the right side of the date box. A calendar pop-up box will
appear. Change the month by clicking the left or right arrow at the top of the box. Choose the date by clicking on the
number in the calendar.
• The time boxes are divided into four parts: hour, minute, second and day part. To enter the time, click on the time part you
want to change. Then either type the value or use the arrow buttons on the right of the time box to increase or decrease
the time.
6. Choose the function for the holiday by clicking the
radio button next to the desired function. Only one
function for holiday can be chosen.
• Secure - Secure is a mode that sets the door to
the locked state. A user who has access rights and a valid credential can unlock a door set to secure mode. The door will
re-lock after the specied relock time.
• Secured Lockout - Secured lockout is a mode that sets the door to the locked state and locks out all credentials except
pass through credentials. A user who has access rights and a valid pass through credential can unlock a door set to
secured lockout mode. The door will re-lock after the specied relock time.
• Passage - Passage is a mode that sets the door to the unlocked state. Any person can open a door with a lock set to
passage mode. The door can be locked, and will remain locked, with a toggle credential.
7. Click Save.
SmarTime (SMT)
Schlage • Schlage Express Soware Manual • 53
Edit a Door Holiday
1. Click SmarTime (SMT).
2. Click Door Holidays.
3. Click to highlight the name of the door holiday you
want to edit.
4. Click Edit.
5. Edit the name in the Name box.
• A name is required and must be between one (1) and thirty-two (32) characters long. The name cannot contain the tab
character or the pound (#) sign.
6. Set the Start Time and the End Time.
• The date boxes are divided into three parts:
month, day and year. To enter the date, click on the date part you want to change and type the value.
• The date can also be chosen by clicking the down arrow on the right side of the date box. A calendar pop-up box will
appear. Change the month by clicking the left or right arrow at the top of the box. Choose the date by clicking on the
number in the calendar.
• The time boxes are divided into four parts: hour, minute, second and day part. To enter the time, click on the time part you
want to change. Then either type the value or use the arrow buttons on the right of the time box to increase or decrease
the time.
7. Choose the function for the holiday by clicking the
radio button next to the desired function. Only one
function for holiday can be chosen.
• Secure - Secure is a mode that sets the door to
the locked state. A user who has access rights and a valid credential can unlock a door set to secure mode. The door will
re-lock after the specied relock time.
• Secured Lockout - Secured lockout is a mode that sets the door to the locked state and locks out all credentials except
pass through credentials. A user who has access rights and a valid pass through credential can unlock a door set to
secured lockout mode. The door will re-lock after the specied relock time.
• Passage - Passage is a mode that sets the door to the unlocked state. Any person can open a door with a lock set to
passage mode. The door can be locked, and will remain locked, with a toggle credential.
8. Click Save.
Î NOTE: The door holiday will not be changed on the door until the door is reprogrammed.
Delete a Door Holiday
1. Click SmarTime (SMT).
2. Click Door Holidays.
3. Click to highlight the name of the door holiday you
want to edit.
4. Click Delete.
5. Click Yes.
Î NOTE: The door holiday will not be changed on the door until the door is reprogrammed.

Schlage • Schlage Express Soware Manual • 55
Users
Adding a User
Create a user record so you can
assign a credential to a new user.
A user is anyone assigned a
credential to operate specic
doors locks.
1. Click Users in the Main
Window:
2. Click New at the bottom of the
left pane:
3. Enter up to 16 characters
each for the Last Name and
First Name elds (the other
elds are optional):
• Assign users to groups
by entering a group name
in the Group eld. It’s
easier to manage
multiple users when
they’re assigned to a
group. If multiple groups
are currently available in the Group dropdown list, make sure all new users are assigned to the proper group. Speak with
your site administrator if you are unsure what to select.
4. Click Save to save the new record.
5. Click Close to return to the Main Menu.
Editing a User
Keep user information up to date
by editing the user entry. When a
resident moves out and returns all
credentials, edit the user entry so
that it shows information for the
new resident.
1. Click Users in the Main
Window.
2. Click Edit at the bottom of the
left pane.
3. Modify values of any elds.
4. Click Save to save the new
record.
5. Click Close to return to the
Main Menu.

56 • Schlage • Schlage Express Soware Manual
Users
Finding a User
To nd a User in the system, follow the steps below.
1. Click Users in the Main
Window.
2. Click Find.
3. The Find User window will open. Select the Find by option.
4. If searching using a name (First or Last) or the PIN/Code enter the
name or PIN into the Search for eld.
a. Click Find. All applicable users will appear in the Search
Results List.
b. Select the desired user in the Search Results List and click
OK. The Find User window will close and the Users window
will show the selected User.
5. If searching for a Card using a Reader:
a. Use the format select drop down menu to select the card
format.
b. Double click the Search for eld.
c. Present the card to the reader.
d. After a few seconds the Find User window will close and the Users window will show the selected User.
6. If searching for an iButton using a Reader:
a. Double click the Search for eld.
b. Present the iButton to the reader.
c. After a few seconds the Find User window will close and the Users window will show the selected User.
Users
Schlage • Schlage Express Soware Manual • 57
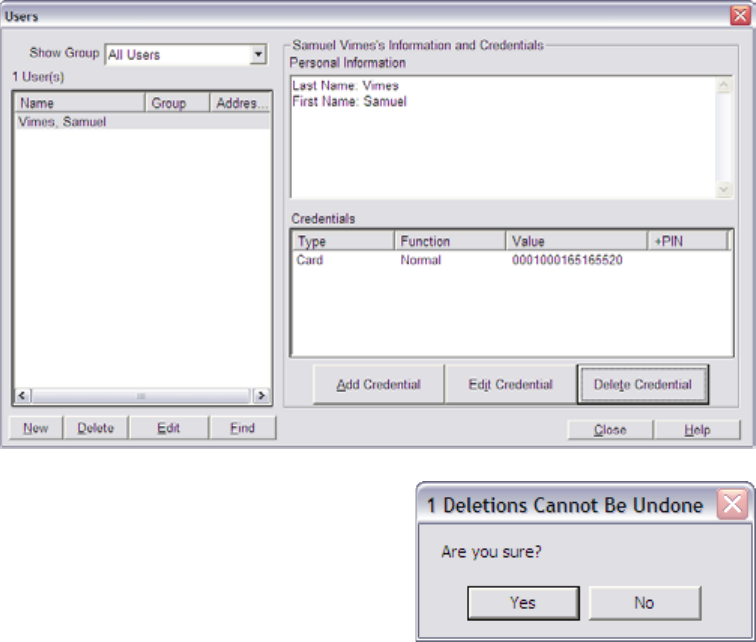
Deleting a User
Delete a user to remove old records.
1. Click Users in the Main
Window
2. Select one user in the left pane and click Delete:
Î NOTE: When you delete a user assigned to a credential, you will be
prompted to delete the credential. See Credentials on page 85 for more
information.
3. Click Yes to conrm the deletion of the user.
4. Click Close to return to the Main Menu.

58 • Schlage • Schlage Express Soware Manual
Users
Importing Users from Text File
The Text File Import option allows
a large number of users to be
added to the system at once by
importing a text (.txt) le
containing the User Information.
To access the Text File Import
option go to the main page and
click on Facility>Import>User
Import from Text File.
Import File Name: Shows the
name and location of the Import
File.
Browse: Click this button to
browse your computer for the
Import Text File. (Only .txt les
accepted)
File Contents Preview: This
window will show the contents of
the selected Text File. This allows
the operator to see the format of
the text le without having to open
the le in a separate window.
Layout Template: Use this drop
down menu to select a layout
template to use.
Column Delimiter: Use this to
select how the information in the
text le is separated.
Skip Lines at Beginning of File: Use this to select how many
lines, if any, should be skipped at the beginning of the text le.
This is used to skip any non-user information such as titles or
headings that do not need to be imported.
Auto Generate PIN: Select this option if you wish the system
to generate a PIN number for each user being imported.
Default Credential Function: Select the credential function
(Normal, Toggle, etc) for the imported Users. This setting will
be applied to all users being imported.
Import PIN as +PIN: If using the +PIN option, select this to
import any PIN numbers as a Credential +PIN option.
Column Labels: This section shows all the system options for
User information. This will automatically populate with all the
options available to a user in this system. Only the credential
types that have been selected in the Settings section will be
shown.
My Columns: This section shows the columns that are dened
by the Operator. See How to Import Users on page 59 for
more information.
Import Preview: This section shows a preview of how the user
information will be imported by the system, according to your
settings. See How to Import Users on page 59 for more
information.
Import: Click this to start the Import.
Save Layout: Click this to save the current layout to the
system. This layout can then be used later in the Layout
Template section.
Delete Layout: Click this to delete the current layout.
Close: Click this to close the Text File Import window. All
unsaved data will be lost.
Help: Click this to open the help le.

Users
Schlage • Schlage Express Soware Manual • 59
How to Import Users
To import a list of users into Schlage Express a text (.txt) le must rst be created with the user information. This le can have any
information that is found in the Users Denition section. Any additional information can be ignored. User information in the text le
can be delineated by a space, a tab, a colon, semi-colon, or any other Operator dened ASCII character (not including any
alphanumeric values or the apostrophe).
In the example below a text le with information delineated by tab is being used.
To import a text file:
1. On the Main page of Schlage Express go to Facility>Import>User
Import from Text File. The Select File to Import window will open.
2. Click the Browse button to open the Select File Import window.
3. Navigate to the text le and click Open.
4. The Select File window will close and the text le will be previewed in
the File Contents Preview section.
5. OPTIONAL: At this point if a Layout Template has been created it can
be selected using the Layout Template drop down box. A Layout
Template will set all the other options (Column Delimiter, Skip Lines,
Auto Generate PIN, Column Order, etc.) in the Text Import File utility.
Layout Templates can save time and
should be considered if a lot of importing
from dierent .txt les, all with the same
layout, is being done.
Î In this example a layout template will
not be used so the [None] option will
be selected.
6. Use the Column Delimiter drop down to
select how the information is delimited in
the text le.
Î In this example the information is delimited with a Tab so the [Tab] option will be selected.
7. Use the Skip Lines at Beginning of File drop down to select how many lines, if any, need to be skipped at the top of the text
le.
Î In this example there are no lines that need to be skipped so the 0 option will be selected.
8. Use the Auto generate PIN drop down if you wish the system to assign a PIN number to each user being imported. Select how
many digits the PIN will have.
Î In this example we are not using PIN numbers so the 0 option will be selected.
9. Use the Default Credential Function drop down to assign a specic Credential Function (Normal, Toggle, One Time Use, etc.)
for all the users being imported.
Î In this example we are assigning Normal function to all users so the Normal option will be selected.
10. Click the Import PIN as +PIN if you wish any PIN numbers being imported to be part of a Credential +PIN setup.
Î In this example we are not using the +PIN option so this option will remain unchecked.

60 • Schlage • Schlage Express Soware Manual
Users
11. Now the Column order must be dened in the system. Look at either the File Contents Preview section or at the original text
le to see what order the information is given.
Î In the example we’re using the information is given in the order of First Name, Last Name, Card, Activation Date and
Expiration Date.
12. Go to the Column Labels section
and select the rst column of
information. Select that column
and click on the button. The
selected column will now
populate the My Columns eld
(and be removed from the
Column Labels eld) and the
Import Preview section will show
the rst column information.
Î In the example we’re using
the rst column is First
Name.
13. Repeat the above step for each
column in use.
Î For our example we get the
following results:
14. OPTIONAL: If you wish to use this Import Layout again, click Save
Layout to save it. The Layout Name window will open.
a. Enter the name of the Layout in the eld provided.
b. Click OK. The Layout Name window will close and the layout will be
saved.
15. To Import the le click Import. The Importing Users window will open and
then close once the import is complete. The imported users can now be
viewed in the User section of Schlage Express.
Î Note: If there are any errors in the import process an Error window will open and the les will not be imported.
Schlage • Schlage Express Soware Manual • 61
Credentials
Credentials are used to gain access to a door. Credentials can be PINs, Card (Mag, Prox or Smart), iButton or an RSI Hand
reader.
Credential Types
PIN: This is the only logical credential available. A PIN is
simply a sequence of numbers and does not require a device.
A PIN is easy to create, has no expense associated with it, but
is not very secure. PIN is an acronym for Personal
Identication Number.
iButton: An iButton is a microchip in a battery case. Each chip
has a unique serial number that is used for identication.
iButtons are very durable, moderately priced and secure.
iButtons can be combined with PINs when the associated
hardware provides this feature.
Card (Mag or Prox): Mag Card - Mag Card is a short term for
magnetic stripe card. Mag Cards are low cost and secure, but
are susceptible to magnetic elds.
Prox Card: Prox Card is short for Proximity Card. Prox cards
are also available as fobs. Prox cards are more expensive than
mag cards but usually perform better, are not susceptible to
magnetic elds and are just as secure.
Smart Cards: These cards are the most secure form of
credential because they have 2-way communication between
card and reader. They operate at the 13.56 MHz frequency.
Some examples of these cards include Mifare Classic, Mifare
Desre EV1, and PIV cards.
RSI Hand: An RSI Hand is the only biometric credential
available. Hands are always combined with a PIN. The PIN
can be encoded on a card (mag or prox). Hands have the
highest available security level at no incremental cost.
Credential Functions
Normal: A normal credential opens a door for a specied time.
The time span is dened by the relock delay. The normal
function works on all devices.
Toggle: A toggle credential opens a door and leaves it open
until it is closed again by a toggle credential. It toggles a door
between locked and unlocked.
Freeze: A freeze credential disables the credential reader. After
a freeze credential has been used on a lock, only a pass
through credential will operate the lock. Present a freeze
credential to return the lock to an operational state.
One Time Use: A onetime use credential opens a door only
once with the normal function. Once a onetime use credential
has been used on a door, it will no longer work on that door. It
can still work on other doors, to which is has been assigned.
Dogged: Dogged is a credential functions that keeps the push
pad pushed in and the door unlocked only on electronic
dogging bars. A dogged credential works as a normal
credential on all other devices.
Pass Through: A pass through credential will always unlock a
lock that is in secured lockout mode, regardless of how the
lock was put in secured lockout mode.
Delete with Audit/Alarm: A delete with audit/alarm credential
will log an audit entry that the credential was used. However,
the credential will NOT unlock the door. If an alarm is available
on the lock, then the alarm will sound.
CT Aux: A CT Aux credential operates the auxiliary relay of a
CT Controller, but not the main relay. The time span the relay
is activated is specied by the relock delay.
CT main and Aux: A CT Main and Aux credential operates
both the auxiliary relay and main relay of a CT controller. The
time span the relays are activated is specied by the relock
delay.
FIPS Compatible
Card + PIN is FIPS Compatible.
Card only or PIN only is not FIPS Compatible.
If you want to use card only or PIN only, you must change the FMK reader on the AD-201 to the MTK reader and change the class
of the AD-series lock to AD-200 instead of AD-201. Both AD-200 and AD-201 are capable of reading PIV cards in several dierent
card formats.
Connect the MT20 Reader before continuing.

62 • Schlage • Schlage Express Soware Manual
Credentials
Adding a Credential
Î For FIPS compatibility, connect the MT20 Reader before continuing.
1. Click Users.
2. Click to highlight the name of the user to which you
want to add a credential.
3. Click Add Credential.
4. Select the type of credential you want to add from
the following:
PIN
a. Click the PIN radio button.
b. Click OK.
c. Enter a PIN number or click Generate to have the system generate a PIN.
d. Select the function from the Function drop-down box.
e. Click OK.
iButton
a. Click the iButton radio button.
b. Click OK.
c. Do one of the following:
Select an iButton from the stock list:
a. Click Yes in the Credentials Available window. If the Credentials Available window did not appear, then no iButtons
are available in the stock list. Proceed to the instructions for Add a new iButton below.
b. Click to highlight the number of the iButton you want to add OR click Find and touch the iButton you want to nd to
the iButton reader.
c. Click Select
Add a new iButton:
a. Click No in the Credentials Available window (if it is visible).
b. Click Read.
c. Touch the iButton you want to add to the iButton reader.
d. To add an optional +PIN, enter the +PIN in the (Optional) +PIN box, or click Generate to have the system generate a
+PIN.
e. Select the function from the Function drop-down box.
f. Click OK.
Card(s) (Mag, Prox, or Smart)
a. Click the Card(s) radio button.
b. Click OK.
c. Do one of the following:
Select a mag, prox, or smart card from the stock list:
a. Click Yes in the Credentials Available window. If the Credentials Available window did not appear, then no cards are
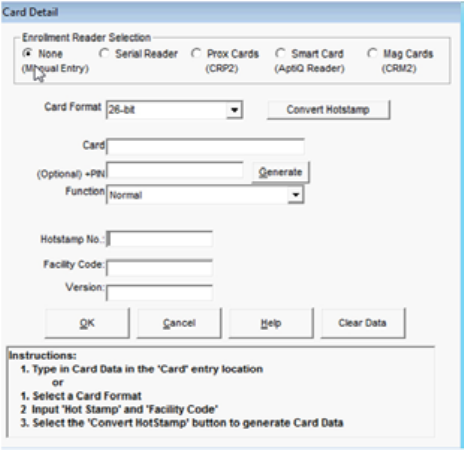
Credentials
Schlage • Schlage Express Soware Manual • 63
available in the stock list. Proceed to the instructions for Add a new Mag, Prox, or Smart Card below.
b. Click to highlight the number of the mag, prox, or smart card you want to add OR click Find and present the card you
want to nd to the mag, prox, or smart card reader.
c. Click Select
Add a new Card:
a. If using an Enrollment Reader to enter cards see See
Using an Enrollment Reader on page 64 for more
information..
b. No Enrollment Reader (Manual): Select “None” in the
Enrollment reader section and follow the instructions in
the box below, as shown in the example.
RSI Hand
a. Click the RSI Hand radio button.
b. Click OK.
c. Click Read.
d. Follow the prompts on the HandKey II screen. Once the user
is successfully enrolled, the HandKey Template box will
display Enrolled.
e. Do one of the following:
• Type the PIN number into the Card or PIN box.
• Click Read to have the system generate a PIN for you.
• Click Read to enter a Card and then present the card to
the card reader.
f. Select the function from the Function drop-down box.
g. Select the menu access level from the Menu Access drop-down box - Consult the HandKey II User Manual for more
information.
h. Select the reject threshold from the Reject Threshold drop-down box - Consult the HandKey II User Manual for more
information.
i. Click OK.
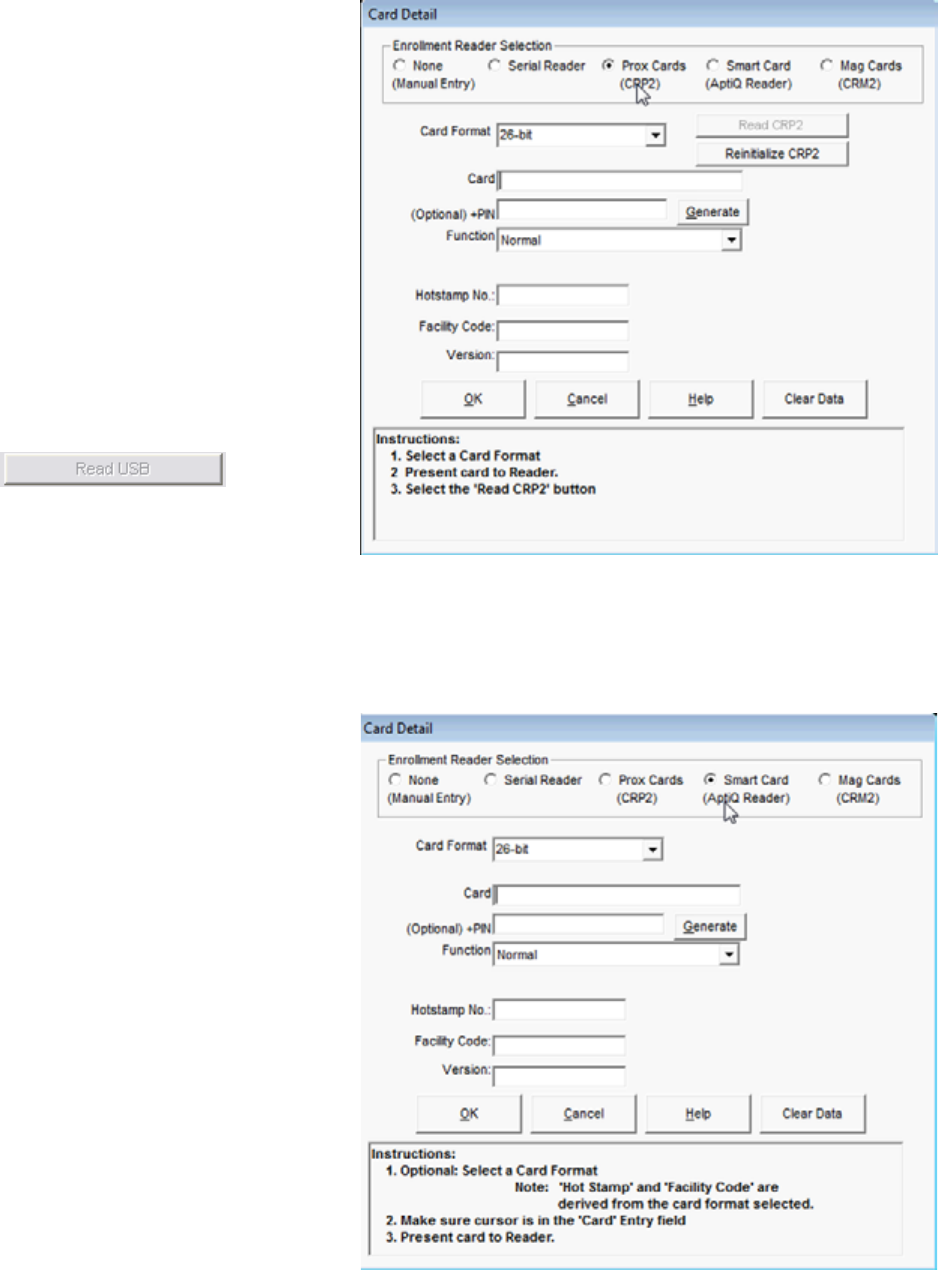
64 • Schlage • Schlage Express Soware Manual
Credentials
Using an Enrollment Reader
After creating a cardholder, you can pre-populate the
credential information using an enrollment reader.
Schlage Express supports the CRM-2 Magnetic Stripe
Enrollment Reader, the CRP-2 Proximity Enrollment
Reader, and the APTIQ SMART Card Enrollment
Reader.
Using CRP-2 Proximity Enrollment Reader:
1. Connect your CRP-2 to your USB port and launch
the Card Detail Window by clicking on the Add
Credential button in the Users Window.
2. If you are already in the Card Detail window when
you connect your enrollment reader, you may need
to click the Reinitialize pcProx button.
3. You will know that Schlage Express has successfully
connected to the enrollment reader as the Read
USB button will be enabled. If Schlage Express
cannot nd the enrollment reader, the Read USB
button will be disabled:
Î Note: Before you read a card you will need to
know how many bits and what format card you
have.
4. Select the correct card format from the Card Format drop down menu and present your card to the enrollment reader. The
reader will beep and the LED will turn green for 10 seconds.
Î Note: During the 10 second period in which the LED is green if a card is presented it will reset the 10 second timer. The
LED must turn red before a new card can be presented.
5. While the LED is green, click the Read USB button and you will see the card data elds populate.
6. Click OK.
7. Repeat the steps above for each additional prox
card.
Using SMART Card Enrollment Reader:
1. Connect your SMART Card Enrollment Reader to
your USB port and launch the Card Detail Window
by clicking on the Add Credential button in the Users
Window.
2. Select the card format from the Card Format drop
down menu.
3. Place your cursor in the Card(s) eld.
4. Present your card to the enrollment reader. The
reader will beep and the card information will
populate the Card(s) eld.
5. Click OK.
6. Repeat the steps above for each additional 75-bit
PIV card.

Credentials
Schlage • Schlage Express Soware Manual • 65
Using the CRM-2 Magnetic Stripe Enrollment Reader:
1. Connect your CRM-2 to your USB port and launch
the Card Detail Window by clicking on the Add
Credential button in the Users Window.
2. Place your cursor in the Card(s) (Mag or Prox) eld.
3. Swipe the card in the enrollment reader. You will see
your card data populate the Card(s) (Mag or Prox)
eld as in the example below.
4. Click OK.
5. Repeat the steps above for each additional
magstripe card.
Deleting a Credential
Delete a credential record from the facility
when a credential is lost or destroyed.
1. Click Users in the Main Window.
2. Select the user in the left pane, select
the credential in the lower right
Credentials pane, then click Delete
Credential.
3. Click Yes to conrm deleting the
credential.
4. Select an appropriate option and click
OK:
5. Select Return to Stock if SCHLAGE
EXPRESS is used to keep track of all
unused Credentials.
6. Select Trashed/Damaged if a
credential is destroyed and you have
possession of it.
7. Select Lost for credentials that cannot be found.
Î NOTE: Selecting “Trashed/Damaged” or “Lost” removes the credential
from the database.
Î After deleting a credential, you must transfer the updated information to the
lock. See Programming a Lock on page 107 for more information.
Schlage • Schlage Express Soware Manual • 67
Doors
Door is the generic term for any opening that can be secured with a locking device. A door can be a regular internal or external
entrance or exit, a sliding door, a cabinet etc. “Door” is also used as a synonym for “locking device” or “lock”.
The Doors Window
The Doors window is used to add, edit and delete doors. It is also used to assign and remove AutoUnlocks and Holidays, and to
copy SmarTime functions from one door to another.
Open the Doors Window
Click the Doors button on the main menu to open the users
window.
Sort Doors
Click any heading to sort doors by that heading.
View Door Information
Click on any door title to view the information for that door.
Add a Door
1. Click Doors.
2. Click New.
3. Enter the name for the door in the Name box.
4. The door name cannot contain the tab or the pound (#) character. If you are using a SNAP programmer to program the doors
in your facility, the name of the door must be between one (1) and eight (8) characters.
5. Enter any (optional) notes in the Notes box.
6. Select the type of door (lock) from the Type box. Follow the directions below for the chosen lock type:
CO-200/CO-220/AD-200/AD-201/CT5000
1. Click the Use First Person In For AutoUnlock Schedules check box to enable/disable the Use First Person In feature.
2. Click to select/deselect the check box(es) next to each credential type that can be used on this lock.
Î Credentials available in this section depend on settings selected in the Credentials and Devices section of Program
Settings.
3. Assign AutoUnlocks to the door, if desired.
Î AutoUnlocks can be assigned to a door at any time.
4. Assign holidays to the door, if desired.
Î Holidays can be assigned to a door at any time.
CM/BE367 Lock
1. Click the Use First Person In For AutoUnlock Schedules check box to enable/disable the Use First Person In feature.
2. Click to select/deselect the check box(es) next to each credential type that can be used on this lock.
Î Credentials available in this section depend on settings selected in the Credentials and Devices section of Program
Settings.
3. Assign AutoUnlocks to the door, if desired.
Î AutoUnlocks can be assigned to a door at any time.
4. Assign holidays to the door, if desired.
Î Holidays can be assigned to a door at any time.
68 • Schlage • Schlage Express Soware Manual
Doors
HandKey II
1. Enter the reader address into the Reader Address box.
Î The address must be between 0 and 254. The address 170 is reserved and cannot be used. See the HandKey II
documentation for information on locating the reader address.
2. Select the connection type from the Connection Type box.
Î Check with your system administrator or see the HandKey II documentation for information on determining the connection
type.
3. Enter the IP address into the TCP/IP Address box or select the serial port from the Serial Port drop-down box
Î Check with your system administrator or see the HandKey II documentation for information on determining the IP address
or serial port.
4. Click Test Connection.
5. If the Connection Successful box appears, click OK. All options were congured correctly and the reader and the system are
communicating properly.
6. If the No Reader Found box appears, click OK and go back to step 6 and check all options. The reader cannot be located
using the settings provided.
7. Click Congure Setup to congure the reader setup.
8. Assign AutoUnlocks to the door, if desired.
Î AutoUnlocks can be assigned to a door at any time.
9. Assign holidays to the door, if desired.
Î Holidays can be assigned to a door at any time.
Mechanical
The Mechanical Lock Properties information is completely optional. The Schlage SCHLAGE EXPRESS Software does not utilize
this information in anyway. This screen is used to record the mechanical key management information for your facility for those
locks/doors that are not controlled electronically or to record the mechanical key override information of electronic lock with
mechanical key override capability. To complete this information, you will need to work directly with your facility locksmith.
If you are unsure whether you should enter mechanical key information into Schlage SCHLAGE EXPRESS software, contact
technical support.
1. To add lock properties, click Properties.
BE367 Deadbolt Lock
1. Click to select/deselect the Enable Lock & Leave check box to enable/disable the Lock & Leave feature.
Î The Lock & Leave Feature is a feature that applies only to BE367 Deadbolts. When Lock and Leave is enabled, the
deadbolt can be re-locked from the outside of the door for a short period of time. By default, the Lock and Leave feature is
disabled.
2. After the Device type has been chosen and set up:
a. Click Save.
b. Click Close to return to the main window.
Doors
Schlage • Schlage Express Soware Manual • 69
Configure HandKey II Setup
1. Click Doors.
2. Click to highlight the name of the HandKey II door you
want to edit in the list and then click Edit.
3. Click Congure Setup.
4. Choose one of the following:
5. Get Current Settings from the Reader
a. Click Get Settings From Reader.
b. The current settings will be displayed in each of the
elds in the window.
c. Click OK.
d. Click Close.
6. Change Settings in the Reader
a. Make changes to the desired elds.
b. Click Update Reader.
c. Click OK.
d. Click Close.
7. Click Save.
8. Click Close.
Hand Reader Setup Data
Reference Info
Reader Address: Displays the address of the current reader
as reference information. The entry in Reader Address cannot
be edited in this screen.
Operating Settings
Access Retries Before Lockout: Sets the number of failed
identication attempts allowed until a user is locked out of a
reader. The lockout is removed after a dierent user
successfully accesses the door. The range is 1: 250 and the
default is 3.
Default Reject Threshold: Sets the level required for a hand
template to match with the stored template. A read scoring
below this level is considered a good read; anything above is
rejected. Setting the level low results in a secure system, but
may increase the false rejection rate, which reduces the
convenience of use. This default level is used when the
individual reject threshold in the user record is set to zero,
otherwise the individual reject threshold overrides the default
setting regardless if it is higher or lower. The range is 30: 250
and the default is 100.
Output Mode: Lock Output Mode has two options:
• Lock sets the relay output to simply open or close.
• Card sets the relay output to send out a number sequence
that operates a Wiegand Control Module.
AUX Relay Time in Seconds: Number of seconds for which
the AUX output contact changes its state after an event caused
it to be activated. The range is 0: 2000 and the default is 5.
Re-lock Time in Seconds: Number of seconds for which the
door will stay unlocked after a successful identication. The
range is 0: 2000 and the default is 5.
Door Shunt in Seconds: Number of seconds between the end
of the relock delay time and the beginning of a “Door Propped
Open” alarm. The range is 0: 20000 and the default is 10.
Feedback
Beeper: When checked, the beeper will sound each time a
button is pressed on the reader. Default is checked.
12 Hour Display: When checked, the time on the reader is
displayed in the 12 hour AM / PM format. The default is
unchecked.
Valid Access Clears AUX: When checked, a successful user
identication will reset the AUX output. This can be used, for
example, to cancel a local alarm. The default is checked.
Print Valid Access Attempt: When checked, the reader will
print the “Valid Access” event message on a printer that has
been connected to the reader. This option will only function
when a printer is connected to the reader. The default is
checked.
Display System Status: When checked, the reader status will
be displayed instead of the time and date. This can be used as
a troubleshooting technique. The default is unchecked.
Reader Menu Passwords
Security: Security menu password. Range is: 0: 9999999999
Default is: 5
Enrollment: Enrollment menu password. Range is: 0:
9999999999 Default is: 4
Management: Management menu password. Range is: 0:
9999999999 Default is: 3
Setup: Setup menu password. Range is: 0: 9999999999
Default is: 2
Service: Service menu password. Range is: 0: 9999999999
Default is: 1
AUX Output On
Door Alarm: When checked, the AUX Output will be activated
when a door alarm occurs.
AUX In: When checked, the AUX Output will be activated when
a signal change occurs at the AUX Input.
Invalid Access: When checked, the AUX Output will be
activated when a when an invalid access event occurs.
Tamper: When checked, the AUX Output will be activated
when a when the tamper switch is activated.
Power Failure: When checked, the AUX Output will be
activated when a when a power failure occurs.

70 • Schlage • Schlage Express Soware Manual
Doors
Edit a Door
1. Click Doors.
2. Click to highlight the name of the door you want to edit.
3. Click Edit.
4. Make any necessary changes. Use the information in the Add a Door section as a reference.
5. Click Save.
Copy SmarTime Functions from Door to Door
A set of SmarTime functions (AutoUnlocks and Holidays) can be copied from one door to another door, or to many doors. This is
useful if you want all (or a large number of) the locks in your facility to have the same AutoUnlocks and Holidays. There are several
things to remember when copying SmarTime functions:
• SmarTime functions can only be copied to those doors that are capable of the selected SmarTime functions.
• If a door cannot manage the full number of the SmarTime functions that are being copied, then only the rst items in the list
will be copied.
• Holidays that are set as “Passage” or “Secured” will not be copied to doors that can only manage Holidays that are set to
“Secured Lockout”. If the door designated as the copy source has Holidays assigned that are set to “Secured Lockout”, then
only these Holidays will be copied.
Î NOTE: When SmarTime functions are copied from one door to another, all previously assigned SmarTime functions will be
lost.
1. Click Doors.
2. Click to highlight the name of the door from which
you want to copy SmarTime functions.
3. Click Copy SMT.
4. Click to select/deselect the check boxes next to the
type of SmarTime functions you want to copy.
5. Click to highlight the name(s) of the door(s) to which
you want to copy the SmarTime functions.
Î Multiple selections can be made by holding
down the Shift or Ctrl key on your keyboard.
6. Click Copy & Close.
Delete a Door
1. Click Doors.
2. Click to highlight the name of the door you want to delete. Multiple doors can be selected by holding down the Shift or Ctrl key
on your keyboard.
3. Click Delete.
4. Click Yes.
Î NOTE: Users will continue to have access to doors that have been deleted from the system until the lock is physically
removed from the door.

Schlage • Schlage Express Soware Manual • 71
Access Rights
The Access Rights section is used to assign
users access to specic doors. The Access
Rights section can not be opened until Users
have been added to the system with
credentials assigned, and Doors have been
set-up in the Doors section. See the Users,
Doors on page 93, and Credentials on
page 85 chapters for details.
View By User: Select this option to display
Users in the system. In this conguration
Doors will be added to Users.
View By Door: Select this option to display
Doors in the system. In this conguration
Users will be added to Doors.
Show Group: Use this drop-down to lter the
selection by Group. Default is All Users.
Hide Time Zone Denitions: Click this to
hide the Time Zone Denitions at the bottom
of the screen. Click again to show them.
Add: Click this to add access to the selected
User or Door.
Copy: Click this to copy access from the selected user (or door) to another user (or door).
Delete: Click this to delete access from the selected user (or door).
Save: Click this to save any changes made to access rights.
Cancel: Click this to cancel any changes that have not yet been saved.

72 • Schlage • Schlage Express Soware Manual
Access Rights
Assign Access Rights
Access rights can be assigned by User or by
Door.
To assign access to a user:
1. Click Access Rights in the Main Window.
2. Click on the View By User option in the
upper left corner of the screen. A list of
Users and Credentials will populate the left
table and Doors and time zones will
populate the right table.
3. Select the user in the upper left pane, then
click Add. The Select From List window will
open showing all eligible doors in the
system.
4. Select the door(s) that this user may open
and then click Add. For multiple selections,
hold the CTRL key while clicking
selections.
5. In the Access Rights window, click the
appropriate Time Zone for this user.
6. Click Save. The system saves the door and time zone assignments for the user.
7. Click Close to return to the Main Menu.
Î NOTE: For Access Right changes to take aect Program Files will need to be generated and uploaded to the locks. See
Generating Program Files on page 83 for more information.
To assign access to a door:
1. Click Access Rights in the Main Window.
2. Click on the View By Door option in the
upper left corner of the screen. A list of
Doors will populate the left table and a list
of users will populate the right table.
3. Select the door in the upper left pane, then
click Add. The Select From List window will
open showing all eligible users in the
system.
4. Select the user(s) that will have access to
this door and then click Add. For multiple
selections, hold the CTRL key while
clicking selections.
5. In the Access Rights window, click the
appropriate Time Zone for this user (you
may have to use the scroll to the far right to
see the time zone options).
6. Click Save. The system saves the door and
time zone assignments for the user.
7. Click Close to return to the Main Menu.
Î NOTE: For Access Right changes to take eect, Program Files will need to be generated and uploaded to the locks. See
Generating Program Files on page 83 for more information.

Access Rights
Schlage • Schlage Express Soware Manual • 73
Copy Access Rights
Access rights can be copied from one user to
another (or group of other) user(s) or from one
door to another (or group of other) door(s).
To copy access from one user to
another:
1. Click Access Rights in the Main Window.
2. Click on the View By User option in the
upper left corner of the screen. A list of
Users and Credentials will populate the left
table and Doors and time zones will
populate the right table.
3. Select the user whose access is going to
be copied, then click Copy. The Select the
Users window will open showing all users
in the system.
4. Select the user(s) that will have their
access rights updated. For multiple
selections, hold the CTRL key while
clicking selections. Click on Copy. The Conrm Copy window will open.
5. Click Yes. The window will close and the access rights of the selected user(s) will be updated.
Î Note: Access will only be copied to the users with the correct credentials. If a user does not have the correct credential
type an error message will open and the access will not be copied.
6. Click Close to return to the Main Menu.
Î NOTE: For Access Right changes to take aect Program Files will need to be generated and uploaded to the locks. See
Generating Program Files on page 83 for more information.
To copy access from one door to another:
1. Click Access Rights in the Main Window.
2. Click on the View By Door option in the
upper left corner of the screen. A list of
Doors will populate the left table and a list
of users will populate the right table.
3. Select the door whose access is going to
be copied, then click Copy. The Select the
Doors window will open showing all doors
in the system.
4. Select the door(s) that will have their
access rights updated. For multiple
selections, hold the CTRL key while
clicking selections. Click on Copy. The
Conrm Copy window will open.
5. Click Yes. The window will close and the
access rights of the selected door(s) will be
updated.
Î Note: Access will only be copied to
doors with the same credentials. If a
door does not use the same credential
type an error message will open and the access will not be copied.
6. Click Close to return to the Main Menu.
Î NOTE: For Access Right changes to take aect Program Files will need to be generated and uploaded to the locks. See
Generating Program Files on page 83 for more information.

Schlage • Schlage Express Soware Manual • 75
Generating Program Files
After you have assigned users, access rights, timezones and holidays to the doors in your facility, you must program the doors in
order to transfer the information. Each time a change is made to a user, door, access right, timezone or holiday, each door that is
aected by the change must be reprogrammed.
The process for generating program les for online and oine doors is slightly dierent.
Generate Program Files for Oine Doors
Be sure that your HHD is connect to the PC prior to generating program les.
1. Click Generate Program Files in Main Window.
Î NOTE: The Generate Program Files item ashes when doors require
programming, and indicates number of doors aected.
2. You can choose to show all
the doors in the system or
show only those that require
programming.
3. All doors that need to be
programmed will be selected
by default. Click the check box
next to any door you do not
want to program to deselect it.
4. Click Generate Program Files.
5. Oine doors are not
programmed at this point. You
still need to physically tour
each door. See Programming
a Lock on page 85 for more
information.
Generate Program Files for Online Doors
1. Click Generate Program Files in Main Window.
Î NOTE: The Generate Program Files item ashes when doors require
programming, and indicates number of doors aected.
2. You can choose to show all the doors in the system or show only those that
require programming.
3. All doors that need to be programmed will be selected by default. Click
the check box next to any door you do not want to program to deselect
it.
4. Click Program Networked Doors.
5. Online doors are automatically programmed once the program les
have been generated. You do not need to do anything else to program
the doors.

Schlage • Schlage Express Soware Manual • 77
Programming a Lock
Selecting a System Programming Device
1. Start the Schlage Express application as
before.
2. Go to Settings> Program Settings. The
Program Settings window will open.
3. Select the Programming tab.
4. If you will be using a SNAP Programmer,
select Locks will be programmed with SNAP
Programmer.
Î NOTE: The Snap Programmer has been
discontinued and replaced with the HHD.
5. If you will be using a HHD, select Locks will be
programmed with Pocket PC device.
6. Click Save and Close.

78 • Schlage • Schlage Express Soware Manual
Programming a Lock
Programming a Lock Using a HHD
To program a lock using the HHD you must rst:
1. Set up the doors in your system and create program les for those doors. See Generating Program Files on page 83 for
more information.
2. Couple the HHD to the Door you wish to program.
3. Program the Lock for the rst time. Follow the steps below for coupling and programming locks.
Coupling
1. Connect the HHD to
the lock.
2. Select Start on the
HHD.
3. Select Schlage Utility
Software (SUS) from
the program menu.
The SUS login screen
will open.
4. Select Manager from
the Log on drop down.
5. Enter password into
the password eld
(default is 123456)
6. Click Log On. The
main screen will open.
7. Start communication
between the HHD and
the lock (see specic
lock for details).
8. Click on Device
Options. The Device
Options screen will
open.
9. Put the lock in
coupling mode (see
specic lock for
details)
10. Click on Couple HHD
to Device option. Once
the lock has been
coupled to the HHD
you will not need to
repeat this step unless
you use a dierent
HHD.

Programming a Lock
Schlage • Schlage Express Soware Manual • 79
Programming
Before you can program a
lock with the HHD, you
must generate program
les and transfer them to
the HHD. See Generating
Program Files on page
83 for more information.
1. Bring the HHD and
either the USB cable
or the Serial Cable
with the CIP attached
to it, to the lock that
needs programming.
Do not plug the USB/
CIP into the lock at
this time.
2. Select Start on the
HHD.
3. Select Schlage Utility Software (SUS) from the program
menu. The SUS login screen will open.
4. Select Manager from the Log on drop down.
5. Enter password into the password eld (default is 123456)
6. Click Log On. The
main screen will open.
7. Connect the HHD to
the lock using the USB
or CIP cables.
8. Start communication
between the HHD and
the lock (see specic
locks for details)
.
9. Click on Device
Options. The Device
Options screen will
open.
10. Click on Program
Lock.
11. Select the Lock you
wish to program from
the list and Click OK.
12. Click Yes.
13. Click Ok. The lock is
now programmed.

80 • Schlage • Schlage Express Soware Manual
Programming a Lock
Updating Locks
Once the lock has been coupled and programmed you can update the lock easily.
1. Generate new program les if needed.
2. Download those les
to the HHD using
ActiveSync or
Windows Mobile
Device Center.
3. Connect the HHD to
the lock being
updated.
4. Connect the HHD to
the lock.
5. Select Start on the
HHD.
6. Select Schlage Utility
Software (SUS) from
the program menu.
The SUS login screen
will open.
7. Select Manager from
the Log on drop down.
8. Enter password into
the password eld
(default is 123456)
9. Click Log On. The
main screen will open.
10. Start communication between the HHD and the lock (see
specic locks for details).
11. When Auto Update is
enabled in the SUS,
as soon as the
communication starts,
the lock will
automatically:
• update lock’s
date/time
• collect audits
• update access
rights
Î Note: For Manual
Update or for
legacy locks
information refer
to the Schlage
Utility Software – User Guide.
Click Yes when message
pops up.
12. Click OK. The lock has
been updated.

Schlage • Schlage Express Soware Manual • 81
Appendix A:
Upgrading from Previous Versions of Schlage Express
It is possible to upgrade your system from a previous version of Schlage Express. Follow the directions below to upgrade your
system.
Î Note: Program Settings and other individual settings will not be backed up and will need to be re-entered into the new version
after upgrade.
1. Backup the database
a. The system is set, by default, to automatically
backup the database whenever the system is
closed. Make sure this feature is enabled. See
Settings on page 29 for more information.
b. Close the system to back up the database.
2. Copy the backed up database le to another
location or folder.
a. Open the location of the backup le.
b. Copy the le.
c. Paste the copied le into a new directory of
your choice.
3. Uninstall the current version of the Schlage Express
a. Open the Control Panel.
b. Open the Add or Remove Programs option.
c. Select Name from the Sort by drop down box.
d. Scroll down the list until you see Schlage
Express. Select it.
e. Click the Remove button. Schlage Express will
be uninstalled.
4. Delete the Schlage Express folder from Program
Files. (Because of the ProxXLator.exe program the
folder will need to be manually removed).
a. Go to My Computer.
b. Click on C:\
c. Click on Program Files.
d. Find and Select the Schlage Express folder.
e. Right Click and select Delete from the drop down options. The Conrm Folder Delete window will open.
f. Click OK. The folder will be deleted.
5. Install this version (4.2) of Schlage Express. See Installing/Starting Schlage Express on page 19 for more information.
6. Restore the back up the previous version.
a. Sign into Schlage Express.
b. Go to Facility>Restore Backup.
c. Click Yes. The Select Facility to Restore window will open.
d. Navigate to the database that was backed up from the previous version and select the backup le.
e. Click Open. The Existing Facility File Found window will open.
f. Click OK.
The old Database has been attached to the new version of Schlage Express and your upgrade is complete.

Schlage • Schlage Express Soware Manual • 83
Appendix B: ProxXLator
Overview
The ProxXLator application is included with Schlage Express to help the user with deriving proximity card data. The Data Input
section allows the user to derive the proximity card raw data from the card’s Hotstamp, Facility Code and Version number. The
Split Data section allows the user to extract Bit Data along with Hotstamp, Facility Code and Version information using known card
formats.
To open the ProxXLator application, do one of the following:
• Double Click on the ProxXLator shortcut icon that was installed during the Schlage Express installation
• Go to Start Menu>All Programs>Schlage>Launch ProxXLator.exe
Data Input
The Data Input window of the ProxXLator
application opens automatically when the
application is started. It can also be accessed by
clicking on the Data Input tab at the top of the
window.
Hotstamp No Field: This is where the Hotstamp of
the proximity credential will be entered.
Facility Code Field: This is where the Facility
Code of the proximity credential will be entered.
Version Field: This is where the Version number
(if applicable) of the proximity credential will be
entered.
Convert button: Clicking this button converts the
information in the above elds and displays that
information Prox Data eld.
Prox Data Field: This eld shows the converted
proximity data once the above elds have been
entered and the Convert button has been clicked.
Copy Button: This button is used to add the information in the Prox Data eld to the clip board. The information can then be
pasted into Schlage Express.
Prox Card Format Section: Lists all the Card Formats that are supported by the ProxXLator application and allows the user to
select which format is in use.

84 • Schlage • Schlage Express Soware Manual
Appendix B: ProxXLator
Using Data Input
To use the Data Input application to derive the Prox Data from a proximity card, follow the instructions below:
1. Open the ProxXLator application.
2. Click on the Data Input tab if not already
selected.
3. Select the card format from the Prox Card
Format list.
4. Enter the hotstamp number of the card in the
Hotstamp No. eld.
5. Enter the facility code in the Facility Code
eld.
6. Enter the version number (if any) in the
Version eld.
7. Click the Convert button. The converted
proximity card data will display in the Prox
Data eld.
8. To copy the proximity card data to the
clipboard click on the copy button . The
proximity card data can now be pasted into
Schlage Express or another application.

Appendix B: ProxXLator
Schlage • Schlage Express Soware Manual • 85
Split Data
The Split Data window of the ProxXLator
application is accessed by clicking on the
Split Data tab at the top of the window.
Card Data: This eld displays the raw card
data of the proximity credential. The data
can be manually entered into this eld or
populated by an enrollment reader.
Bit Data: This eld displays the bit data of
the proximity credential.
Hotstamp No.: These elds display the
converted Hotstamp information of the
credential. The card format of the
credential will determine which elds will
populate. Multiple elds will populate if the
data lends itself to multiple formats.
Facility Code: These elds display the
converted Facility Code information of the
credential. The card format of the
credential will determine which elds will populate. Multiple elds will populate if the data lends itself to multiple formats.
Version: This eld will display the version information for the Proxif format only.
Split Data: Clicking this button converts the information from the Card Data eld into the other elds.
Com Port: If reading credential information from a lock or serial reader, use this drop down to specify which port it is connected to.
Read From Lock: If reading credential information from a lock, present the card to the lock and then click this button, the card
information will populate the Card Data eld.
Read from USB: If reading credential information from a USB reader, present the card to the reader and then click this button. The
information will populate the Card Data eld.
Reinitialize USB: If the USB reader is connected to the computer after the ProxXLator application has been started, click this
button to enable the USB reader.

86 • Schlage • Schlage Express Soware Manual
Appendix B: ProxXLator
Using Split Data
To use the Split Data application to derive
the hotstamp, facility code and version
number from a proximity card, follow the
instructions below:
1. Open the ProxXLator application.
2. Click on the Split Data tab.
3. Manually entering data:
a. Enter the proximity card data into
the Card Data eld.
b. Click on the Split Data button. The
bit data of the card will populate
the Bit Data eld and any
converted data will populate the
Hotstamp, Facility Code, and
Version elds under the
applicable card formats.
c. Repeat steps a and b for any
additional cards.
4. Entering data using a Lock or Serial Reader:
a. Connect the lock to the computer.
b. Select the com port of the lock using the Com Port drop down.
c. Present the card to the lock to be read.
d. Click the Read from Lock button. The proximity card data will populate the Card Data eld.
e. Click on the Split Data button. The bit data of the card will populate the Bit Data eld and any converted data will populate
the Hotstamp, Facility Code, and Version elds under the applicable card formats.
f. Repeat steps c through e for any additional cards.
5. Entering data using a USB Reader:
a. Connect the reader to the
computer.
b. Click the Reinitialize USB button.
c. Present the card to the reader to
be read.
d. Click the Read from USB button.
The proximity card data will
populate the Card Data eld.
e. Click on the Split Data button. The
bit data of the card will populate
the Bit Data eld and any
converted data will populate the
Hotstamp, Facility Code, and
Version elds under the applicable
card formats.
f. Repeat steps c through e for any
additional cards.
Schlage • Schlage Express Soware Manual • 87
Index
A
Access Rights
Assign 72
Copy 73
AD 200 6
AD 201 6
Add
AutoUnlock 50
Card 39
Credential 62
Door 67
Door AutoUnlock 50
Door Holiday 52
Holiday 52
User 55
User Time Zone 49
Adding
System Operators 21
Assign
Access Rights 72
Programming iButton 22
Audit 27
Change the Maximum Quantity of
Saved 27
Purge 28
Save 44
Save Purged 28
View 45
Auto Card Replacement 36
AutoUnlock
Add 50
Delete 51
Edit 51
B
Backup 6, 33
Change Folder Path 33
Disable Prompt 34
Enable Prompt 34
BE367 6, 22
C
Card
Find 40
Lost 42
Cards
Stock List 39
Change
Backup Folder Path 33
CIP 6
CM993 6
CO-200 6
CO-220 6
Components
System 6
Connecting
HHD 10
Connection
Hardware 7
Copy
Access Rights 73
SmarTime Functions 70
Coupling 78
Creating
Facility 19
Credential 23
Add 62
Delete 65
Functions 61
Setting 19
Specifying 23
Types 61
User 6
Credential Default Activation
Disable 32
Enable 32
CRM-2 65
CRP-2 64
CT1000 6
CT5000 6
D
Daylight Savings Time 31
Delete
AutoUnlock 51
Credential 65
Door 70
Door AutoUnlock 51
Door Holiday 53
Holiday 53
Report 48
Time Zone 50
User 57
Devices 23
Specifying 23
Disable
Backup Prompt 34
Credential Default Activation 32
Expiration Date 32
First Person In 31
Stock List 26
Warning Messages 26
Door
Add 67
Delete 70
Edit 70
Sort 67
View 67
Door AutoUnlock
Add 50
Delete 51
Edit 51
Door Holiday
Add 52
Delete 53
Edit 53
Duplicate
PIN 24
88 • Schlage • Schlage Express Soware Manual
Index
E
Edit
AutoUnlock 51
Door 70
Door AutoUnlock 51
Door Holiday 53
Holiday 53
Mag Card Template 35
User 55
User Time Zone 49
Enable
Backup Prompt 34
Credential Default Activation 32
Expiration Date 32
First Person In 31
Stock List 26
Warning Messages 26
Enrollment Reader 64
CRM-2 65
CRP-2 64
Magnetic Stripe 65
SMART Card 64
Event List
Print 44
Save 44
Expiration Date
Disable 32
Enable 32
F
Facility
Backup Location 20
Creating 19
Find
iButton 37
Synchronization Folder 10
User 56
FIPS 6, 37, 39, 40, 42, 61, 62
First Person In
Disable 31
Enable 31
G
Generate
Program Files 75
H
HandKey II
Setup 69
Hardware
Connection 7
HHD 6
Connecting 10
Programming 78
Setup 9
HH-SERIAL Cable 6
HH-USB Cable 6
Holiday
Add 52
Delete 53
Edit 53
I
iButton
Find 37
Lost 38
Stock List 37
Trash 38
Import
User 58
Installing
Windows Mobile Device Center 9
K
KC2 22
KC2 5000 6
KC2 9000 6
L
Locking Device 5
Locks
Update 80
Lost
Card 42
iButton 38
M
Mag Card Template 35
Edit 35
Magnetic Stripe 65
Manager Accounts 34
Monitoring
Start 43
Stop 43
O
Oine Doors
Program Files 75
Online Doors
Program Files 75
Operator Settings 34
P
PIN
Default Length 24
Duplicate 24
How Number of Buttons Aects 24
Preferences 25
Print
Event List 44
Program
Settings 23
Program Files
Generate 75
Oine Doors 75
Online Doors 75
Programmer Accounts 34
Programming 29, 79
Using HHD 78
Programming Device
Select 77
Programming iButton
Assigning 22
ProxXLator 83
Purge
Audits 28
Index
Schlage • Schlage Express Soware Manual • 89
R
Report
Delete 48
View 47, 48
S
Save
Audit Events 44
Event List 44
Select
Programming Device 77
Setting
Credentials 19
Facility Backup Location 20
Synchronization Folder 20
Settings
Program 23
Setup
HandKey II 69
HHD 9
SMART Card 64
SmarTime 49
Functions 70
SMT 49
Sort
Door 67
Specifying
Credentials and Devices 23
Devices 23
Start
Monitoring 43
Stock List
Add Card 39
Cards 39
Disable 26
Enable 26
Find Card 40
iButtons 37
Trash Card 42
Stop
Monitoring 43
Synchronization Folder
Changing the Path 10
Find 10
Setting 20
System
Components 6
System Operators
Adding 21
T
Technical Support 5
Time Defaults 30
Time Zone
Delete 50
Trash
Card 42
iButton 38
U
Update
Locks 80
Upgrading 81
User
Add 55
Credentials 6
Delete 57
Edit 55
Find 56
Import 58
User Time Zone
Add 49
Edit 49
V
View
Audit 45
Door 67
Report 48
Reports 47
W
Warning Messages
Disable 26
Enable 26
Windows Mobile Device Center
Installing 9

Allegion (NYSE: ALLE) creates peace of mind by pioneering safety and security. As
a $2 billion provider of security solutions for homes and businesses, Allegion
employs more than 7,800 people and sells products in more than 120 countries
across the world. Allegion comprises 23 global brands, including strategic brands
CISA
®
, Interex
®
, LCN
®
, Schlage
®
and Von Duprin
®
.
For more, visit www.allegion.com.
About Allegion
© 2019 Allegion
012249, Rev. 01/19
www.allegion.com/us
