
Overview
Smart List is a flexible component that allows you to build custom lists by using point and click configuration. It can handle Salesforce objects, files
and custom data sources such as web services.
The component works with any Salesforce object and can be deployed on Lightning home, app, record and community pages as well as screen
flows.
This allows you to get rid of most limitations of list views and related lists:
Capability
Smart List
OOB List
Highly Customizable Record Lists
Yes
Limited capability
Highly Customizable Tiles
Yes
No
Highly Customizable Files lists
Yes
No
Populate fields on file upload
Yes
No
Custom Actions
Complex logic on selected records
Yes
Limited capability
Custom actions on all objects
Yes
No
Records Filtering
Predefined filters
Yes
Limited capability
Visibility filters based on record ownership and role hierarchy
Yes
Limited capability
Records Search
Customizable search form
Yes
No
SOSL Search on related lists
Yes
No
Easy search on Record Type, Owner, and Related record
Yes
No
Data Source
Display data from external services or complex SOQL queries
Yes
No
Indirect Relationships such as display Contacts of the Account of a Case
Yes
Limited capability
Display records not shared with user
Yes
No
Available in Screen Flows
Yes
Limited capability

Like list views and related lists, Smart Lists allow sorting, filtering and navigation to record detail. They also offer additional filtering capabilities
with predefined and visibility filters based on record ownership and role hierarchy (My, My Team, My Subordinates and All)
Like Related Lists, Smart Lists can be displayed as Tiles with additional capabilities:
• Customizable Layout
• Customizable fields in Title
• Badge with Dynamic styling
• Sort
• Record selection
Sortable Columns
Hyperlinks with
navigation to
record detail
Visibility FiltersPredefined Filters
Sortable Fields
Badge with
Dynamic StylingCustomizable Title

Unlike list views and related lists, the Search Form can be customized for displaying the fields you want to expose in the order relevant to your
users.
It also allows you to easily search Owner, related records, and Record Type fields with lookups and picklists
SOSL Search on
Record or File Content
Search on Filterable
Fields
Lookup for searching
Owner and related
records
Picklist for searching
on record type

There are 3 types of Smart Lists:
• SOQL list for displaying and editing records from any Salesforce object
• Files list for managing files
• Apex Data Source for displaying data retrieved by an Apex class. This Apex class can be used for retrieving data with a Web Service or a
complex SOQL query not handled by the standard SOQL list
Smart Lists can be used for building child lists with 3 types of relationships:
• Direct Relationship: records of the list are retrieved based on the Id of the parent record
Actions for SOQL & Apex List Actions for Files List
Custom Record
Actions
Custom List
Actions for
Selected Records
Standard Actions
for creating,
updating and
deleting records
Custom List
Actions for
Selected Files
Custom Files
Actions
Standard Files
Actions
Standard Files
Actions
Standard Actions
for creating,
updating and
deleting records

• Indirect Relationship on Id: records of the list are retrieved based on id values stored present in both the parent record and the list records
• Indirect Relationship on Text Value: records of the list are retrieved based on text values present in both the parent record and the list
records
Contents
How to use this document ................................................................................................................................................................................................ 8
Upgrade from Previous Versions ....................................................................................................................................................................................... 9
Upgrade from Spring 23 ................................................................................................................................................................................................ 9
Upgrade from Summer 22 ............................................................................................................................................................................................. 9
Quick Start ....................................................................................................................................................................................................................... 10
Example 1: List of Cases of an Account with predefined filters, visibility filters and custom action ........................................................................... 10
Example 2: List of Files of an Account .......................................................................................................................................................................... 22
Example 3: Tiles of Leads ............................................................................................................................................................................................. 24
Guided Setup ................................................................................................................................................................................................................... 27
Step 1: Create a Smart List Definition .......................................................................................................................................................................... 27
Step 2: Create Smart List Fields ................................................................................................................................................................................... 33
Step 3 - Optional: Create Smart List Filters .................................................................................................................................................................. 36
Step 4 - Optional: Create Smart List Actions ................................................................................................................................................................ 36
Step 5 – Add the list to a target Page .......................................................................................................................................................................... 38
Lightning App Builder Page ..................................................................................................................................................................................... 38
Digital Experience Page ........................................................................................................................................................................................... 39
Screenflow ............................................................................................................................................................................................................... 41
Search Customization .................................................................................................................................................................................................. 43
Wrap Mode Customization .......................................................................................................................................................................................... 45
Sorting Customization ................................................................................................................................................................................................. 45
Files List Customization ............................................................................................................................................................................................... 46
Considerations for object, and field access ................................................................................................................................................................. 47
Considerations for standard record actions ................................................................................................................................................................ 47
External Object support ............................................................................................................................................................................................... 47
Features by List Type and Targets ............................................................................................................................................................................... 49
Apex Data Sources ........................................................................................................................................................................................................... 51
Apex Data Source for Record Detail Page .................................................................................................................................................................... 51
Apex Data Source for Home Page or Custom Tab ....................................................................................................................................................... 57
Pre-requisites for adding standard record actions to your list .................................................................................................................................... 62
Interface and Classes Reference .................................................................................................................................................................................. 63
smartLists.SmartListApexSourceInterface2 Interface ............................................................................................................................................. 63
smartLists.SmartListApexSourceGetPage Class ....................................................................................................................................................... 63
smartLists.SmartListController.FilterEntry Class ..................................................................................................................................................... 64
Localization ...................................................................................................................................................................................................................... 65

How to use this document
If you are upgrading from Summer 22 or Spring 23, make sure to implement the steps described in the Upgrade from Previous Versions section
Visit this Trailhead Group if you want to collaborate and get updates on Smart Lists
Go to the Quick Start section if you want to learn Smart Lists configuration by building 3 samples lists
Go to the Guided Setup section if you need a step-by-step setup guide for all the use cases supported by Smart Lists
Go to the Localization section if you need to localize your Smart Lists for supporting multiple languages
Examples of Apex Data Sources can be found in the Apex Data Sources section

Upgrade from Previous Versions
Upgrade from Spring 23
Because of a Salesforce limitation, page layouts are not always updated during a package upgrade. To make sure you are using the proper version
of the layouts, edit a Smart List Definition record and check if you can see the new field Display Mode.
If you cannot see it, assign Smart List Definition Layout 280 and Smart List Field Layout 280 to your profile
These new fields must be populated on your List Definition records:
• Display Mode must be set to ‘Table’
• Show SOSL Search must be set to ‘In Filters Panel’
Upgrade from Summer 22
These new fields must be populated on your Field Definition records:
• Display in Filters Panel
• Display Position in Filters Panel
• Sortable in List
Apex Data Source classes must be updated with the new format see Apex Data Source for Record Detail Page and Apex Data Source for Home Page
or Custom Tab

Quick Start
Learn Smart List configuration by configuring these 3 sample lists:
• List of Cases of an Account
• List of Files of an Account
• Tiles of Leads
Example 1: List of Cases of an Account with predefined filters, visibility filters and custom action
Step 1: Create the list
• Setup / Custom Metadata Type / Click Manage Records in front of Smart List Definition
• Click New
• Use the following screenshot for creating the list definition:
Notes:
• Data Source Type: SOQL with Sharing for displaying the records visible by the user; SOQL without Sharing for ignoring the records visibility
rules for the user
• Display Mode: Table for displaying the list as a table
• List Label is populated with ‘Sample Case List’. If you leave this field empty, the list label will be the plural label of the list SObject, ‘Cases’ for
this example
• Show SOSL Search: In Filters Panel for displaying the search box in the Filters Panel, In Component for displaying it above the list, Not
Displayed for removing the SOSL search
• SObject: Base object of the list
• Parent Id Field: Field of the base object containing the id of the parent record for list of child records. Not needed if the list has no parent
• Enable All Record Actions: Allow to create, edit, and delete records in the list. Actions are displayed if the user has the corresponding access
on the object. For example, if a user can create and edit records in the object but cannot delete them, the Delete action won’t be available.
• Visibility Filters fields: Check the filters you want to display in the list. Specify in Default Visibility Filter the filter that will be used when the
list is displayed for the first time

Step 2: Create the fields
• Setup / Custom Metadata Type / Click Manage Records in front of Smart List Field
• Use the following table for creating the fields:
Field
List Settings
Filters Settings
Table Settings
Field
Label
Field Name
Display
Type
Display
in List
Display
Position
in List
Sortable
in List
Default
Sort
Field
Display
in
Filters
Panel
Display
Position
in Filters
Panel
Lookup
in
Filters
Panel
Lookup
Subtitle
Field
Column
Width
Wrap
CaseNumber
Hyperlink
to Detail
Yes
0
Yes
FALSE
Yes
0
FALSE
FALSE
Subject
Yes
1
Yes
FALSE
Yes
3
FALSE
FALSE
Description
Yes
2
No
FALSE
No
FALSE
250
TRUE
Contact
Contact.Name
Hyperlink
to Detail
Yes
3
Yes
FALSE
Yes
2
TRUE
Title
FALSE
LastModifiedDate
Yes
4
Yes
TRUE
Yes
4
FALSE
FALSE
Status
Yes
5
Yes
FALSE
Yes
1
FALSE
FALSE
Owner
Yes
6
Yes
FALSE
Yes
5
TRUE
Title
FALSE
IsClosed
No
No
FALSE
No
FALSE
FALSE
Notes:
• CaseNumber: Display Type is Hyperlink to Detail because we want the field to be rendered as a hyperlink to Case Detail
• Description:
o displayed in the list but not in the Filters Panel (Display in Filters = No)
o its content will be wrapped on 3 lines if needed (Wrap = True; it is not sortable in the list (Sortable in List = No); the width of the
column is 250 pixels (the width of the other columns is determined by the system because Column Width is left blank)
• Status: is displayed in the list and in the Filters but not at the same position (Display Position in List = 5; Display Position in Filters = 1)
• Contact.Name:
o Field Label is Contact because we don’t want to use ‘Full Name’ which is the label defined at the object level
o Display Type is Hyperlink to Detail because we want the field to be rendered as a hyperlink to the Contact detail page
o Because Lookup in Filters Panel is checked and Lookup Subtitle Field which is set to Title, the field is searchable in the Filters Panel as
a lookup where users can search Contacts by Name and Subtitle
o If you want to search by Contact Name, uncheck Lookup in Filters
• Owner:
o Because the field name is Owner, the list determines that the name of the owner must be displayed in the list and the field is
searchable in Filters as a lookup where users can search the owner by name and by the field added in Lookup Subtitle Field which is
the Title of Users in this example
o If you want to search by Owner Name instead, set the field name to Owner.Name and uncheck Lookup in Filters Panel
• IsClosed: This field is not displayed in the list and the Filters Panel. It is added to the list because it is needed by a custom action of this
example

Step 3: Test your page
• Make sure, the Apex Class ‘smartLists.SmartListController’ is accessible by your user
• Display an account record
• Setup / Edit Page

• In the Component widget on the left, select the Smart List component in Custom – Managed (1)
• Drag the Smart List component on the page (2)
• In List Definition Name (3), select the name of the list you created
• Activate the page if needed and save it
• Test the list. Change the parameters of the list definition to see how they affect the list
1
2
3

Step 4: Create predefined list filters
• Setup / Custom Metadata Type / Click Manage Records in front of Smart List Filter
• Use the following table for creating the filters:
Filter Label
Default
Filter
SOQL Filter
Cases I Created This Year
FALSE
CreatedDate = THIS_YEAR AND CreatedById = USERID
Closed Cases
FALSE
IsClosed = true
Open Cases
TRUE
IsClosed = false
• Notes:
o Default Filter is used for specifying which filter is displayed when the list is displayed for the first time
o SOQL Filter must be a valid SOQL WHERE clause
o The Smart Lists variable USERID returns the Id of the running user
• Refresh the Account page to display the new filters
Step 5: Create a custom list action
• Create a new auto-launched flow
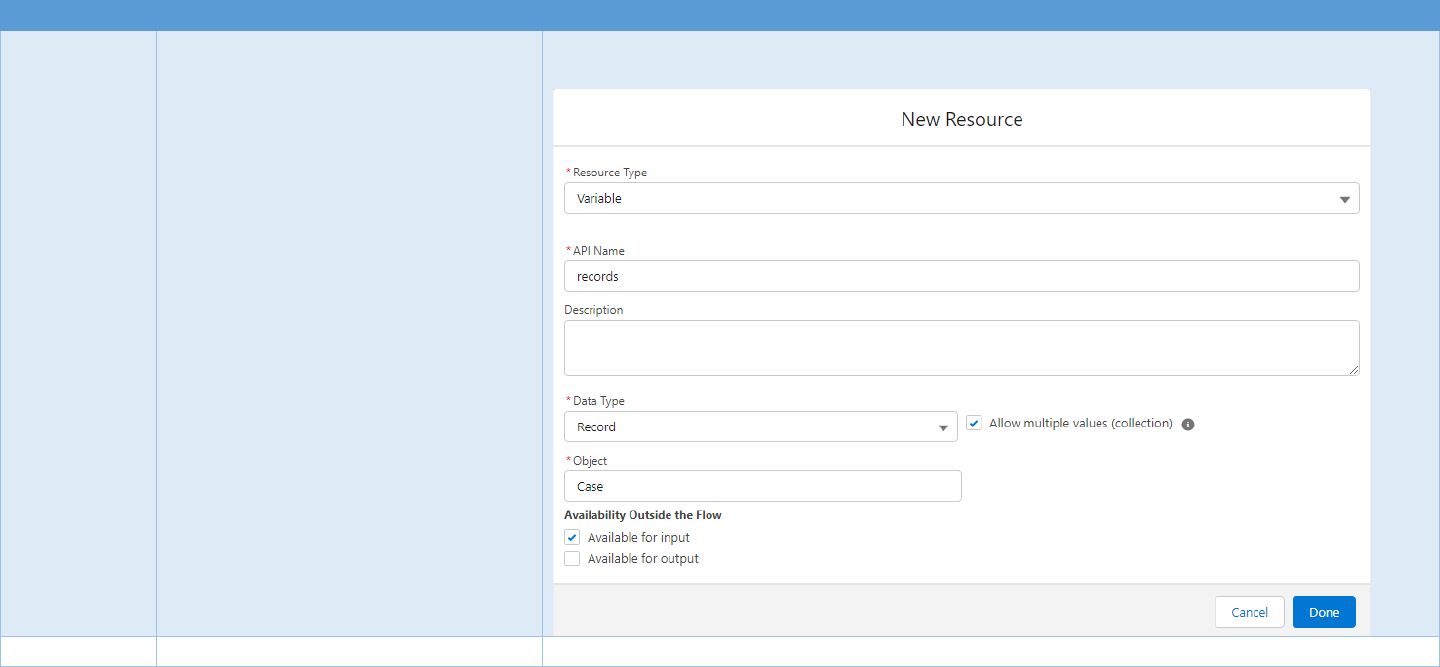
• Create the following flow variables:
Variable
Type
Description
records
Collection of records – Available for
input (Object = Case)
Contains a list of records passed to the flow. Each record includes the Id field as well all
the other fields defined in the list
successMsg
Text – Available for output
Message to display when the action is successful

errorMsg
Text – Available for output
Message to display when the action failed
cases
Collection of Records (Object = Case)
Collection for storing the cases updated by the flow
case
Record (Object = Case)
Case to update in the database
canSaveCases
Boolean
Flag for tracking if the cases can be closed. Default value: {!$GlobalConstant.True}

- Add the following elements to the flows:
Current Item from Loop Loop_Cases > Case Id

• Save the flow as ‘SLCases – Close Cases’ and activate it
• Create a List Action: Setup / Custom Metadata Type / Click Manage Records in front of Smart List Action
• Use the following table for creating the list and row action:
Action Label
Type
Display
Position
Refresh
After
Execution
Category
Flow Name
Close Case
Row Action
0
Row
Autolaunched Flow
SLCases_Close_Cases
Close Selected Cases
List Action
0
List
Autolaunched Flow
SLCases_Close_Cases
• Refresh the Account page to display the Actions
• Click the arrow on the right of a row to display the Row Actions and select the ‘Close Case’ menu item
• Select several records in the list by clicking the checkbox of the left column and click the ‘Close Selected Cases’ button
• Create a custom permission called ‘Can Close Case’ with API Name ‘Can_Close_Case’
• Assign the custom permission to your profile or permission set
• Edit the List Actions and put ‘Can_Close_Case’ in the Custom Permission field
• Refresh the Account page and check that your actions are visible
• Remove the custom permission from your profile or permission set
• Refresh the Account page and check your actions are no longer visible

Example 2: List of Files of an Account
Step 1: Create the list
• Setup / Custom Metadata Type / Click Manage Records in front of Smart List Definition
• Click New
• Use the following screenshot for creating the list definition:
Notes:
• Allowed Extensions is used for specifying the file extensions allowed for upload:
o If empty, no extension check is performed on upload
o If not empty, the extension check is performed for all users without the custom permission Don’t check file extension

Step 2: Create the fields
• Setup / Custom Metadata Type / Click Manage Records in front of Smart List Field
• Use the following table for creating the fields:
Field
List Settings
Filters Settings
Files Settings
Field Label
Field Name
Display
Type
Display
in List
Display
Position
in List
Sortable
in List
Default
Sort
Field
Display
in Filters
Panel
Display
Position
in Filters
Panel
Editable in File Edit Form
Title
File Preview
TRUE
0
Yes
FALSE
Yes
0
Editable and required
Description
TRUE
1
Yes
FALSE
Yes
1
Editable
SharingPrivacy
TRUE
2
Yes
FALSE
Yes
2
Editable and required
LastModifiedDate
TRUE
3
Yes
TRUE
Yes
3
Notes:
• Display Type is not needed for Files list except for adding a link to the file preview popup. This popup is not available in Digital Experience
sites
• The Editable in File Edit Form attribute is used for specifying which fields are included in the file edit form which is displayed when a file is
uploaded, or its detail is updated
Step 3: Assign the following permissions to your profile or permission set
Label
API Name
Description
Don't check file extension
SmartFilesList_Don_t_check_file_extension
Bypass the file extension check for Upload File and Upload New Version
actions
Download Files
SmartFilesList_Download_Files
Control access to File Download action
Edit File Details
SmartFilesList_Edit_File_Details
Control access to Edit File Details action
Preview Files
SmartFilesList_Preview_Files
Control access to Preview File action
Upload Files
SmartFilesList_Upload_Files
Control access to Upload File action
Upload New Version
SmartFilesList_Upload_New_Version
Control access to Upload New Version action
View File Details
SmartFilesList_View_File_Details
Control access to View File Details action
Step 4: Add a Smart Files List component to the Account Detail Page and select the name of the list you created in List Definition Name
Step 5: Test the component
Step 6: Add/Remove some of the above custom permissions and refresh the page to see how the list is affected
See Files List Customization for more details
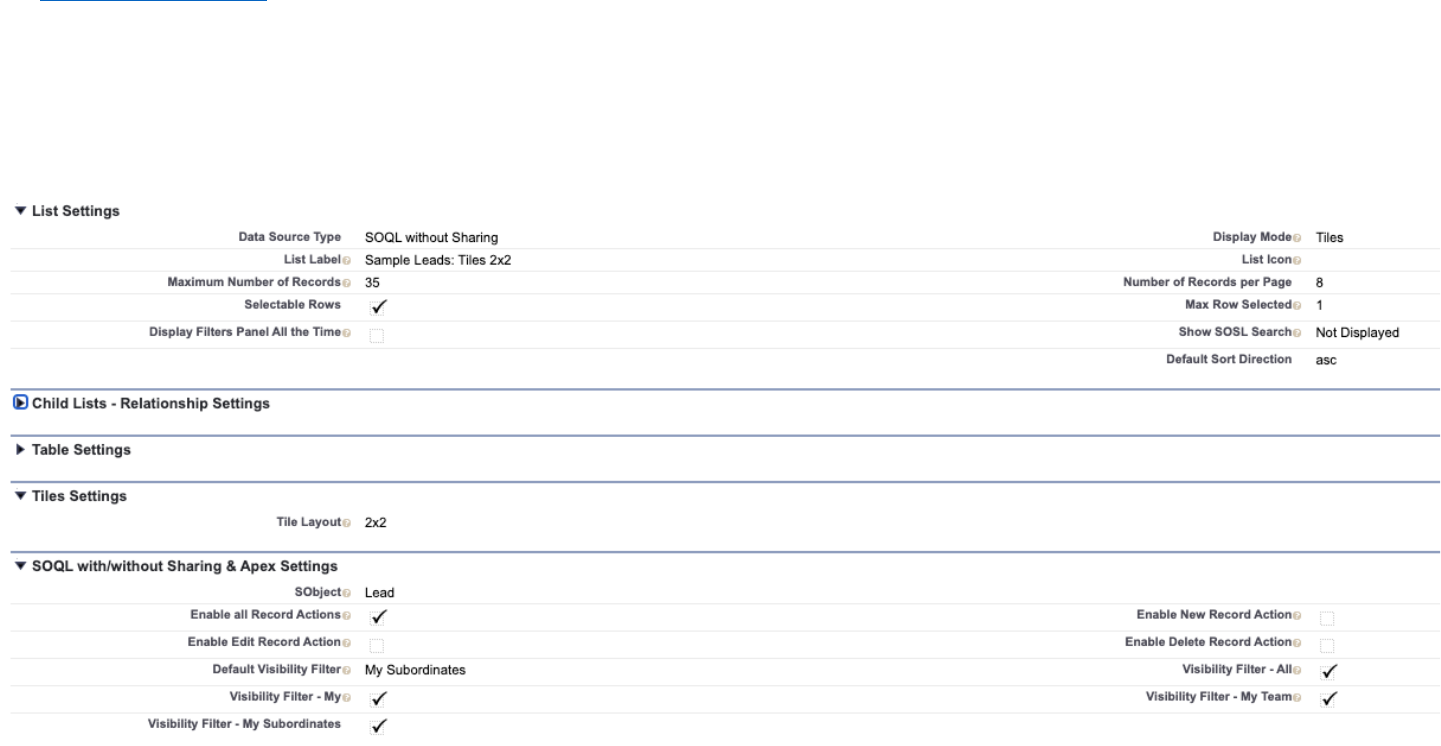
Example 3: Tiles of Leads
Step 1: Create the list
• Setup / Custom Metadata Type / Click Manage Records in front of Smart List Definition
• Click New
• Use the following screenshot for creating the list definition:
Note: Tile Layout is 2x2 because we want to display 2 tiles per row and 2 fields per tile

Step 2: Create a formula field on the Lead object for the dynamic styling of the tile badge
Field Label: Rating Badge Style
Field Name: Rating_Badge_Style__c
Data Type: Formula Text
Formula:
IF( ISPICKVAL(Rating, "Hot"),
"bc:#2e844a;tc:white", IF(
ISPICKVAL(Rating, "Warm"), "bc:#feca39;tc:black",
"bc:#2172d5;tc:white"))
bc: background color of the badge; must be be a valid CSS color such as white or RGB(128,128,128) or hex color
tc: color of the text if the badge; must be a valid CSS color such as white or RGB(128,128,128) or hex color
if an invalid style is returned by the formula field, the badge will be displayed with a blue background and a white text
Step 3: Create the fields
• Setup / Custom Metadata Type / Click Manage Records in front of Smart List Field
• Use the following table for creating the fields:
Field
List Settings
Filters Settings
Tiles Settings
Field Name
Display
Type
Display
in List
Display
Position
in List
Sortable
in List
Default
Sort
Field
Display
in
Filters
Display
Position
in Filters
Lookup
in
Filters
Panel
Lookup
Subtitle
Field
Display
in Tile
Header
Display
as
Badge
Badge Style
Field
Name
Hyperlink
to Detail
TRUE
0
Yes
TRUE
Yes
0
FALSE
TRUE
FALSE
Status
TRUE
1
Yes
FALSE
Yes
1
FALSE
TRUE
FALSE
Rating
TRUE
2
Yes
FALSE
Yes
2
FALSE
TRUE
TRUE
Rating_Badge_
Style__c
Owner
TRUE
3
Yes
FALSE
Yes
3
TRUE
Title
FALSE
FALSE
Phone
TRUE
4
Yes
FALSE
Yes
4
FALSE
FALSE
Email
TRUE
5
Yes
FALSE
Yes
5
FALSE
FALSE
RecordType
TRUE
6
Yes
FALSE
Yes
6
FALSE
FALSE
Notes:
• Name: This field is displayed in the Tile Header because Display in Tile Header is checked
• Status: This field is displayed after Name in the Tile Header because Display in Tile Header is checked and its Display Position in List is
greater
• Rating: This field is displayed in the Tile Header as a dynamically style badge based on the style returned by the formula field
Rating_Badge_Style__c
• RecordType:
o Because the field name is RecordType, the list determines that the name of the record type must be displayed in the list and the
field is searchable in Filters as a picklist containing all the active record type values
Step 4: Add a Smart List component to the Home Page and select the name of the list you created in List Definition Name
Step 5: Change the value of Tile Layout on the list definition and refresh the page to see how the layout of the Tiles is affected

Guided Setup
Step 1: Create a Smart List Definition
Smart List Definition Detail
• Enter unique values in Label & Smart List Definition Name
List Settings
This section contains the settings for all list types
• Data Source Type:
o SOQL with Sharing: display records of an object and enforce the records visibility rules of the running user
o SOQL without Sharing: display records of an object and bypass the records visibility rules of the running user
o Files: display files related to a parent record
o Apex Data Source: custom Apex Data Provider
• Display Mode: Table or Tile
• List Label
o Leave empty if you want to use the default value (Files lists or lists with SObject)
§ Default value for list with a SObject: plural label of the SObject. Example: Cases if SObject is set to Case
§ Default value for Files list: Files
o You can override the default label by entering a value or $Label.CustomLabelName if you want to use a translatable label. Example:
$Label.CasesLists for using a custom label named CaseLists
o You need to provide a value for Apex lists not associated to a SObject
• List Icon
o Leave empty if you want to use the default value (Files lists or lists with SObject)
§ Default value for list with a SObject associated to a tab: icon of the object
§ Default value for list with a SObject not associated to a tab (Campaign Member, Opportunity Product…): Salesforce default
icon. See below for setting your own icon
§ Default value for Files list: standard Files icon

o You can override the default icon by entering the name of a Salesforce icon: https://www.lightningdesignsystem.com/icons/
§ The icon name must respect the following syntax: name of the category in lower case + : + name of the icon. Example,
utility:bookmark for the bookmark icon of the Utility category
§ You need to provide a value for Apex lists not associated to a SObject
§ No icon is displayed is you provide an invalid value
• Records management
o Maximum Number of Records: maximum number records that can be displayed in a list
o Number of Records per Page: number of records retrieved when the user scrolls in the list; for tables, used for determining the
height of the list
• Row Selection
o Selectable Rows: checked if users can select rows in the list; required if you want to use list level action
o Max Row Selected: value greater than 0; radio buttons are displayed if 1 is entered, otherwise checkboxes are displayed
• Display Filters All the Time & Show SOSL Search: see Search Customization
• Default Sort Direction: see Sorting Customization
Child Lists - Relationship Settings
This section is used for configuring child lists (list of records related to a parent record). Examples: Cases of an Account or Files of an Account
3 types of relationships are available:
• Direct relationship: the id of the parent record is used for retrieving the child records displayed in the list:
o Parent Id Field: API name of the field containing the Id of the parent record on the list object. For example, AccountId for a list of
child Cases of a parent Account because Case.AccountId contains the value of the parent record. Only supported for SOQL & Apex
lists
• Indirect relationship on Id: an Id field of the parent record is used for retrieving the records of the list
o Parent Id Field: API name of the field containing the Id of the parent record on the list object. Only supported for SOQL & Apex lists
o Indirect Relationship: Parent Object: API name of the parent object. Example: Account for a list added to the case page
o Indirect Relationship: Parent Key Field: API name of the field of the parent object containing the id of the list records
Examples:
• List of Cases for an Account (list on an Account record page):
o Parent Id Field: AccountId (name of the Case field containing the Id of the parent Account)
• List of Files for an Account (deployed on an Account record page):
o Parent Id Field: not used
• List of Contacts related to the Account of a parent Case (list on a Case record page)
o Indirect Relationship: Parent Key Field: AccountId because Case.AccountId contains the Id of the Account related to the Case
o Parent Id Field: AccountId because Contact.AccountId contains the Id of the Account related to the Contact
• List of Contacts related to the department of a parent Case (deployed on a Case record page)
o A custom text field Department__c has been created on Case & Contact for storing the code of the department
o Indirect Relationship: Parent Key Field: Department__c because Case. Department__c contains the code of the department of the
Case
o Parent Id Field: Department__c because Contact. Department__c contains the code of the department of the Contact
o Using non Id fields for indirect relationships is only supported for SOQL and Apex lists but not for Files lists
• List of Files related to the Account of a parent Case (list on a Case record page)
o Indirect Relationship: Parent Key Field: AccountId because Case.AccountId contains the Id of the Account related to the Case
o Parent Id Field: not used

Table Settings
This section is used when Display Mode is set to ‘Table’ and contains the parameters of the table:
• Show Table Header: display the names of the columns in a table header
• Wrap Text Max Lines: see Wrap Mode Customization
• Show Row Number Column: if checked, a column is added on the left of the table and contains the number of the row
• Row Number Start: if Show Row Number Column is checked, specifies the number of the first row
Tiles Settings
This section is used when Display Mode is set to ‘Tiles’ and contains the parameters of the tiles:
• Tile Layout: controls the layout of the tile. 3x1 means that each row of the component will contains 3 tiles and 1 field will be displayed in a
row of a tile
• Example: 2 tiles per row of the component
• Example: 2 fields per row of a tile

SOQL with/without Sharing & Apex Settings
• SObjectName: name of the SObject of the list. For Apex lists, only needed if you want to add record actions to your list
• Record Actions:
o Control the standard record actions: New, Edit, and Delete Record. These actions are not displayed if the running user does not have
the corresponding access on the object
o Enable all Record Actions: check if you want to allow users to create, update and delete records in the list
o Enable New, Edit, Delete Record Action: check if you want to specify which record actions are available in the list
• Visibility Filters:
o Visibility Filters are records filters based on record ownership and role hierarchy:
o Check the Visibility Filters; make sure the selected filters are supported by your object. My Team is not supported on some standard
objects. My, My Team and My Subordinates are not available for objects without an Owner field
o Default Visibility Filter: filter that will be used the first time the list is displayed; must be one of the selected filters
o If you need to build a list with one filter only (My Cases, My Team Leads), select the filter you need and the Visibility Filters
combobox won’t be displayed
o My Subordinates doesn’t return records for users without a role
Files Settings
• Allowed Extensions:
o If you want to restrict the extensions of the files that can be uploaded, enter a comma separated list of file extension. For example:
txt,jpg
o Leave blank if you don’t want to have a restriction of file extensions
o See Files List Customization for more details
User: VP Service
Role: VP
User: Director Service
Role: Director
User: CSR1
Role: CSR
User: CSR2
Role: CSR
User: CEO
Role: CEO
Record Visibility by Filter when VP Service is the running userCase Records
My TeamMy SubordinatesMyAllCase OwnerCase Number
XCEO1
XXXVP Service2
XXXDirector Service3
XXCSR14
XXCSR25

Apex Settings
• Data Provider Class: name of the class of the data provider. See Apex Data Sources
• Row Key:
o Field of the data source containing the unique identifier of a record returned by the data source
o See Apex Data Sources
Step 2: Create Smart List Fields
Information
• Enter unique values in Label & Smart List Field Name; best practice: prefix the values with the name of the parent list
Field
• Smart List Definition: parent list
• Field Label:
o Leave empty if you want to use the label of the field (SOQL and Files lists only)
o Custom value: enter a value or enter $Label.CustomLabelName if you want to use a translatable label
• Field Name:
o SOQL and Files lists:
§ API name of a field: can be a related field. Examples: Account.Name or Branch__r.Code__c
• Fields are only displayed if the running user has read access on the field
• Related fields are only displayed if the running user has read access on the related object and the related field
• While SmartLists does not limit the depth of the relationships (Contact.Account.Parent.Name), adding related fields
to lots of different objects has an impact on the performance of the component
§ RecordType predefined field: RecordType.Name is displayed in the list and a picklist of active record types is displayed in the
Filters
§ Owner predefined field: Owner.Name is displayed in the list and a lookup for selecting the owner is displayed in the Filters
o Apex Data Source: name of the field in the data source
• Display Type:
o Hyperlink to Detail
§ Select this value if you want to display a hyperlink to a record detail in the column
§ For Apex Data Sources, you need to enter the name of the field containing the Id of the related record in Hyperlink to Detail
Id Field
o File Preview (Files List only): add a hyperlink for opening the standard File Preview page. Because this page is not available in Digital
Experiences sites, it is replaced by a hyperlink to the file detail page in a Digital Experience context
o Other values: ignored for SOQL and Files list types; required for Apex Data Source

• Hyperlink Id Field (used with Hyperlink to Detail):
o Field of the list record containing the Id of the target record. Example: For a hyperlink to Account on Case, Hyperlink Id Field =
AccountId
o SOQL and Files lists
§ If left blank, SmartLists will automatically determine the value for you:
• Base field of the list (Case Number for a list of Cases): Id of the record (Case.Id)
• Related Field (Account.Name for a list of Cases): Id of the related record (Case.AccountId)
§ If Hyperlink to Detail is set on a formula field, you will need to populate this value because SmartLists cannot determine a
value. Example for a formula displaying the name and city of the account of a case: AccountId
o Apex lists: must be populated with the field of the data source containing the id of the target record. See Apex Data Source for
Record Detail Page
o You don’t need to create a field definition for the field specified in Hyperlink Id Field
List Settings
• Display in List: if checked, the field is displayed in the list.
• Display Position in List: if the value is 1, the field will be displayed to the right of the field with value 0
• Sortable in List &Default Sort Field: see Sorting Customization
• Note: It you want to add HTML formatted formula fields, make sure that the height of the content is 19 pixels or lower. Otherwise, it will be
truncated. Column wrapping is not available for this data type
Filters Settings
• Display in Filters Panel & Display Position in Filters Panel: see Search Customization
• Lookup in Filters Panel & Lookup Subtitle Field: see Search Customization
Table Settings
• Column Width: specify the initial with of the column in pixels; or leave blank if you want the system to automatically determine the width of
the column
• Wrap Text: see Wrap Mode Customization

Tiles Settings
• Display in Tile Header: if checked, the field is displayed in the tile header, otherwise, it is displayed in the tile. Several fields can be added to
the header; they will be added based on the order specified in Display Position in List
Example: Tile Header with Lead Name and Lead Status
• Display as Badge: if checked, the field is displayed in the tile header as a badge with a dynamic styling
• Badge Style Field: Formula field returning the style of the badge for the current record
o the formula field must return a string formatted as follows: bc:valid color; tc:valid color
See https://developer.mozilla.org/en-US/docs/Web/CSS/color_value for valid color codes
o bc is used for specifying the background color of the badge
o tc is used for specifying the color of the text of the badge
o Example for Lead Rating dynamic styling: IF( ISPICKVAL(Rating, "Hot"),"bc:#2e844a;tc:white", IF(ISPICKVAL(Rating, "Warm"),
"bc:#feca39;tc:black","bc:#2172d5;tc:white"))
Files Settings
• Editable in File Edit Form:
o –None--: the field is not displayed in the File Edit Form
o Editable and Required: the field is displayed as required in the File Edit Form even if it is not required at the database level
o Editable: the field is in the File Edit Form. It will be marked as required in the form if it is required at the database level
o Note: Checkbox fields cannot be required in the File Edit Form
Note: you can create fields that are not displayed in the list and in the Filters if you need them in the flow actions

Step 3 - Optional: Create Smart List Filters
If you create only one filter, it will be used as default and the Filters combobox won’t be displayed
• Enter unique values in Label & Smart List Filter Name; best practice: prefix the values with the name of the parent list
• Smart List Definition: parent list
• Filter Label: enter a value or enter $Label.CustomLabelName if you want to use a translatable label
• Default Filter: check if you want this filter to be used when the list is displayed for the first time
• SOQL Filter: SOQL expression of the filter; for SOQL and Files lists only.
o Example of filters for a list of cases:
§ Status = ‘Open’
§ RecordType.DeveloperName = ‘MyRt’
§ CreatedById = USERID. The variable USERID return the Id of the running user
§ SOQL date functions and date literals are available
Step 4 - Optional: Create Smart List Actions
• Enter unique values in Label & Smart List Action Name; best practice: prefix the values with the name of the parent list
• Smart List Definition: parent list
• Action Label: enter a value or enter $Label.CustomLabelName if you want to use a translatable label
• Type:
o List Action: action executed on the rows selected in the list; the button of this action is displayed at the top of the list when rows are
selected
o Row Action: action executed on a singled row; the menu item of this action is displayed in the row actions menu
• Display Position: display position in the list of buttons or in the row actions menu. If you enter 1; the action will be displayed after the action
with 0
• Refresh After Execution: determine if the list of the row must be refreshed after the execution of the action
• Category: type of flow Autolaunched or Screen
• Custom Permission: if populated, the action is available if the running user has this custom permission; API name of the custom permission

• Flow Name: API name of the flow
o See Autolaunched Flow Example
o Your flow must have the following variables:
API Name
Resource
Type
Data
Type
Object
Allow
multiple
values
Availability
outside
the flow
Description
records
Variable
Record
Base object
of the list
Checked
Available
for input
List of records passed to the flow. Each record includes the Id field
and all the list fields
If your flow need a field that you don’t want to display in the list or
in the Filters Panel, create a Field Definition with Display in List =
false and Display in Filters = No
successMsg
Variable
Text
N/A
Unchecked
Available
for output
Message to display if the action is successful
No message will be displayed if no value is returned
errorMsg
Variable
Text
N/A
Unchecked
Available
for output
Message to display if the action fails
No message will be displayed if no value is returned
• Screenflow Modal Height: height in pixels of the modal window used for displaying the screen flow; not needed for auto-launched flows

Step 5 – Add the list to a target Page
• Prerequisite: make sure, the Apex Class ‘smartLists.SmartListController’ is accessible by your user
Lightning App Builder Page
• Navigate to the page where you want to add the list
• Edit the App Builder page
• In the Components widget on the left, select the Smart List / Smart Files List component in Custom – Managed
• Drag the component on the page
• Enter the parameters of the component
o List Definition Name: name of the List Definition
• Activate the page if needed and save it

Digital Experience Page
• Open your site in Experience Builder
• Select the page where you want to add your list

• In the Components widget on the left, select the Smart List / Smart Files List component in Custom Components
• Drag the component on the page
• Enter the parameters of the component
o For a list of child records, Record ID must be populated with {!recordId}
o List Definition Name: name of the List Definition
• Preview your changes
• Click Publish

Screenflow
• Consideration for Screenflows
o Hyperlinks to Detail are not available in Screenflows because you need to end the flow before navigating to another screen; as a
workaround, you can configure your list for allowing the selection of 1 record at a time (Max Row Selected > 1 on List Definition) and
build a custom Custom Flow Action that will close the flow and navigate to the record after a click on Next
o Screenflows actions are not available in Screenflows because of a Salesforce limitation
• Create a Screenflow
• If row selection is allowed in your list, create a variable for receiving the record(s) selected in the list if you need to use the selected records
in your flow
o Data Type: Record
o Object: SObject of the list
o Allow multiple values: checked if the list is configured for selecting more than 1 records (Max Row Selected > 1 on List Definition):

• Add the Smart List / Smart Files List component to a screen
• Enter the properties of the component
o Input Type: object type of the list – Not available for Smart Files Lists
o INTERNAL: must be set to {!$GlobalConstant.True}
o List Definition Name: API name of the list definition
o Minimum Row Selected: enter a value if you want to make sure users select at least a specific number of rows before moving to the
next screen
o Record ID: flow variable containing the parent id of the list; leave blank if the list is not related to a parent record
o Advanced / Manually assign variables:
§ If unchecked (required for reactive flows), use the variables of the component:
• Selected Record: selected record for single selection lists. Data type: Record of SObject of the list
• Selected Records: selected records for multi selection lists. Data type: collection of Record of SObject of the list
• Selected Records Count: number of records selected in the list. Data type: Number
§ If checked, assign the output values to your own variables

Search Customization
• List Definition
o Display Filters Panel All the Time: if checked, the Filters Panel is displayed all the time and cannot be closed; otherwise, the Filters
Panel is displayed when the Filters button is clicked
o SOSL Search:
§ The SOSL search box visibility and location are controlled by the value set in Show SOSL Search:
• In Filters Panel: the SOSL search box is displayed in the Filters Panel
• In Component: the SOSL search box is displayed above the list
• Not Displayed
§ SOSL search is only searching the text fields (Email, Phone, String, Text Area, Url); related fields or fields with other data types
are not searchable
§ The SOSL search box is not displayed if the list has no searchable fields
§ Some objects, such as Opportunity Line Item or Campaign Member, are not searchable with SOSL. The SOSL search box is not
displayed for these objects
Search box
Search box

• Field Definition
o Display in Filters Panel: select No if you don’t want to display the field in the Filters Panel; fields which are not searchable because of
their datatype or Shield Probabilistic Encryption are not displayed in the Filters Panel even if Display in Filters is selected
o Display Position in Filters Panel: display position in the Filters Panel. If you enter 1; the field will be displayed after the field with 0
o Lookups in Filters Panel
o Lookups are used for filtering on record Owner and related records in the Filters Panel
o In the search results, the name field of the record (Name, CaseNumber…) as well as an optional subtitle field are displayed
o Lookup in Filters Panel: if checked, the field is displayed as a lookup; otherwise it is displayed as a text field
o Lookup Subtitle Field: field of the related record that is displayed in the search results for an easier identification of the records
§ subtitle is optional
§ must have the data type Text, Email, Phone or Picklist
§ not displayed if the running user does not have read access to the field
• Search on text fields with Shield Deterministic Encryption:
o Encrypted text fields are searched based on the exact value provided in the panel (= operator)
o Non-encrypted text fields are searched with the LIKE operator
• Search on text fields of External Objects:
o The LIKE operator is not available on External Objects. Text fields are searched based on the exact value provided in the panel (=
operator)
• If you don’t want to allow search in your list, make sure that Visible in Filters Panel is set to No on all the fields
Name Field of the record (Name, CaseNumber…)
Lookup Subtitle
Search
Results

Wrap Mode Customization
• List Definition
o Wrap Text Max Lines: number of lines before wrapping the content of a cell; if you enter 3 and the cell contains 4 lines, 3 lines will
be displayed in the cell and 3 dots will be added at the end of the third line to indicate there are more lines in the cell
• Field Definition
o Wrap Text: check if you want to wrap the content of the cells of this column; if unchecked, only 1 line is displayed in the cells of this
column
Sorting Customization
• List Definition
o Default Sort Direction: sort direction used for the Default Sort Field the first time the list is displayed
• Field Definition
o Sortable in List: select No if you want to disable the sort on this field to avoid performance issues
o Default Sort Field: check if the records must be sorted on this field the first time the list is displayed
No wrap Wrap on 3 lines

Files List Customization
Standard Actions
Access to standard actions is controlled by custom permissions that can be added to a profile or a permission set:
Label
API Name
Description
Don't check file extension
SmartFilesList_Don_t_check_file_extension
Bypass the file extension check for Upload File and Upload New Version
actions
Download Files
SmartFilesList_Download_Files
Control access to File Download action
Edit File Details
SmartFilesList_Edit_File_Details
Control access to Edit File Details action
Preview Files
SmartFilesList_Preview_Files
Control access to Preview File action
Upload Files
SmartFilesList_Upload_Files
Control access to Upload File action
Upload New Version
SmartFilesList_Upload_New_Version
Control access to Upload New Version action
View File Details
SmartFilesList_View_File_Details
Control access to View File Details action
Note: some standard actions are not available for all targets. See Features by List Type and Targets for more details
Restrict Extensions of Uploaded Files
It is possible to restrict the extensions of the files uploaded with the File Upload and File Upload new Version actions.
The valid extensions are defined on the list definition in Allowed Extensions as a comma separated list of extensions such as jpg,txt.
The control of the extensions is only happening if a value has been entered in Allowed Extensions and the running user does not have the custom
permission Don’t check file extension
File Edit Form
It is possible to create a File Edit Form which is displayed when new files are uploaded or when Edit File Details is selected.
The fields are added to the form by entering a value in ‘Editable in File Edit Form’ of the Field Definition:
• Editable and Required: the field is displayed in the form as required if the running user has access to the field
• Editable: the field is displayed in the form if the running user has access to the field. The field is marked as required if it is required at the
object level
The fields are displayed in the form based on the order specified in Display Position in List
Considerations for object, and field access
• An error message is displayed if the running user doesn’t have read access to the object of the list
• List fields are not displayed in the list if the running user doesn’t have read access to the field
• An error message is displayed if none of the list fields are visible by the running user
Considerations for standard record actions
• New, Edit and Delete actions are only available if the running user has the corresponding access rights on the object
• The New/Edit form is using the page layout assigned to the running user
External Object support
Restrictions and Limitations
• Record actions are not supported
• Lookups in the Filters panel are not supported
• Visibility filters are ignored
• Related fields are not sortable
• Text fields are searched with the = operator instead of LIKE
Configuration of relationships
• Child relationships with a standard or custom object are configured as follows:
o An Indirect Lookup field must be added to the external object:
§ Related to: parent standard or custom object
§ Target Field: field of the parent object containing the Id of the parent record available in the external object
§ External Column Name: field of the external object containing the id of the parent record
§ Example for a relationship to Account on Order (Order__x):
• Account field ERP_Account_Number__c contains the ERP account number
• External object field Account_Number__c contains the ERP account number and is mapped to External Column Name
accountNumber
• Indirect Lookup field Account__c on Order__x:
o Related To: Account
o Target Field: ERP_Account_Number__c
o External Column Name: accountNumber
o An indirect relationship must be configured as follows follows on the List Definition:
§ Parent Id Field: Account__c (field on child external object)
§ Indirect Relationship: Parent Key Field: ERP_Account_Number__c (field on Account)
• Child relationships between related external objects are configured as follows:
o An External Lookup field must be added to the child external object:
§ Related to: parent external object
§ External Column Name: field of the child external object containing the id of the parent record
§ Example for a relationship to Order (Order__x) from Order Line (Order_Line__x):
• Order__x field Order_Number__c contains the order number
• Order_Line__x field Order_Number__c contains the order number and is mapped to orderNumber
• External Lookup field Order__c on Order_Line__x:
o Related To: Order__x
o External Column Name: orderNumber
o An indirect relationship must be configured as follows on the List Definition:
§ Parent Id Field: Order_Number__c (field on child external object)
§ Indirect Relationship: Parent Key Field: ExternalId

Features by List Type and Targets
Availability by Target
Targets
Feature
Lightning App Builder pages
Digital Experience site pages
Screen Flow
List Type
SOQL List
Home, App, and Record pages
All pages
Everywhere
Files List
Record page
Record detail page
Everywhere
Apex Data Source
Home, App, and Record pages
All pages
Everywhere
Standard Record Actions
New
Available
Available
Available
Edit
Available
Available
Available
Delete
Available
Available
Available
Standard File Actions
File Upload
Available
Available
Available
File Download
Available
Available
Available
File Preview
Available
Automatically replaced by View
File Details
Not available
View File Details
Available
Available
Not available
Edit File Details
Available
Available
Available
Upload New Version
Available
Available
Available
Custom Actions
Screenflow
Available
Available
Not available
Auto-launched Flow
Available
Available
Available

Features by List Type
List Types
Feature
SOQL List
Files List
Apex Data Source
SOSL Search
All text fields of the records
Content of the files
All text fields of the records
Filters Panel fields
All filterable fields of the base object
with Display in Filters set to Yes
All filterable fields of Content Version
with Display in Filters set to Yes
All fields with Display in Filters set to
Yes
Custom Filters
Available
Available
Available
Visibility Filters
All
Available
Available
Available
My
if supported by object
Available
Available
My Subordinates
if supported by object
Available
Available
My Team
if supported by object
Not Available
Available
Note for Apex Data Source: the support for the features must be implemented in the data provider

Apex Data Sources
Apex Data Source for Record Detail Page
Step 1: Create an Apex class with the following code. Make sure your user has access to the class:
global with sharing class ApexDataSourceWithParent implements smartLists.SmartListApexSourceInterface2 {
// Base query used by getPage and getRecords
Static String baseQuery = 'SELECT AccountId, StageName, Sum(Amount) OpptiesSum, Count(Id) OpptiesCount, Owner.Name Owner FROM Opportunity';
// Group By clause used by getPage and getRecords
Static String groupByClause = ' GROUP BY StageName, AccountId, Owner.Name';
// Get a list page
public List<Map<String, Object>> getPage(smartLists.SmartListApexSourceGetPage parms) {
String query = baseQuery;
// Add visibility filter to the query
query += ' USING SCOPE ' + parms.getScope();
// Add relationship with parent record to where clause
String whereClause = parms.getParentIdField() + ' = \'' + parms.getParentId() + '\'';
// If predefined filter defined for the list, add the filter to the where clause
whereClause += String.isEmpty(parms.getFilter()) ? '' : ' AND (' + parms.getFilter() + ')';
String havingClause = '';
// If values entered in Filters Panel, add them to the where and having clauses
if (parms.getFilterEntries() != null && parms.getFilterEntries().size() > 0) {
List<smartLists.SmartListController.FilterEntry> whereEntries = new List<smartLists.SmartListController.FilterEntry>();
List<smartLists.SmartListController.FilterEntry> havingEntries = new List<smartLists.SmartListController.FilterEntry>();
for (smartLists.SmartListController.FilterEntry fe : parms.getFilterEntries()) {
if (fe.fieldName == 'Sum(Amount)')
havingEntries.add(fe);
else if (fe.fieldName == 'Count(Id)')
havingEntries.add(fe);
else
whereEntries.add(fe);
}
String filtersWidget = smartLists.SmartListController.buildFilter(whereEntries);
whereClause += String.isEmpty(filtersWidget) ? '' : (String.isEmpty(whereClause) ? filtersWidget : ' AND (' + filtersWidget + ')');
havingClause = smartLists.SmartListController.buildFilter(havingEntries);
}
// Add where clause to query
query += String.isEmpty(whereClause) ? '' : ' WHERE ' + whereClause;
// Add group by to query
query += groupByClause;
// Add having clause to query
query += String.isEmpty(havingClause) ? '' : ' HAVING ' + havingClause;
// If sort field passed, add sort parameters to query
query += String.isEmpty(parms.getSortField()) ? '' : ' ORDER BY ' + parms.getSortField() + ' ' + parms.getSortDirection();
// Add paging parameters to query

query += ' LIMIT ' + parms.getPageSize() + ' OFFSET ' + parms.getOffset();
// Retrieve the records
return getRecords(query);
}
// Get a list record
public List<Map<String, Object>> getRecord(String id) {
String query = baseQuery;
// Add where clause to query
query += ' WHERE AccountId = \'' + id + '\'';
// Add group by to query
query += groupByClause;
// Retrieve the records
return getRecords(query);
}
// Query the database and format the records for Smart Lists
private List<Map<String, Object>> getRecords(String query) {
System.debug('Query ' + query );
// Query the database
AggregateResult[] oppties = Database.query(query);
// Parse the returned records and format them for Smart List
System.debug('Oppties ' + oppties);
List<Map<String, Object>> results = new List<Map<String, Object>>();
for (AggregateResult oppty : oppties) {
Map<String, Object> record = new Map<String, Object>();
record.put('RowKey', (String)oppty.get('AccountId') + (String)oppty.get('StageName') + (String)oppty.get('Owner')); // Note: Required field for identifying a unique record
record.put('Id', oppty.get('AccountId')); // Note: A field called Id is required in the list for using flow actions
record.put('StageName', oppty.get('StageName'));
record.put('Sum(Amount)', oppty.get('OpptiesSum'));
record.put('Count(Id)', oppty.get('OpptiesCount'));
record.put('Owner.Name', oppty.get('Owner'));
results.add(record);
}
return results;
}
}

Step 2: Create a list definition
Notes:
- Parent Id Field is used for passing the parent id to the Apex Class
- Data Provider Class is the name of the class created at Step 1
- RowKey is the name of the field populated in the Apex Data Source. It must contain a unique row identifier

Step 3: Create the fields
Field
List Settings
Filters Settings
Field Label
Field Name
Display
Type
Hyperlink
to Detail
Id Field
Display
in List
Display
Position
in List
Sortable
in List
Default
Sort
Field
Display
in Filters
Panel
Display
Position
in Filters
Panel
Stage
StageName
String
TRUE
0
Yes
FALSE
Yes
0
Number of Opportunities
Count(Id)
Integer
TRUE
1
Yes
FALSE
Yes
1
Total Amount
Sum(Amount)
Curren
cy
TRUE
2
Yes
FALSE
Yes
2
Owner
Owner.Name
String
TRUE
3
Yes
FALSE
Yes
3
Note:
- Field Label and Display Type are required for an Apex Data Source
Step 4: Create the predefined filters
Filter Label
Default
Filter
SOQL Filter
Won Opportunities
FALSE
IsClosed = true AND isWon = true
Opportunities in Progress
TRUE
IsClosed = false
Lost Opportunities
FALSE
IsClosed = true AND isWon = false
Step 5: Add the list to your Account Detail Page

Test Class
@isTest
public with sharing class ApexDataSourceWithParentTest {
@isTest
static void testGetPage() {
// Create the test data
Account acc = new Account(name = 'test');
insert acc;
Opportunity oppty1 = new Opportunity(name = 'Oppty1', AccountId = acc.Id, CloseDate = System.today(), StageName = 'Prospecting', Amount=100);
Opportunity oppty2 = new Opportunity(name = 'Oppty2', AccountId = acc.Id, CloseDate = System.today(), StageName = 'Value Proposition', Amount=100);
Opportunity oppty3 = new Opportunity(name = 'Oppty3', AccountId = acc.Id, CloseDate = System.today(), StageName = 'Closed Won', Amount=100);
List<Opportunity> oppties = new List<Opportunity>{oppty1, oppty2, oppty3};
insert oppties;
// Create values from Filters Panel
smartLists.SmartListController.FilterEntry fe1 = new smartLists.SmartListController.FilterEntry();
fe1.fieldName = 'StageName';
fe1.operator='LIKE';
fe1.values = new String[]{'Prospecting' };
fe1.type='STRING';
smartLists.SmartListController.FilterEntry fe2 = new smartLists.SmartListController.FilterEntry();
fe2.fieldName = 'Sum(Amount)';
fe2.operator='>=';
fe2.values = new String[]{'100'};
fe2.type='CURRENCY';
smartLists.SmartListController.FilterEntry fe3 = new smartLists.SmartListController.FilterEntry();
fe3.fieldName = 'Count(Id)';
fe3.operator='>=';
fe3.values = new String[]{'1'};
fe3.type='INTEGER';
List<smartLists.SmartListController.FilterEntry> fes = new List<smartLists.SmartListController.FilterEntry>{fe1, fe2, fe3};
Test.startTest();
// Define getPage parameters
smartLists.SmartListApexSourceGetPage getPageParms =
new
smartLists.SmartListApexSourceGetPage().withScope('everything').withFilter('').withFilterEntries(fes).withParentIdField('AccountId').withParentId(acc.Id).withSortField('StageName').withSortDirecti
on('asc').withOffset(0).withPageSize(10);
ApexDataSourceWithParent ds = new ApexDataSourceWithParent();
// Invoke getPage
List<Object> result = ds.getPage(getPageParms);
Test.stopTest();
System.assertEquals(1, result.size());
}
@isTest
static void testGetRecord(){
// Create the test data
Account acc1 = new Account(name = 'test1');

Account acc2 = new Account(name = 'test2');
List<Account> accs = new List<Account>{acc1, acc2};
insert accs;
Opportunity oppty1 = new Opportunity(name = 'Oppty1', AccountId = acc1.Id, CloseDate = System.today(), StageName = 'Prospecting');
Opportunity oppty2 = new Opportunity(name = 'Oppty2', AccountId = acc2.Id, CloseDate = System.today(), StageName = 'Value Proposition');
List<Opportunity> oppties = new List<Opportunity>{oppty1, oppty2};
insert oppties;
Test.startTest();
ApexDataSourceWithParent ds = new ApexDataSourceWithParent();
// Invoke getRecord
List<Object> result = ds.getRecord(acc1.Id);
Test.stopTest();
System.assertEquals(1, result.size());
}
}

Apex Data Source for Home Page or Custom Tab
Step 1: Create an Apex class with the following code. Make sure your user has access to the class:
global with sharing class ApexDataSource implements smartLists.SmartListApexSourceInterface2 {
// Base query used by getPage and getRecords
Static String baseQuery = 'SELECT AccountId, Account.Name AccountName, StageName, Sum(Amount) OpptiesSum, Count(Id) OpptiesCount, Owner.Name Owner FROM Opportunity';
// Group by used by getPage and getRecords
Static String groupByClause = ' GROUP BY StageName, AccountId, Account.Name, Owner.Name';
// Get a list page
public List<Map<String, Object>> getPage(smartLists.SmartListApexSourceGetPage parms) {
String query = baseQuery;
// Add visibility filter to the query
query += ' USING SCOPE ' + parms.getScope();
// If predefined filter defined for the list, add the filter to the where clause
String whereClause = String.isEmpty(parms.getFilter()) ? '' : parms.getFilter();
String havingClause = '';
// If values entered in Filters Panel, add them to the where and having clauses
if (parms.getFilterEntries() != null && parms.getFilterEntries().size() > 0) {
List<smartLists.SmartListController.FilterEntry> whereEntries = new List<smartLists.SmartListController.FilterEntry>();
List<smartLists.SmartListController.FilterEntry> havingEntries = new List<smartLists.SmartListController.FilterEntry>();
for (smartLists.SmartListController.FilterEntry fe : parms.getFilterEntries()) {
if (fe.fieldName == 'Sum(Amount)')
havingEntries.add(fe);
else if (fe.fieldName == 'Count(Id)')
havingEntries.add(fe);
else
whereEntries.add(fe);
}
String filtersWidget = smartLists.SmartListController.buildFilter(whereEntries);
whereClause += String.isEmpty(filtersWidget) ? '' : (String.isEmpty(whereClause) ? filtersWidget : ' AND (' + filtersWidget + ')');
havingClause = smartLists.SmartListController.buildFilter(havingEntries);
}
// Add where clause to query
query += String.isEmpty(whereClause) ? '' : ' WHERE ' + whereClause;
// Add group by clause to query
query += groupByClause;
// Add having clause to query
query += String.isEmpty(havingClause) ? '' : ' HAVING ' + havingClause;
// If sort field passed, add sort parameters to query
query += String.isEmpty(parms.getSortField()) ? '' : ' ORDER BY ' + parms.getSortField() + ' ' + parms.getSortDirection();
// Add paging parameters to query
query += ' LIMIT ' + parms.getPageSize() + ' OFFSET ' + parms.getOffset();
// Retrieve the records
return getRecords(query);
}
// Get a list record

public List<Map<String, Object>> getRecord(String id) {
// Add where clause to query
String query = baseQuery + ' WHERE AccountId = \'' + id + '\'';
// Add group by to query
query += groupByClause;
// Retrieve the records
return getRecords(query);
}
// Query the database and format the records for Smart Lists
private List<Map<String, Object>> getRecords(String query) {
List<Map<String, Object>> results = new List<Map<String, Object>>();
System.debug('Query ' + query );
// Query the database
AggregateResult[] oppties = Database.query(query);
// Parse the returned records and format them for Smart List
for (AggregateResult oppty : oppties) {
Map<String, Object> record = new Map<String, Object>();
record.put('RowKey', (String)oppty.get('AccountId') + (String)oppty.get('StageName') + (String)oppty.get('Owner')); // Note: Required field for identifying a unique record
record.put('Id', oppty.get('AccountId')); // Note: A field called Id is required in the list for using flow actions
record.put('Account.Name', oppty.get('AccountName'));
record.put('StageName', oppty.get('StageName'));
record.put('Sum(Amount)', oppty.get('OpptiesSum'));
record.put('Count(Id)', oppty.get('OpptiesCount'));
record.put('Owner.Name', oppty.get('Owner'));
results.add(record);
}
return results;
}
}

Step 2: Create a list definition
Notes:
- Data Provider Class is the name of the class created at Step 1
- RowKey is the name of the field populated in the Apex Data Source. It must contain a unique row identifier

Step 3: Create the fields
Field
List Settings
Filters Settings
Field Label
Field Name
Display
Type
Hyperlink
to Detail
Id Field
Display
in List
Display
Position
in List
Sortable
in List
Default
Sort
Field
Display
in
Filters
Panel
Display
Position
in Filters
Panel
Account
Account.Name
Hyperlink
to Detail
Id
TRUE
0
Yes
TRUE
Yes
0
Stage
StageName
String
TRUE
1
Yes
FALSE
Yes
1
Number of Opportunities
Count(Id)
Integer
TRUE
2
Yes
FALSE
Yes
2
Total Amount
Sum(Amount)
Currency
TRUE
3
Yes
FALSE
Yes
3
Owner
Owner
String
TRUE
4
Yes
FALSE
Yes
4
Note:
- Field Label and Display Type are required for an Apex Data Source
- Hyperlink to Detail Id Field is required for Apex Data Sources if Display Type = ‘Hyperkink to Detail’. It must be populated with the name of
the data source field containing the Id of the target record
Step 4: Create the predefined filters
Label
Filter Label
Default
Filter
SOQL Filter
Apex - Won
Won Opportunities
FALSE
IsClosed = true AND isWon = true
Apex - Working
Opportunities in Progress
TRUE
IsClosed = false
Apex - Lost
Lost Opportunities
FALSE
IsClosed = true AND isWon = false
Step 5: Add the list to your Home Page or to a custom tab

Test Class
@isTest
public with sharing class ApexDataSourceTest {
@isTest
static void testGetPage() {
// Create the test data
Account acc = new Account(name = 'test');
insert acc;
Opportunity oppty1 = new Opportunity(name = 'Oppty1', AccountId = acc.Id, CloseDate = System.today(), StageName = 'Prospecting', Amount = 100);
Opportunity oppty2 = new Opportunity(name = 'Oppty2', AccountId = acc.Id, CloseDate = System.today(), StageName = 'Value Proposition', Amount = 100);
Opportunity oppty3 = new Opportunity(name = 'Oppty3', AccountId = acc.Id, CloseDate = System.today(), StageName = 'Closed Won', Amount = 100);
List<Opportunity> oppties = new List<Opportunity>{oppty1, oppty2, oppty3};
insert oppties;
// Create values from Filters Panel
smartLists.SmartListController.FilterEntry fe1 = new smartLists.SmartListController.FilterEntry();
fe1.fieldName = 'StageName';
fe1.operator='LIKE';
fe1.values = new String[]{'Prospecting' };
fe1.type='STRING';
smartLists.SmartListController.FilterEntry fe2 = new smartLists.SmartListController.FilterEntry();
fe2.fieldName = 'Sum(Amount)';
fe2.operator='>=';
fe2.values = new String[]{'100'};
fe2.type='CURRENCY';
smartLists.SmartListController.FilterEntry fe3 = new smartLists.SmartListController.FilterEntry();
fe3.fieldName = 'Count(Id)';
fe3.operator='>=';
fe3.values = new String[]{'1'};
fe3.type='INTEGER';
List<smartLists.SmartListController.FilterEntry> fes = new List<smartLists.SmartListController.FilterEntry>{fe1, fe2, fe3};
Test.startTest();
// Define getPage parameters
smartLists.SmartListApexSourceGetPage getPageParms =
new smartLists.SmartListApexSourceGetPage().withScope('everything').withFilter('').withFilterEntries(fes).withSortField('StageName').withSortDirection('asc').withOffset(0).withPageSize(10);
ApexDataSource ds = new ApexDataSource();
// Invoke getPage
List<Object> result = ds.getPage(getPageParms);
Test.stopTest();
System.assertEquals(1, result.size());
}
@isTest
static void testGetRecord(){
// Create the test data
Account acc1 = new Account(name = 'test1');
Account acc2 = new Account(name = 'test2');

List<Account> accs = new List<Account>{acc1, acc2};
insert accs;
Opportunity oppty1 = new Opportunity(name = 'Oppty1', AccountId = acc1.Id, CloseDate = System.today(), StageName = 'Prospecting');
Opportunity oppty2 = new Opportunity(name = 'Oppty2', AccountId = acc2.Id, CloseDate = System.today(), StageName = 'Value Proposition');
List<Opportunity> oppties = new List<Opportunity>{oppty1, oppty2};
insert oppties;
Test.startTest();
ApexDataSource ds = new ApexDataSource();
// Invoke getRecord
List<Object> result = ds.getRecord(acc1.Id);
Test.stopTest();
System.assertEquals(1, result.size());
}
}
Pre-requisites for adding standard record actions to your list
List Definition
The base object must be populated
Apex Data Source
The data source must return the record id in a field called Id
For objects with record types, the data source must return the record type id in a field called RecordTypeId

Interface and Classes Reference
smartLists.SmartListApexSourceInterface2 Interface
Interface that must be implemented by the data source
The data source class must be defined as global to be visible by the package
Method
Parameter
Name
Purpose
Invoked when
Description
Type
getPage
Returns one page of records
list is displayed for the first time, is refreshed or
scroll is used for displaying more records
Parameters of the page
smartLists.SmartListApexSourceGetPage
getRecord
Returns one record
Record must be refreshed after execution of a row
action
You don’t need to add code to this function if your
list does not use row actions
Record Id
String
smartLists.SmartListApexSourceGetPage Class
Parameters of a call to smartLists.SmartListApexSourceInterface2.getPage.
This class includes a fluent builder for creating new instances of parameters for the test classes. Example: new
smartLists.SmartListApexSourceGetPage().withScope('everything').withFilter('Status = \'Closed'\').withXYZ…
Property
Description
Type
Read
Create
scope
Visibility filter of the query:
- everything: All records
- my: My records
- team: My team records
- subordinates: My subordinates records
Notes:
- everything, my, team are SOQL scopes; must be added to USING SCOPE. See:
https://developer.salesforce.com/docs/atlas.en-
us.soql_sosl.meta/soql_sosl/sforce_api_calls_soql_select_using_scope.htm
- subordinates is not a SOQL scope; must be added to the WHERE clause as
Owner.UserRole.ParentRoleId = \'' + UserInfo.getUserRoleId() + '\''
String
getScope()
withScope(scope)
filter
Predefined filter selected in the list; must be added to the WHERE claus
Null if no filters were added to the list
String
getFilter()
withFilter(filter)
parentIdField
Name of the field of the list object containing the Id of the parent record; if populated must be
added to the WHERE clause with parentId
Only populated for child lists; null otherwise
String
getParentIdField()
withParentIdField(parentIdField)
parentId
Id of the parent record; if populated must be added to the WHERE clause with parentIdField
Only populated for child lists; null otherwise
String
getParentId()
withParentId(parentId)
filterEntries
List of filters entered in the Filters Panel and the SOSL search box; must be added to the
WHERE clause
smartLists.SmartListController.buildFilter(filterEntries) is used for converting the filter entries
into a string
Null if no filters added
List<smartLists.SmartListController.FilterEntry>
getFilterEntries()
withFilterEntries(filters)

sortField
Sort field selected in the list; must be added to the SORT clause if populated
Null if no sort field selected
String
getSortField()
withSortField(sortField)
sortDirection
Sort direction selected in the list: asc or desc; must be added to the SORT clause if populated
String
getSortDirection()
withSortDirection(sortDirection)
offset
Row number of the first record returned by the query; must be added to the query for paging
Integer
getOffset()
withOffset(offset)
pageSize
Number of records of the page; must be added to the query for paging
Integer
getPageSize()
withPageSize(pageSize)
smartLists.SmartListController.FilterEntry Class
Filter entered in the Filters Panel or the SOSL Search box
Property
Description
fieldName
Name of the field in the data source or ‘SOSLSearch’ for the value entered in the SOSL Search box
operator
Determined by the component from the Display Type:
- BOOLEAN: =
- STRING, EMAIL, PHONE, TEXTAREA, URL: LIKE
- DATE, DATETIME, TIME, CURRENCY, DECIMAL, PERCENT, INTEGER: >= OR <=
values
Array of 1 value
Type
Field Display Type

Localization
Overview
The data displayed in the lists is automatically localized. Picklist and Record Types values are translated in the user language if a translation is
provided in the Translation Workbench
Date and number fields are displayed according to the user locale.
The labels of the list, fields, filters, and actions are translatable. This can be done by entering $Label.MyCustomLabel in the corresponding Label
field.
See Step 1: Create a Smart List Definition for example.
All the strings and messages used by the component are translatable custom labels
Component
Description
Label
Value
Global
Assistive text for spinners
Loading
Loading...
Global
Assistive text of dialogs close button
Close
Close
Global
Cancel button label of dialogs and Filters Panel
Cancel
Cancel
SOSL Search box
Placeholder
SearchBoxPlaceholder
Search this list...
SOSL Search box
Assistive text
SearchBoxLabel
Search when user hits the 'enter' key
Custom Filters combobox
Assistive text of the combobox
FilterSelection
Filter Selection
Visibility Filters combobox
Assistive text of the combobox
VisibilityFilterSelection
Visibility Filter Selection
Visibility Filters combobox
All filter label
SOQLScopeAll
All
Visibility Filters combobox
My filter label
SOQLScopeMy
My
Visibility Filters combobox
My Team filter label
SOQLScopeMyTeam
My Team
Visibility Filters combobox
My Subordinates filter label
SOQLScopeMySubordinates
My Subordinates
Tile – Sort Field Selector
Assistive text of the Sort Field Selector
SortFieldSelection
Sort Field Selection
Tile – Sort Field Order
Assistive text of the Sort Ascending button
SortAscending
Sort Ascending
Tile – Sort Field Order
Assistive text of the Sort Descending button
SortDescending
Sort Descending
Refresh list button
Button title
Refresh
Refresh
Show/Hide Filters button
Button title of selected state
HideQuickFilters
Hide Filters
Show/Hide Filters button
Button title of deselected state
ShowQuickFilters
Show Filters
List Info
Label for several items
ItemPlural
Items
List Info
Label for one item
ItemSingular
item
List Info
Filters Panel
Label for several items selected in the list
Label for several items selected in the picklist values dialog
SelectedPlural
selected
List Info
Filters Panel
Label for one item selected in the list
Label for one item selected in the picklist values dialog
SelectedSingular
selected

List Info
Label for sort field
SortedBy
Sorted by
List Info
Label of filter by criteria
FilteredBy
Filtered by
List Message
Message displayed at the bottom of the list when more
records are available
LoadMoreRecords
Scroll to load more records
List Message
Message displayed at the bottom of the list when the
maximum number of records has been loaded
MaxRecordsLoaded
Maximum of {0} records loaded.
Additional records may be available
List Message
Message displayed at the bottom of the list when no records
found
NoItemsToDisplay
No items to display.
List Message
Message displayed at the bottom of the list when all records
have been loaded
AllRecordsLoaded
All records are loaded
Filters Panel
Filter widget title
QuickFilters
Filters
Filters Panel
SOSL search field label - Files
FilterSOSLSearchFileContent
Search File Content
Filters Panel
SOSL search field label - Record
FilterSOSLSearchRecord
Search Record
Filters Panel
Date/Datetime/Time range: Start filter label
FilterRangeStartLabel
Start
Filters Panel
Date/Datetime/Time range: End filter label
FilterRangeEndLabel
End
Filters Panel
Number Range: Min filter label
FilterRangeMinLabel
Min
Filters Panel
Number Range: Max filter label
FilterRangeMaxLabel
Max
Filters Panel
Boolean filter: checked value label
Checked
Checked
Filters Panel
Boolean filter: unchecked value label
Unchecked
Unchecked
Filters Panel
Picklist filter: label of the Show More button displayed when
the picklist has more than 5 values
ShowMore
Show More
Filters Panel
Lookup filter: search box placeholder when no data has been
entered
LookupPlaceholder
Search {0}...
Filters Panel
Lookup filter – Search results: recent records label
LookupRecent
Recent {0}
Filters Panel
Lookup filter – Object selector: accessible text
LookupObjectSelector
Select an object - Current Selection: {0}
Filters Panel
Lookup filter – Object selector: queue object label
LookupQueueus
Queues
Filters Panel
Lookup filter – Search results: no records found message
LookupNoResults
No Results
Filters Panel /Field label in List
Label of the Owner field
Owner
Owner
Filters Panel
Clear filter button assistive text
Clear
Clear
Filters Panel
Apply button label
Apply
Apply
Filters Panel
Clear All Filters button label
ClearAllFilters
Clear All Filters
Filters Panel / SOSL Search box
SOSL search field: Error message for value with less than 2
characters
FilterSOSLSearchTooShortError
The search string must be at least 2
characters
Filters Panel
Date/Datetime/Time range: Error message for start value >
end value
FilterRangeStartError
Start value must be lower than End value
Filters Panel
Date/datetime range: Error message for end value < start
value
FilterRangeEndError
End value must be greater than Start
value
Filters Panel
Number range: Error message for min value > max value
FilterRangeMinError
Min value must be lower than Max value
Filters Panel
Number range: Error message for max value < min value
FilterRangeMaxError
Max value must be greater than Min
value
Filters Panel – Select Picklist values
dialog
Label of Available picklist values
Available
Available

Filters Panel – Select Picklist values
dialog
Label of Selected picklist values
Selections
Selections
New record list action
New button label
New
New
Edit Record dialog - New
Next button label on the record type page
Next
Next
Edit Record dialog – New
Message displayed on save success
was created.
was created.
Edit Record dialog
Edit File Details dialog
Edit record row action
Dialog title
Dialog title
Edit menu item label
Edit
Edit
Edit Record dialog - Edit
Edit File Details dialog
Save button label
Save
Save
Edit Record dialog
Edit File Details dialog
Message displayed on save success
WasSaved
was saved.
Delete record row action
Delete file row action
Menu item label
Delete
Delete
Delete Record dialog
Dialog title
DeleteRecordTitle
Delete {0}?
Delete Record dialog
Confirmation message for record deletion
DeleteRecordMessage
Are you sure you want to delete this {0}?
Delete Record dialog
Confirmation message for file deletion
DeleteFileMessage
Deleting a file also removes it from any
records or posts it's attached to
Delete Record dialog
Message displayed on successful record delete
WasDeleted
was deleted.
Upload Files list action
Button label
UploadFiles
Upload Files
Upload Files list action
Message displayed on successful file upload
FilesHasBeenUploaded
File(s) have been uploaded
Download list action
Menu assistive text
DownloadMenu
Download Menu
Download Files dialog
Confirmation message
DownloadConfirm
Are you sure you want to download {0}
file(s) worth {1} MB?
Download Files dialog
Dialog title
DownloadFiles
Download Files
Download Files dialog
Error message when download files limit exceeded
DownloadLimit
Download limit exceeded. Please
download less than {0}MB and less than
{1} files
Download All Files list action
Menu item label
DownloadAllFiles
Download All Files
Download Selected Files list action
Menu item label
DownloadSelectedFiles
Download Selected Files
Preview Selected Files list action
Button assistive text
PreviewSelectedFiles
Preview Selected Files
Download File row action
Menu item label
Download
Download
Edit Files Details row action
Menu item label
EditFileDetails
Edit File Details
Preview file row action
Menu item label
PreviewFile
Preview File
Upload New Version row action
Menu item label
UploadNewVersion
Upload New Version
Upload New Version row action
Message displayed after a successful upload of a new version
FileVersionWasUploaded
File "{0}" was uploaded
Upload New Version dialog
Label of Upload button
Upload
Upload
Upload New Version dialog
Label of new version reason field
UploadNewVersionReason
What Changed? (optional)
Upload New Version dialog
Error message for technical error on upload new version
ErrorMsgCantUploadNewVersion
Unexpected error on upload new
version:
Upload New Version dialog
Error message for invalid file extension
ErrorMsgInvalidExtension
Your company doesn't support the
following file types:

View Files Details row action
Menu item label
ViewFileDetails
View File Details
Smart Files List dialogs
Used in dialogs and messages
File
File
Smart Files List
Default label of files list
Files
Files
Tiles
Load More button label
LoadMore
Load More
Tiles
Load All button label
LoadAll
Load All
Row selection – Screenflow
context
Error message on selected records < min selected records
MinRowSelectionError
You must select at least {0} record(s)
