1
Excire Foto 2024
Quickstart
Version 3.0, September 2023

2
Index
What is Excire Foto? - The highlights 4
Basic functions 4
User interface overview 4
Create the first and additional databases 5
Important initial settings 6
Note on upgrading from older Excire Foto versions 6
Adding photos in Excire Foto 7
Resuming the import after an interruption 7
Synchronizing - adding new photos to an existing folder 7
Assign keywords automatically and manually 8
Creating and using a keyword hierarchy 9
View and edit photo metadata 9
EXIF data 9
Change Capture Date 9
GPS data 10
Transfer GPS data from one photo to another 10
IPTC data 10
Using IPTC profiles 10
Narrow down the current view by using the filter bar 10
Various search functions 11
Free text search w. X-Prompt AI 11
Find Duplicates 11
Edit search result with the flag assistant 13
Find people 17
Find by keyword 19
Find faces 20
Find similar photos 21
Find by GPS 22
Advanced evaluations with Excire Analytics 23
Collections and slideshow 24
Slide show settings 24
Arrange photos manually 25
Workflow-Examples 25
Frequently Asked Questions 26

4
What is Excire Foto? - The highlights
Excire Foto is the most innovative AI-based software for perfect photo management
on Windows or macOS. Automatic image analysis and tagging, numerous intelligent
search functions and the integrated duplicate finder help the user to keep order and
find the photos you are looking for. Excire Foto is not only fun to use, it saves a lot of
time that can be better spent on the creative side of photography.
In the latest version "Excire Foto 2024", in addition to a further improved AI and AI
free text search, GPS search, a slide show function with numerous configuration
options and other improvements were added.
The previously separate extension Excire Analytics is now an integral part of Excire
Foto and is used to perform various interesting statistical analyses based on the
metadata from the photos.
Basic functions
User interface overview
The user interface is divided into a left column, where the folder navigation is located
and search results and collections can be displayed.
To the right is the grid view with thumbnails of the photos. By double-clicking on a
photo, it can be displayed in a larger preview view up to a 1:1 enlargement.
The right column contains detailed information about the selected photo such as
histogram, keywords and metadata. Below that you will find the keyword hierarchies
of the keywords assigned by Excire Foto. But also user-defined keywords can be
created hierarchically. By selecting keywords, you can navigate directly to the photos
with the corresponding content.
At the top between the menu and the photo grid is the filter bar. Here, various criteria
can be selected to narrow down and sort the current photo display.
The various search functions of Excire Foto can be accessed via the buttons above
the right column of the screen.

5
Create the first and additional databases
During installation, Excire Foto asks for a directory in which to create the default
database.
In fact, this directory will later store not only the database file, but also other data
such as thumbnails, preview images and the program cache (temporary storage).
These data can consume some disk space over time, so it makes sense to make
sure that there is enough free space on the selected hard disk.
The Excire databases require about 250 MB of hard disk space for 100,000 photos.
The preview memory is then about 25 GB at the highest quality, and when a preview
is generated for each photo.
Moving the default database to another hard drive
It is also possible to manually move the database to another hard disk afterwards. To
do this, Excire Foto must be closed and the selected directory with the required files
and subdirectories must be moved to the new location. The next time Excire Foto is
started, it will detect the missing database and ask where to create a new default
database. If you select the new location of the folder here, the database will be
opened from this location from now on.
These files and folders must be moved in the process:
• 1to1.exfoto
• previews.exfoto
• thumbnails.exfoto
• excire_foto.local.db
• excire_foto.local.db-shm (if existing)
• excire_foto.local.db-wal (if existing)
• backend.db
• backend.db-shm (if existing)
6
• backend.db-wal (if existing)
Additional databases
For some photographers it may be useful not to manage all photos in a single
database. They can create an additional database in the selected directory via the
menu command "File -> Choose folder for new database". Via "File -> Open
database folder" it is then possible to switch between the existing databases. To do
this, the program is automatically closed briefly and reopened with the selected
database.
Important initial settings
Before the first photos are read into the database, it should be ensured that the
program settings correspond to the user's intentions. While it is possible to change
the settings at any time, in some cases this can result in the need to re-analyze
directories, which can add additional time that may be unnecessary if the possible
settings are considered in advance.
While the default settings meet the needs of most users, Excire Foto is used by very
different types of photographers, so we have provided additional flexibility via the
settings.
In the Excire Foto -> Preferences menu, various settings can be made via the
different theme tabs.
Before importing photos for the first time, these settings are important:
In the "Add" tab, you will find the option to enable reading of PSD files created with
Adobe Photoshop. The default setting is "off", as this slows down the process of
reading in folders.
Under "Collections" there is an option to set the quality of compression for the
preview images. The size of the previews that Excire Foto generates is always
1280x720 pixels. If this resolution is not sufficient, the 1:1 preview can be activated.
This option is always available in the preview, but is usually generated only after
confirming a demand, because 1:1 previews consume significantly more disk space
on the hard disk where the Excire Foto database is stored.
This request can be disabled in the settings. In addition, the 1:1 preview image can
then be used as the default preview image. However, this may delay the quick
browsing of photos a bit, since the larger file has longer loading times than the
smaller preview version of the photo.
In the "Metadata" tab, you can set whether Excire Foto should always save the
metadata in sidecar files in XMP format when the "Save metadata" function is
selected from the menu. This is a special case, as normally XMP files are only used
for raw formats; for JPG and TIF files the metadata will be saved directly in the image
file. Users who want to exchange metadata between Excire Foto and the Capture
One image editor must enable the "Always use sidecar files" option, otherwise
Capture One will not read the metadata.
Note on upgrading from older Excire Foto versions
If you have already used Excire Foto in an older version, an update of the existing
database will be performed the first time you start Excire Foto 2024.
7
It is recommended to create a backup of the database beforehand. It is not possible
to switch to a previous version of Excire Foto with this database afterwards.
Since the automatic keyword recognition with the help of AI has been significantly
improved again in Excire Foto 2024, you can select during the update whether the
existing AI keywords should be reassigned by the new AI.
Manually assigned keywords will not be changed.
Adding photos in Excire Foto
After the most important basic settings have been made, the actual construction of
the photo archive begins by adding photo folders from the hard disk in Excire Foto to
the database.
To do this, click on the "+Add" button in the left column of the screen and select a
directory. This can be directly added to the database with all its subfolders. The
photos are not only added, but also analyzed and automatically tagged with the help
of artificial intelligence (AI).
This process may take some time, but only once. For large photo collections, it can
make sense to let the process run overnight.
We also recommend running a test with a smaller set of photos first to get a feel for
how long it takes to load and analyze the photos. This is highly dependent on the
speed of the system used consisting of computer hardware and hard drives, as well
as their connection. Photos can also be added from external hard drives or data
servers on the network (NAS systems).
When adding photos to the database, the original files remain unchanged in
their location.
Excire Foto creates reduced preview files in the database, so that the photo archive
can be searched and displayed even when external hard drives are not currently
connected.
The progress of the import process is indicated by a progress bar. If you click on this
bar, more details are displayed, and it is possible to cancel the process prematurely.
Data that has already been collected is retained, so that you can continue adding and
analyzing it later.
Resuming the import after an interruption
To continue the process after an interruption, right-click on a folder name and first
select "Analyze" to finish analyzing the photos that have already been added.
Then select "Synchronize" for the folder to add and analyze any missing photos.
Synchronizing - adding new photos to an existing
folder
If you save new photos in an existing folder, it must be synchronized in Excire Foto in
order to include and analyze the new photos.
8
To do this, right-click on the name of the folder in the folder navigation and select the
"Synchronize" command.
A dialog box will now appear in which you can set whether subfolders should also be
searched, whether any existing keywords should be read from the files or whether an
IPTC profile should be assigned.
Afterwards a security question appears, which should be read carefully, before
you answer it with No or Yes!
The question is whether you want to remove unavailable folders and photos from the
Excire Foto database during synchronization.
This is useful if the contents of the folders have changed due to moving and deleting
photos. These will then be removed from the original folder in Excire Foto, as they
are no longer accessible there.
However, if you are synchronizing a folder on an external hard drive that is not
currently connected, clicking "Yes" would mean that all folders on that hard
drive would be removed from the database!
Assign keywords automatically and manually
As photos are added, Excire Foto automatically analyzes them and, with the help of
artificial intelligence, assigns appropriate keywords to the photo in terms of content
and photographic criteria.
For example, the photo of a dog can be automatically associated with the keywords
"pet", "dog", "mammal" and "animal". But also with "bright" and "contrasty" from the
category of photography keywords.
The user has no influence on the initial assignment of the keywords by the artificial
intelligence. Subsequently, however, the keywords can be supplemented by own
keywords and unwanted or inappropriate keywords can be removed from the photo.
To do this, select one or more images in the image overview and then edit the
keyword field in the right column.
Clicking the small cross next to a keyword removes it from the photo.
New keywords can be assigned by entering a keyword in the field above the
keywords. Keywords that have already been created are suggested for selection
during the typing process, so that similar keywords are not created unintentionally. By
clicking the plus symbol, a new, user-defined keyword is created.
Keywords that are already included in the AI keyword hierarchy of Excire Foto are
displayed with a blue frame, user-defined keywords are displayed with a gray frame.
Behind keywords assigned by the AI, a number is displayed (0.01 - 0.99) indicating
which certainty (level of probability) the AI assumes for this keyword.
Keyword confirmation
You can confirm AI keywords by clicking the checkmark in front of the keyword. This
causes these keywords to be treated as manually assigned keywords and the photos
to appear at the front of the results display when searching for these keywords.
9
Creating and using a keyword hierarchy
In the right column, Excire's own keyword hierarchy and the hierarchy of user-defined
keywords are displayed one below the other and can be expanded and collapsed.
In the Excire Foto keyword hierarchy, only the keywords that have already been
assigned to one or more photos during the analysis are displayed. It is not a
complete list of all keywords available in Excire Foto.
The Excire Foto AI keyword hierarchy cannot be modified by the user.
The situation is different with the user-defined keyword hierarchy. Here, any number
of keywords can be added and created in the form of a custom hierarchy.
Important: A user-defined keyword hierarchy must be created in advance before the
keywords are assigned to photos. Once keywords have been created, they cannot be
subsequently arranged in a hierarchy.
To add a keyword to the user-defined hierarchy, right-click on an existing keyword
and select "Create keyword". The new keyword will then be placed under the
selected keyword in the hierarchy.
View and edit photo metadata
In the right column of the screen, the metadata for the photo is displayed and can be
edited by clicking on the pencil icon.
This opens the dialog for editing the metadata, where the fields for contact, content,
shot and copyright can be filled in. This can also be done using a pre-defined IPTC
profile that can be assigned to the photo.
The metadata view is divided into EXIF data and IPTC data categories. You can find
the toggle switch in the left column of the metadata window.
The display and maintenance of EXIF data is again divided into different views: By
clicking the corresponding tab above the display, you can switch between General
and GPS Data.
EXIF data
The EXIF data display contains technical data about the image such as camera
model, exposure time, aperture and the date the image was taken.
Change Capture Date
You can find the capture date at the very bottom of the EXIF data display in the
metadata editor.
There you can set a shooting time consisting of date and time for a photo.
Afterwards you have to click on Save to finally apply the data. This way you can also
change the capture date and time for several selected photos at once. To do this,
activate the checkmark under "Apply to all" before saving.
10
GPS data
In the GPS tab, you can display or edit the GPS coordinates for a photo.
The GPS coordinates can be entered in a text field with latitude and longitude.
Alternatively, it is also possible to select the location in a map view.
You can move the map section as you like and zoom in or out. As soon as you click
on a location, the coordinates are automatically transferred to the text field.
The dialog must be confirmed with Save to save the changed coordinates.
GPS data can be used for GPS search in Excire Foto.
Transfer GPS data from one photo to another
If you have a photo that already contains the GPS data and you want to transfer it to
one or more other photos, there is an easier way than using the metadata editor.
To do this, select the photo with the GPS data and click on the "Copy GPS metadata"
button in the right column under Metadata. Then select all photos that should get the
same GPS coordinates and click on the button "Paste GPS Metadata".
IPTC data
In the IPTC data category, you can store information about the shot, such as the
photographer's contact details, content description, location of the shot (in text form),
and copyright information.
Using IPTC profiles
The File - IPTC Profile Manager command allows you to create and modify IPTC
profiles, which can then be assigned to one or more photos.
This is possible in two ways:
1. when editing the metadata
2. directly when adding the photos when importing a new folder or synchronizing.
If you use IPTC profiles to fill the metadata, it is easier to update the data later by
simply changing the IPTC profile. All changes are automatically applied to the images
that have the corresponding IPTC profile assigned.
Narrow down the current view by using the filter bar
Above the gallery view is the filter bar, which can be used to limit the set of displayed
photos by various criteria.
This filtering always refers to the currently displayed photos that were selected by
selecting one or more folders in the folder navigation of the left column or by clicking
on "All photos" under Database.
If the filter options are not visible, the filter toolbar can be expanded by clicking on the
small triangle.

11
There is the possibility to filter by star rating, by color markers and by selection or
rejection flags. Furthermore, it is possible to filter by metadata such as camera, f-
stop, exposure time or focal length. Additional metadata fields can be activated for
the selection via the program settings.
Furthermore, the shooting date can be restricted, e.g. by year, month or a specific
day.
The sorting of the display can be done either by the file name or by the recording
date, and in ascending or descending order. Since Excire Foto 2024, sorting via the
aesthetics rating of the photos is also possible.
Finally, there is a free text field "Search", which restricts the display with respect to
the file path and name. For example, you can enter parts of the file name like "JPG"
or "Italy" to find corresponding photos. This field does not search the metadata
contents, but refers exclusively to folder and file names.
Various search functions
Below are the different search options of Excire Foto.
Free text search with X-Prompt AI
Via the "X-Prompt AI" search, it is possible to search for photos by entering any text
with the help of artificial intelligence.
This search is independent of keywords and is based purely on how one would
describe an image.
This allows creative entries such as "Romantic mood at the lake" or similar
descriptions that go beyond a pure keyword entry.
The result of this search can then be further refined and narrowed down, for
example, using a keyword search. But the reverse is also possible.
By clicking on the cogwheel symbol, the search options can be set, for example,
whether the entire database or the currently displayed photos should be searched,
how many photos should be displayed in the result and how strict the search should
be.
When entering text, you can also switch between German (DE) and English (EN).
Find Duplicates
With the help of the duplicate finder it is possible to find photos that are duplicate or
multiple in the archive and mark them for deletion if desired.
For all dialog elements there are tooltips that appear as soon as you move the
mouse pointer over the corresponding element. This is important because they often
contain important explanations.
12
We distinguish three types of duplicates in the Duplicate Finder:
a) Exact duplicates: These are photos or files that are binary identical. Since this
requires checking each file again, this duplicate search takes longer. It also requires
access to the original files. This means that external hard drives must be connected
in order to find exact duplicates on them.
b) Near duplicates: These are photos that are visually similar. The degree of
similarity can be adjusted by a slider. The stricter the setting, the more you will find
almost exact duplicates. Here you can optionally choose between a faster or a more
accurate search algorithm.
Variant b) is therefore our standard recommendation for duplicate search.
c) Sequences or bursts: These are photos of a sequence whose shooting date may
differ only by a certain duration, which can be set. This function is also useful when
photos differ because they have been edited or developed differently. Since the
capture date is identical for these photos, you can thus find different variants of a
photo (different white balance than the raw, B/W, etc.).

13
Edit search result with the flag assistant
The duplicates found can be edited using the flag assistant, which helps to mark
duplicates that are no longer needed with a rejection flag (deletion flag) and then
14
delete the photos permanently. Alternatively, the "Accepted" flag is used to positively
mark photos and then delete the unmarked duplicates.
By default, the settings that are easiest to use are displayed at the top of the dialog.
These include:
• Reject all photos except RAW - (sets a rejection marker for all other formats
except RAW).
• Reject all JPGs whose shortest side is smaller than (value can be set in
pixels) - sets a reject marker for resized JPGs (for example, photos used for
the web or email)
• Accept all RAW/JPG pairs (sets an "Accepted" flag instead of a reject marker)
• Accept the JPG with the highest resolution (can also accept RAW files)
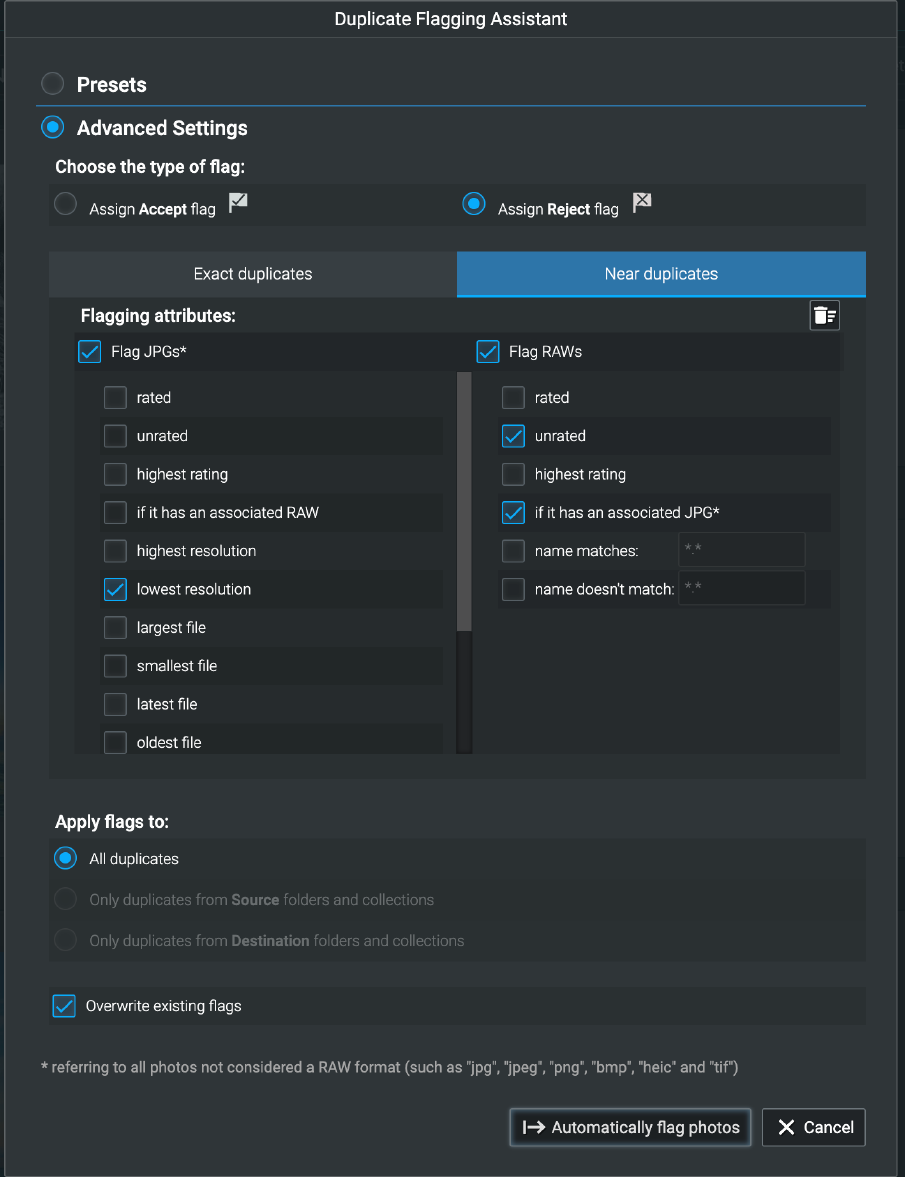
As an alternative to the default settings, the advanced settings can also be used to
have more detailed selection options. Here you can first determine whether the
Accept flag or the Reject flag should be used.
Then settings for non-RAW formats (JPG, PNG, etc...) can be made separately from
the settings for RAW formats.
Selection criteria can be size or age of the file or also the rating with star markers. In
case of exact duplicates, a distinction based on parts of the file name with wildcards
can also be selected (for example, "*web.*").
Before executing the automatic flag settings, it is also possible to select whether
existing flags should be overwritten or retained.
Important:
The flag assistant does not automatically delete photos, but only marks them with
appropriate flags, which can then be used to select for the deletion process.

15
16
Advanced settings for Near-Duplicates:

17
Advanced settings for Exact Duplicates:
Find people
With the help of the Find People function you can find all the photos of a certain
person in the database.
To start the search, select a photo in the library that contains the person you are
looking for.
18
Then click the “Find people" button in the upper right corner of the search bar.
The search dialog opens, in which the marked photo is displayed and the face is
framed with a box. If there are several faces, click on the one of the person(s) you
are looking for to select it. It is also possible to search for photos with more than one
person.
The filter options can be used to narrow down the search, for example to photos in
which the person you are looking for is smiling or has their eyes open.
In addition, keywords can be specified to further refine the search.
Search options can be specified in the lower section of the search dialog. These
options concern the degree of similarity with the searched person, the maximum
number of search results (from 10 to a maximum of 50,000) and whether the search
should be performed in the entire database, only in the currently displayed photos or
in specific folders or collections.
Find people results can then be transferred to a collection and tagged with the
person's name. Or you can assign a keyword with the person's name to the photos
so that you can find them later using a simple keyword search.

19
Find by keyword
The keyword search is called up via the corresponding search button in the top right-
hand corner and allows you to select a combination of keywords that must match the
photos you are looking for.
Both the automatically assigned keywords and the user-defined keywords are
available for selection.

20
This way you can quickly find photos related to specific topics and content. And you
will be surprised what you can find in the photo archive.
In the search options, as in all searches, you can set whether the search should refer
to the entire database, the current view or specific folders and collections.
Find faces
The search for faces is called up using the "Find faces" button. In the search dialog
you can select different criteria in levels - the number of faces in the photo, the age of
the persons, whether the persons should be male or female, the eyes should be
open or closed and whether they should smile or not. If these properties are not
important in the search, you can leave them disabled.

21
Find similar photos
To search for similar photos, you must first select a photo as a template. Then you
can call the search dialog via the button.
Among the search options, the distinction between two types of similarity search is
important:
1. content (searches for photos with similar content).
2. color (here the similarity is determined by the color distribution in the image)
Furthermore, the similarity limit can be set from strict to loose in values from 1 to 100,
which leads to different search results.

22
Find by GPS
After clicking the "Find by GPS" button, a selection dialog box opens in which you
can enter the starting position of your search.

23
For this purpose, you can enter the GPS coordinates, specify a location via the list
selection or mark a point on the map.
In addition, you select a radius as a radius for the search and specify whether the
search should be performed over the entire database or only a subset of the photos.
The maximum number of results can also be limited.
Using the "+" and "-" buttons in the map view, you can zoom in and out as desired.
By keeping the mouse button pressed, you can move the map section.
Advanced evaluations with Excire Analytics
With the the extension Excire Analytics, detailed analyses of the photo inventory can
be performed based on the metadata.
Examples would be:
• with which camera or lens you have taken the most photos
• what your favorite subjects are and what you use to photograph them best

24
• with which settings or which camera-lens-combination you have taken your
best rated pictures
• which lens is particularly suitable for which motifs, e.g. portraits
• which lenses you should take with you on your trip and what you can safely
leave at home
• in which photo genre you are particularly good
• up to which exposure time your telephoto still takes good pictures
• which camera or lenses you hardly use at all and therefore could sell
Excire Analytics is unlocked with an additional license key after purchase. An
additional download is not necessary. The license key is entered in the same field
where the license for the full version of Excire Foto is entered. The license is bound
to the e-mail address entered during the purchase.
There is separate documentation on how Excire Analytics works, which can be
downloaded here:
https://shop.excire.com/downloads/excire-foto/ExcireAnalytics.pdf
Collections and slideshow
Photos can be arranged in collections and displayed on the screen in the form of a
slide show.
To do this, you assign any photos from different folders to a collection.
A collection contains only a reference to a photo, not an independent copy of the
photo. This way, photos can be assigned to multiple collections without storing
additional files on the hard disk.
If you also want to physically store the photos of a collection in a shared folder on
your hard disk, this is possible by right-clicking on the export function.
To create a collection, click on the plus button under Collections. Alternatively, it is
also possible to create groups to which several collections can be assigned. This way
you can arrange your collections in two levels to have a better overview.
The arrangement of groups and collections can also be changed later by drag & drop
with the mouse.
A collection can be opened as a slide show by right-clicking and played on the
screen.
Slide show settings
By right-clicking on a collection, you can set the title of a slideshow and open the
start screen of the slideshow.
However, there are other settings for the slideshow that can be found in the program
settings.
These can be set via the menu Excire Foto -> Preferences and there in the tab
"Slideshow".
25
The start screen of the slideshow also displays the keyboard shortcut, which can also
be used to access the settings.
In the preferences you can set the display duration of the photos, the duration and
type of transition between photos. The slideshow can also be played in a random
order, once or as a continuous loop.
Finally, the color of the background and the text can be set.
These settings (with the exception of the title) apply across the board to all
slideshows, but can be changed at any time.
Arrange photos manually
Unless the random order of the photos has been activated, the photos are played in
the order in which they are arranged on the screen. The photos can be arranged in
any order by dragging and dropping them with the mouse. This user-specific order
remains in the collection until it is changed again or the sorting in the filter bar is
changed to another criteria.
Workflow-Examples
Common use cases from our users include:
Navigating through the photo collection based on content.
With the automatically assigned keywords, one can navigate through the photo
collection based on content, finding many old treasures and awakening beautiful
memories. This often directly generates new ideas for creative photo projects.
Find and delete duplicates
Find duplicates is one of the most popular features in Excire Foto. Duplicate photos
can be easily found in the archive and the unnecessary versions can be deleted.
Editing variants or almost identical images from series shots can also be selected
and deleted. This creates space and order on the hard drives.
Add automatic keywords and create your own keyword hierarchy
After automatic keywording by the artificial intelligence in Excire Foto, it is much more
fun to dive deeper into the photo collection and add your own keywords to the AI
keywords. After all, the AI can't know what the occasion was for a particular group
photo.
Searching for people and assigning names
Which leads directly to the next common use case: Finding people in the photos and
assigning names. Since Find People in Excire Foto works on the basis of an example
photo, many users proceed by searching for a person with an example and then
tagging all found photos with the person's name as a keyword. This way, people can
be easily retrieved later using the keyword search.
Select and rate images after vacation
With the help of the quick image viewer, you can easily view your photos in Excire
Foto after your vacation and rate the best pictures with a star mark, while
unsuccessful snapshots can be deleted directly from the hard disk again. To select a
photo, first click on the folder with the vacation pictures and then double-click on the

26
first photo to start viewing. With the arrow key you can easily switch to the next
picture or quickly switch between two pictures for comparison. The number keys 1-5
assign star ratings (0 deletes them again).
Create photo books and family albums
Often, occasion-related collections are also created using the search functions in
Excire Foto.
For example, you can create a collection for a family member's birthday album or
your daughter's wedding album, and then gradually fill this collection using various
searches. Search results can be easily assigned to an existing collection by right-
clicking. In the end, the photos can be exported to a shared folder for easy photo
book creation.
For this task, GPS search can be used well, too, when it comes to finding photos
from a certain region and retracing a travel route. Or to document the changes of a
place over the years that one has visited again and again.
Search and export photos for social media
The export function can also be used to output the best photos, which you have
selected with the help of the search functions and the star filters, for use in a web
gallery or on social media in a smaller resolution. To do this, simply specify the
desired image resolution when exporting and output the photo in the selected
directory for this type of photos (e.g. "Photos for Facebook").
Frequently Asked Questions
We receive many support questions about Excire Foto every day. We have therefore
published the answers to the most frequently asked questions in our help center:
https://support.excire.com/portal/en/kb/excire
You can also create a support ticket from there if you do not find the answer you are
looking for.
Support
How to contact our support in different ways you can find in this article:
https://support.excire.com/portal/en/kb/articles/how-can-i-contact-customer-support
In order to be able to analyze technical problems, it is helpful for us if you use the
"Send error report..." function from the help menu, because this way we also receive
the technical log files from the program.
