
PureConnect®PureConnect®
2023 R32023 R3
Generated:
09-November-2023
Content last updated:
04-August-2020
See Change Log for summary of
changes.
Group Policy DeploymentGroup Policy Deployment
for CIC Applicationsfor CIC Applications
Technical ReferenceTechnical Reference
AbstractAbstract
Genesys recommends group policy deployment of CIC client
workstation applications using Windows startup scripts. It describes
how to create the script and the group policy, and provides sample
scripts and CIC client workstation application feature name and
properties tables.
For the latest version of this document, see the PureConnect
Documentation Library at: http://help.genesys.com/pureconnect.
For copyright and trademark information, see
https://help.genesys.com/pureconnect/desktop/copyright_and_trademark_information.htm.
1

2
4
4
5
5
6
6
6
7
7
8
8
8
9
9
9
9
9
9
10
10
10
10
11
11
16
16
16
17
17
18
18
20
21
25
25
25
27
27
29
29
31
31
31
33
33
34
34
34
36
36
36
37
37
37
38
39
39
39
40
41
Table of ContentsTable of Contents
Table of Contents
Introduction to Group Policy Deployment
For more information
Workstation Application Install Share Directory Contents
Setup.exe
Using Scripts to Deploy CIC Client Workstation Applications
MSI software deployment vs. using a script
Machine vs. user script
Applying patches
Using transforms to modify the install
Create the Script
Basic install
Examples
Logging and silent flag
Examples
Apply a transform
Examples
Apply a patch
Examples
Modify properties
Examples
Apply patch and transform
Examples
Create the Group Policy
Create a group policy to run a startup script (machine policy)
User experience
Other uses for a group policy running a script
Apply patches (if not using Interactive Update)
Install ESs
Uninstall the software
Sample Scripts
Sample Install script for CIC client workstation applications
Sample Uninstall script for CIC client workstation applications
Sample Upgrade script for CIC client workstation applications
Client Workstation Application Installs: Feature Names and Properties Tables
IC User Applications (32-bit)
Features set to install level 1 (install by default)
Features set to install level 100 (enabled but not installed by default)
Properties that the user can set
IC User Applications (64-bit)
Features set to install level 1 (install by default)
Features set to install level 100 (enabled but not installed by default)
Features set to install level 0 (disabled)
Properties that the user can set
IC Business Manager Applications
Features set to install level 1 (install by default)
Properties that the user can set
IC Server Manager Applications
Features set to install level 1 (install by default)
Properties that the user can set
Interactive Update Client
Features set to install level 1 (install by default)
Properties that the user can set
Interaction Scripter Client
Features set to install level 1 (install by default)
Properties that the user can set
Client Plugin Installs: Product Codes
Client Language Plugins
Tier 1 Client Language Plugins
Tier 2 Client Language Plugins
Tier 3 Client Language Plugins
2

41
42
42
42
43
43
47
48
48
53
55
58
Microsoft Outlook Interaction Desktop Plugin for IC User Applications
Interaction Dialer Client Plugins
Interaction Dialer Client Language Plugins
Tier 1 Client Language Plugins
Appendix A: Base Installation Package Deployment
Create and deploy the base installation package
Customize the base installation package
Install the Orca database editor
Create a transform
Verify the changes that the transform will make
Apply the transform to the base installation package
Change Log
3

Introduction to Group Policy DeploymentIntroduction to Group Policy Deployment
Genesys recommends group policy deployment of CIC client workstation applications using Window startup scripts. This document
explains why the scripting method resolves issues that occurred with the formerly recommended base installation package (and
administrative install for localized CIC client workstation applications) methods. It describes how to create the script and the group
policy, and provides sample scripts and CIC client workstation application feature name and properties tables.
For more informationFor more information
For more information about:
Workstation installatio nsWorkstation installatio ns , see the following sections of
PureConnect Installation and Configuration Guide
, available in the
Installation and ConfigurationInstallation and Configuration section of the PureConnect Documentation Library:
"Client Workstation" describes client workstation requirements.
"Client Workstation Installations" describes how to install the IC User Applications, IC Business Manager Applications, and
IC Server Manager Applications on individual client workstations from a share on the CIC Server.
CIC Language Pack installationsCIC Language Pack installatio ns , see
CIC Language Pack Technical Reference
, available in the PureConnect
Documentation Library.
Gro up Policy deploymentGro up Policy deployment , see the Microsoft TechNet articles at http://technet.microsoft.com/en-
us/library/cc754948%28v=WS.10%29.aspx and http://technet.microsoft.com/en-us/library/cc782152%28v=WS.10%29.aspx.
Windows Installer from the co mmand lineWindows Installer from the co mmand line , see Microsoft TechNet article at http://technet.microsoft.com/en-
us/library/cc787899(WS.10).aspx.
VBScriptVBScript , see MSDN Library at http://msdn.microsoft.com/en-us/library/t0aew7h6(v=VS.85).aspx.
MsiExec command line optio nsMsiExec command line optio ns , see TechNet article at http://technet.microsoft.com/en-
us/library/cc759262%28WS.10%29.aspx.
4

Workstation Application Install Share Directory ContentsWorkstation Application Install Share Directory Contents
The following table shows the CIC 2015 R1 and later client workstation application shares on the CIC Server:
The IC_UserApps_32bit, IC_UserApps_64bit, IC_BusinessManagerApps, and IC_ServerManagerApps shares were
created by the CIC Server install run as part of the CIC Server installation.
The IC_Update share was created by the Interactive Update Provider install run as part of the CIC Server installation.
Installation programInstallation program ShareShare ContentsContents
IC User Applications 32-bit
IC_UserApps_32bit \backup
\LanguagePlugins
ICUserApps_32bit_20##_R#.msi
ICUserApps_32bit_Lang_##.mst
Setup.exe
IC User Applications 64-bit
IC_UserApps_64bit \backup
\LanguagePlugins
ICUserApps_64bit_20##_R#.msi
ICUserApps_64bit_Lang_##.mst
Setup.exe
IC Business Manager Applications
IC_BusinessManagerApps \backup
\LanguagePlugins
ICBusinessManagerApps_20##_R#.msi
ICBusinessManagerApps_Lang_##.mst
Setup.exe
IC Server Manager Applications
IC_ServerManagerApps \backup
\LanguagePlugins
ICServerManagerApps_20##_R#.msi
ICServerManagerApps_Lang_##.mst
Setup.exe
Interactive Update Client
IC_IUpdate \backup
IUpdateClient_20##_R#.msi
IUpdateClient_Lang_##.mst
Setup.exe
Here is a description of the CIC workstation application install share directory contents. In the examples below, the string
{Install_Name} is used in place of the names such as IC_UserApps_64bit or IUpdateClient to address all the
workstation applications at the same time.
Setup.exeSetup.exe
Setup.exe manually installs/updates CIC client workstation applications and client language plugins on
individual client
workstations.
If you choose to deploy IC User Applications using a group policy, you will not run
Setup.exe. Instead, the deployment process
will replicate what Setup.exe does.
5

Using Scripts to Deploy CIC Client WorkstationUsing Scripts to Deploy CIC Client Workstation
ApplicationsApplications
In this section:
MSI software deployment vs. using a script
Machine vs. user script
Applying patches
Using transforms to modify the install
MSI software deployment vs. using a scriptMSI software deployment vs. using a script
Genesys found that deploying software using the formerly recommended base .msi installation package methods has the
following limitations:
Machine policies require at least two rebo ots before the Machine policies require at least two rebo ots before the software is installedsoftware is installed
When the computer is rebooted the first time, the software is installed in an advertised state. It shows up in Add/Remove
programs, but it is not yet installed. The second reboot of the computer actually installs the software. This process can
sometimes require three or more reboots depending upon the network, the group policy enforcement and other
considerations.
User policies are installed in an advertised stateUser policies are installed in an advertised state
When the user logs onto the computer, the software is installed in an advertised state. Depending upon how the group
policy was set up, the user will either need to click on a shortcut to fully install the product or open a file associated with
the product. The user policy will not fully install the software on the computer without user action.
Applying patches to the GA install requires an administrative Applying patches to the GA install requires an administrative installinstall
If the administrator wants to install the GA product and apply a patch at the same time, a patched administrative install
needs to be created and the group policy needs to deploy the resulting .msi. Future patches cannot be applied to this
installation directly - they require that a new administrative install be created, that install be patched, and then the patched
.msi be redeployed. These types of installs cannot be patched using Interactive Update.
Using a group policy to apply a script to do the software install removes all of these limitations.
Machine vs. user scriptMachine vs. user script
Scripts applied to the computer are
startup
scripts, while scripts applied to the user are
logon
scripts. Startup scripts are
recommended, although either can be used to install the CIC client workstation applications. There are a couple of important
differences to remember:
Startup scripts are run when the computer is booted and run under the LocalSystem account. This makes this type of script a
good one to use if the application is to be installed for all users of the computers or if one or more users of the computer are
not a member of the computer's local administrators group. No multiple reboots are required.
Logon scripts are run when the user logs onto the machine. If the user is a member of the computer's local administrators
group, the installation will be performed for all users of the machine. If he is not a local administrator, the installation will be
performed for that user only. No multiple reboots are required.
Note:Note:
Some features may require local administrator privileges (like fax or screen capture drives).
This document provides instructions for creating a machine This document provides instructions for creating a machine (startup script) o nly.(startup script) only.
6

Applying patchesApplying patches
Because the Windows Installer command line allows the application of a patch at the time of the initial installation, patches can
easily be applied when the software is installed using a script. The advantage here (besides the fact that no patched administrative
install is necessary), is that future patches can be applied to the computers directly either via Interactive Update or by using another
script. The installations are seen as a normally-patched installation and not a patched administrative install.
While Interactive Update is the best method to update the installs, it's also possible to use a script to apply a patch to an existing
install.
Using transforms to modify the installUsing transforms to modify the install
As with the base .msi deployment method, transforms can be used to modify the installation. The transform's name and path is
simply added to the Windows Installer command line that is executed on the computer by the script. Instructions for creating a
transform are found in "Appendix A: Base Installation Package Deployment".
7

Create the ScriptCreate the Script
There are several scripting methods that can be used to install software on a client workstation. It's even possible to use a simple
batch file to do the installation. In this document, a sample VBscript is provided and the examples use this script.
In essence, the script is just running a Windows Installer command line on the client workstation. Using a group policy to apply the
script is discussed here, but any deployment method that allows a command line to be run could be used.
In this section:
Basic install
Logging and silent flag
Apply a transform
Apply a patch
Modify properties
Apply patch and transform
Basic installBasic install
Documentation is widely available for the various options for the Windows Installer command line so only the applicable
parameters will be discussed here. The basic format of the Windows Installer command line is:
msiexec /i <PathToMSI>
Where <PathToMSI> is the full path to the installation file. This file should exist on a share to which the client workstation has
access. If the path contains spaces, it should be surrounded by quotes. Quotes can always be used to surround paths or property
values, so it's not a bad idea to always use them to avoid problems.
msiexec /i "\\SoftwarePC\IC client installs\ICUserApps_32bit_2015_R1.msi"
msiexec /i "SoftwarePCICappsICUserappsICUserApps_32bit_2015_R1.msi"
msiexec /i "\\SoftwarePC\ICUApps32\LangPlugins\ICUserApps_LanguagePlugin_de_2015_R1.msi"
msiexec /i "\\SoftwarePC\Plugins\ICBusinessManagerApps_LanguagePlugin_es_2015_R1.msi"
ExamplesExamples
8

Logging and silent flagLogging and silent flag
It is recommended that logging be added to the basic command line with the preferred flag for logging (/l*vx). The "no UI" flag
(/qn) will also be added so that the install is silent:
msiexec /i <PathToMSI> /l*vx <PathToLogFile> /qn
Where <PathToLogFile> is the full path to the desired log file. Again, this path should be quoted if it contains spaces.
msiexec /i "\\SoftwarePC\IC client installs\ICUserApps_32bit_2015_R1.msi" /l*vx
"C:\temp\ICUserApps_32bit_2015_R1.log" /qn
msiexec /i "\\SoftwarePC\ICapps\ICuserapps\ICUserApps_32bit_2015_R1.msi" /l*vx
"%temp%\ICUserApps_32bit_2015_R1.log" /qn
In the second example, the TEMP variable is used to direct the log file to the user's temp directory. In the case of a startup script (a
machine script) this would be the Windows\temp directory.
Note:Note:
If the /qn flag is added, and the install runs under a user account with UAC enabled, Windows Installer disallows the install. The
reason is that when run silently, the UAC prompt cannot be popped and the user cannot allow the install. The work-around for a
site with UAC enabled and running under the user account is to use /qb (reduced UI) instead of /qn. This allows the UAC
prompt to be seen by the user.
Apply a transformApply a transform
If a transform had been created to modify the install, it could be added to the command line using the TRANSFORMS property:
msiexec /i <PathToMSI> /l*vx <PathToLogFile> TRANSFORMS=<PathToTransformFile>
Where <PathToTransformFile> is the full path to the transform. The path must be surrounded by quotes if it contains spaces.
msiexec /i "\\SoftwarePC\IC client installs\ICUserApps_32bit_2015_R1.msi" /l*vx
"C:\temp\ICUserApps_32bit.log" TRANSFORMS="\\SoftwarePC\IC client
transforms\ICUserApps_32bit.mst" /qn
msiexec /i "\\SoftwarePC\ICapps\ICuserapps\ICUserApps_32bit_2015_R1.msi" /l*vx
"%temp%\ICUserApps_32bit_2015_R1.log" TRANSFORMS="\\SoftwarePC\ICtransforms\ICUserApps_32bit.mst"
/qn
Apply a patchApply a patch
If a patch is available to be applied at the time of the initial install, it can be added using the PATCH property:
msiexec /i <PathToMSI> /l*vx <PathToLogFile> PATCH=<FullPathToMSP>
Where <FullPathToMSP> is the full path to the patch. Again, surround this value in quotes if it contains spaces.
msiexec /i "\\SoftwarePC\IC client installs\ICUserApps_32bit_2015_R1.msi" /l*vx
"C:\temp\ICUserApps_32bit_2015_R1.log" PATCH="\\SoftwarePC\IC client
patches\ICUserApps_32bit_2015_R1_Patch1.msp" /qn
msiexec /i "\\SoftwarePC\ICapps\ICuserapps\ICUserApps_32bit.msi" /l*vx
"%temp%\ICUserApps_32bit_2015_R1.log"
PATCH="\\SoftwarePC\currentICpatches\ICUserApps_32bit_2015_R1_Patch1.msp" /qn
ExamplesExamples
ExamplesExamples
ExamplesExamples
9

Modify propertiesModify properties
It's also possible to modify certain values used by the install from the command line. A transform is used for this purpose, but it
may be easier to simply provide the values on the command line if only one or two properties are being modified.
msiexec /i <PathToMSI> /l*vx <PathToLogFile> PROPERTYNAME1=value1 PROPERTYNAME2=value2
Where PROPERTYNAME1 and PROPERTYNAME2 are the property names (in all caps as shown) and value1 and value2 are the
values for those properties. The property names mustmust be all capped, or Windows Installer will not see them as being global and will
ignore them.
Each property/value combination is separated with a space and there is no space on either side of the equal sign. The values are
case insensitive, but should be surrounded by quotes if they contain spaces.
Using the command line to set values is useful for setting the CIC Server name or the desired install location on the local machine.
Note:Note:
A transform can be used to do the same thing and would be a better choice if more than these two properties were being set or
if there are changes to the features installed by default. A transform makes these kinds of modifications much cleaner.
In the first example, the CIC Server name is being set from the command line. In the second example both the CIC Server name and
installation location are being set.
msiexec /i "\\SoftwarePC\IC client installs\ICUserApps_32bit_2015_R1.msi" /l*vx
"C:\temp\ICUserApps_32bit_2015_R1.log" ICSERVERNAME=ICServer1/qn
msiexec /i "\\SoftwarePC\ICapps\ICuserapps\ICUserApps_32bit_2015_R1.msi" /l*vx
"%temp%\ICUserApps_32bit_2015_R1.log" ICSERVERNAME=ICServer1 INTERACTIVEINTELLIGENCE="D:\Program
Files\IC Apps" /qn
For a list of properties that can be modified, see "CIC Client Workstation Application Feature Names and Properties Tables".
For instructions on how to create a transform, see "Create a transform" in "Appendix A: Base Installation Package Deployment".
Apply patch and transformApply patch and transform
Finally, it's possible to apply both the patch and a transform at the same time. This would be the method used if localized clients
are being installed, because the localized binaries are included in the patch and the transform would be created to set the necessary
properties to install the language feature(s).
msiexec /i <PathToMSI> /l*vx <PathToLogFile> TRANSFORMS=<PathToTransformFile>
PATCH=<FullPathToMSP>
msiexec /i "\\SoftwarePC\IC client installs\ICUserApps_32bit_2015_R1.msi" /l*vx
"C:\temp\ICUserApps_32bit_2015_R1.log" TRANSFORMS="\\SoftwarePC\IC client
transforms\ICUserApps_32bit.mst" PATCH="\\SoftwarePC\IC client
patches\ICUserApps_32bit_2015_R1_Patch1.msp" /qn
msiexec /i "\\SoftwarePC\ICapps\ICuserapps\ICUserApps_32bit_2015_R1.msi" /l*vx
"%temp%\ICUserApps_32bit_2015_R1.log" TRANSFORMS="\\SoftwarePC\ICtransforms\ICUserApps_32bit.mst"
PATCH="\\SoftwarePC\currentICpatches\ICUserApps_32bit_2015_R1_Patch1.msp" /qn
ExamplesExamples
ExamplesExamples
10

Create the Group PolicyCreate the Group Policy
Create a group policy to run a startup script (machine policy)Create a group policy to run a startup script (machine policy)
1. Open the Active Directory Users and Computers applet on the domain controller and create a new Organizational Unit (OU) to
contain the computers for the client install. In this example, the OU is named ICBMApps_Install.
2. Right-click the new OU and select PropertiesProperties .
3. Click the Group PolicyGro up Policy tab and click the OpenOpen button to start the Group Policy Management snap-in.
4. Find the OU in the tree, right-click it, and select Create Create and Link a GPO Hereand Link a GPO Here .
11

5. Give the GPO a name. In this example, the GPO is named ICBMAppsInstall.
6. Right-click the GPO that is created and select EditEdit to start the Group Policy Object Editor.
7. Right-click on the GPO name at the top of the tree and select Pro pertiesProperties .
12

8. Click the GeneralGeneral tab and note the Unique Unique NameName value. This value is used by Active Directory to create a folder where scripts
relating to this group policy will reside on the domain controller.
9. In Windows Explorer, locate the folder with the Uniq ue Uniq ue NameName value under the Windows\SYSVOL\domain\Policies folder.
Place the script in the Machine\Scripts\Startup folder there. In this example the script is named
ICBMApps_InstallScript.vbs. Windows Explorer can be closed after placing the script.
13

10. Go back to the Group Policy Object Editor and expand the Computer Computer ConfigurationConfiguratio n branch of the tree, and then the
Windows Windows SettingsSettings branch, and click Scripts (Logo n/Logo ff).Scripts (Logon/Logoff).
11. Right-click the StartupStartup script and select PropertiesProperties .
12. Click the AddAdd button to add the script.
13. Click the BrowseBrowse button to select the script or type its name in the Script NameScript Name field.
14

14. The script should appear in window on the Startup PropertiesStartup Properties page. Click OKOK to close the property page.
15. Right-click the GPO and select EnforcedEnforced to enforce the group policy.
15

16. Add computers to the OU.
17. From the command line, type gpupdate to update the group policies for the domain.
When the workstations contained in the OU reboot, the startup script will run and install the CIC client application software. In this
case, the IC Business Manager Applications install will be run under the LocalSystem account, and will be available to users when
they log onto the their machines.
Note:Note:
If users are actively logged on while the CIC client application is installed, they may see one or more progress messages,
for example:
Instruct users to allow the installation to continue. They should
not
click the CancelCancel button - doing so may corrupt the
installation or cause it to fail.
Let users know that their client machines will automatically reboot as needed to save the changes.
Other uses for a group policy running a scriptOther uses for a group policy running a script
Interactive Update is the preferred method for applying patches to CIC client workstation applications following the initial
installation, but it is possible to use the Windows Installer command line to apply a patch to an existing install. The syntax of the
command is:
msiexec /p <PathToMSP>
Where <PathToMSP> is the full path to the patch. Logging is recommended and the silent flag should also be used:
msiexec /p <PathToMSP> /l*vx <PathToLogFile> /qn
Because group policies can be ordered, it is possible to apply the initial install and then patch that install as long as the group
policy for the initial install was first in the list of applied group policies.
User experienceUser experience
Apply patches (if not using Interactive Update)Apply patches (if not using Interactive Update)
16

A script can be applied to install Engineering Specials (ESs). The Windows Installer command line syntax for installing an ES is the
same as for applying a patch to an existing install:
msiexec /p <pathToMSP>
Where <PathToMSP> is the full path to the patch. Logging is recommended and the silent flag should also be used:
msiexec /p <PathToMSP> /l*vx <PathToLogFile> /qn
An uninstall script can be applied to remove the CIC client workstation application software from client machines. The Windows
Installer command line syntax for removing software is:
msiexec /x <ProductGUID>
Where the ProductGUID is the GUID of the product to be uninstalled. The sample script contains each of the client GUIDs for the
20
XX
R
X
release. The product GUIDs change with each release. To get the product GUIDs for your current release, look at the
Additional Files\Product Codes directory on the CIC 2015 R1 or later .iso image. Logging is recommended and the silent
flag should be used:
msiexec /x <ProductGUID> /l*vx <PathToLogFile> /qn
Note that if the product represented by the GUID isn't installed on the machine, the uninstall fails silently.
The process of removing software is much easier using scripts. The install group policy is removed and the uninstall policy is
created. It would be possible to also leave the group policy in place and simply swap the install script for an uninstall script, editing
the group policy to add the uninstall script (and remove the install script).
See "Sample Scripts" for a sample uninstall script.
Install ESsInstall ESs
Uninstall the softwareUninstall the software
17

Sample ScriptsSample Scripts
Sample Install script for CIC client workstation applicationsSample Install script for CIC client workstation applications
This script is provided as a sample of one way that the CIC client workstation applications could be deployed. The script is flexible
enough that the user may use it for any of the three CIC client applications.
The script is heavily commented and should be self-explanatory. There is a section titled "Configurable parameters" that are
parameters that the user can set to control which install is run as well as specify the path to the msi file, the application to install, a
flag to disable logging and the logging directory path. Optional values that can be set are the CIC Server name, the installation
directory and the path to the transform file, if one is used.
Note:Note:
The script checks to see if the application is already installed and if it is, it simply exits. By default, the install log will be written
to the user's TEMP directory and will be in the form of <installName>_installLog_<timestamp>.log.
The sample install script is provided below:
Const HKEY_LOCAL_MACHINE = &H80000002
Dim ICApp(4,1), AppToInstall, strComputer, strKeyPath, strValueName, objRegistry,
WShell, r
Dim commandLine, installSharePath, defaultTempDir, rootName, ICServerName
strComputer = "."
Set WShell = Wscript.CreateObject("Wscript.Shell")
Set envShell = Wshell.Environment("User")
Set objRegistry = GetObject("winmgmts:\\" & strComputer &
"\root\default:StdRegProv")
'GUIDs for 20XX RX installs
'GUIDs for the current release can be found in the "Additional Files\ProductCodes”
directory
'on the ISO image
'replace "{xxxxxxxx-xxxx-xxxx-xxxx-xxxxxxxxxxxx}" with the product's
GUID and
'"20XX_RX" with the release name (i.e., "2017_R4")
ICApp(0,0) = "{xxxxxxxx-xxxx-xxxx-xxxx-xxxxxxxxxxxx}" 'IC Business
Manager Apps
ICApp(0,1) = "ICBusinessManagerApps_20XX_RX.msi"
ICApp(1,0) = "{xxxxxxxx-xxxx-xxxx-xxxx-xxxxxxxxxxxx}" 'IC User
Apps (32_bit)
ICApp(1,1) = "ICUserApps_32_20XX_RX.msi"
ICApp(2,0) = "{xxxxxxxx-xxxx-xxxx-xxxx-xxxxxxxxxxxx}" 'IC User
Apps (64_bit)
ICApp(2,1) = "ICUserApps_64bit_20XX_RX.msi"
ICApp(3,0) = "{xxxxxxxx-xxxx-xxxx-xxxx-xxxxxxxxxxxx}" 'IC Server
Manager Apps
ICApp(3,1) = "ICServerManagerApps_20XX_RX.msi"
strValueName = "DisplayName"
'sets defaultTempDir to user temp directory
defaultTempDir = wshell.ExpandEnvironmentStrings(envShell("TEMP"))
'------------------------------ Configurable parameters ---------------------------------------------
'set to 0 to install ICBM, 1 to install ICUApps_32, 2 to install ICUApps_64,
3 to install ICSM, 4 to install ICWC
AppToInstall=1
'set to the network installshare folder
installSharePath="\\MyServer\software\clientsoftware"
'default log directory is the user temp directory. This may be windows\temp
if run under LocalSystem
18

'if change is desired, the logDir variable should be in quotes like this:
'logDir="c:\temp"
logDir=defaultTempDir
'Set to false to disable logging
logInstall=True
'adds ICSERVERNAME property to the command line if the variable is not
empty
'if value is added, it should be surrounded by quotes like this:
'ICServername="MyICServer"
ICServerName=""
'adds installation directory property to the command line if variable is
not empty
'by default, the client applications install to "C:\Program Files\Interactive
Intelligence"
'if value is added, it should be surrounded by quotes like this:
'installDir="C:\Program Files\Interactive Intelligence"
installDir=""
'adds transform (MST) to the command line if one is used to set properties
and features to be installed
'this value should be the full path and name of the transform, surrounded
by quotes. Ex:
'transformPath="\\myserver\\myInstallShare\transforms\ICUAppsInstall.mst"
transformPath=""
'----------------------------------------------------------------------------------------------------
strKeyPath = "SOFTWARE\Microsoft\Windows\CurrentVersion\Uninstall\"
& ICApp(AppToInstall,0) & "\"
objRegistry.GetStringValue HKEY_LOCAL_MACHINE,strKeyPath,strValueName,dwValue
'gets msi file's root name (used in naming the logfile)
rootName=mid(ICAPP(AppToInstall,1),1,len(ICAPP(AppToInstall,1))-4)
'creates a timestamp to make log name unique
makeTimestamp=Year(Now) & Month(Now) & Day(Now) & Hour(Now)
& Minute(Now) & Second(Now)
'Installs the product if it is not installed. If it is installed, does
nothing.
If IsNull(dwValue) Then
'basic command line to install the product
commandLine="msiexec /i " & Chr(34) &
installSharePath & "\" & ICApp(AppToInstall,1)
&
Chr(34)
'adds logging to command line if LogInstall is set to
"true"
If(logInstall) Then
commandLine=commandLine & "
/l*vx " & Chr(34) & logDir & "\" &
rootName
& "_installLog_" & makeTimeStamp & ".log"
& Chr(34)
End If
'adds ICSERVERNAME property to the command line if a
value is provided for the ICServerName variable
If ICServerName"" Then
commandLine=commandLine & "
ICSERVERNAME=" & Chr(34) & ICServerName & Chr(34)
End If
'adds INTERACTIVEINTELLIGENCE property to the command
19

line if a value is provided for the installDir variable
If installDir"" Then
commandLine=commandLine & "
INTERACTIVEINTELLIGENCE=" & Chr(34) & installDir &
Chr(34)
End if
'adds TRANSFORMS property to the command line if a value
is provided for the transformPath variable
If transformPath"" Then
commandLine=commandLine & "
TRANSFORMS=" & Chr(34) & transformPath & Chr(34)
End if
'adds switch for quiet execution (no UI) to the command
line
commandLine=commandLine & " /qn"
'the window is hidden and the script waits until the
install is finished before continuing
r=wshell.run(commandLine,0,true)
End If
Set WShell = Nothing
Set objRegistry = Nothing
Set envShell = Nothing
Sample Uninstall script for CIC client workstation applicationsSample Uninstall script for CIC client workstation applications
This script is provided as an example of how a script could be used to remove the CIC client workstation application. Please refer
to Uninstall the software for background information.
It contains a
Configurable parameters
section where the user can choose the install to be removed, the logging directory and a flag
to disable logging if desired. By default, the uninstall log will be written to the user's TEMP directory and will be in the form of
<installName>_uninstallLog_<timestamp>.log.
The script checks to see if the selected application is installed and if it is not, it simply exits.
The sample uninstall script is provided below:
Const HKEY_LOCAL_MACHINE = &H80000002
Dim ICApp(4,1), AppToInstall, strComputer, strKeyPath, strValueName, objRegistry,
WShell, r
Dim commandLine, defaultTempDir, rootName
strComputer = "."
Set WShell = Wscript.CreateObject("Wscript.Shell")
Set envShell = Wshell.Environment("User")
Set objRegistry = GetObject("winmgmts:\\" & strComputer &
"\root\default:StdRegProv")
'GUIDs for 2015 R1 installs
'GUIDs for the current release can be found in the "Additional Files\ProductCodes”
directory
'on the ISO image
'replace "{xxxxxxxx-xxxx-xxxx-xxxx-xxxxxxxxxxxx}" with the product's
GUID and
'"20XX_RX" with the release name (i.e., "2017_R4")
ICApp(0,0) = "{xxxxxxxx-xxxx-xxxx-xxxx-xxxxxxxxxxxx}" 'IC Business
Manager Apps
ICApp(0,1) = "ICBusinessManagerApps_20XX_RX.msi"
ICApp(1,0) = "{xxxxxxxx-xxxx-xxxx-xxxx-xxxxxxxxxxxx}" 'IC User
Apps (32_bit)
ICApp(1,1) = "ICUserApps_32_20XX_RX.msi"
ICApp(2,0) = "{xxxxxxxx-xxxx-xxxx-xxxx-xxxxxxxxxxxx}" 'IC User
Apps (64_bit)
ICApp(2,1) = "ICUserApps_64bit_20XX_RX.msi"
ICApp(3,0) = "{xxxxxxxx-xxxx-xxxx-xxxx-xxxxxxxxxxxx}" 'IC Server
Manager Apps
20

ICApp(3,1) = "ICServerManagerApps_20XX_RX.msi"
strValueName = "DisplayName"
'sets defaultTempDir to user temp directory
defaultTempDir = wshell.ExpandEnvironmentStrings(envShell("TEMP"))
'------------------------------ Configurable parameters ---------------------------------------------
'set to 0 to uninstall ICBM, 1 to uninstall ICUApps_32, 2 to uninstall
ICUApps_64, 3 to uninstall ICSM, 4 to uninstall ICWC
AppToUninstall=1
'default log directory is the user temp directory. This may be windows\temp
if run under LocalSystem
'if change is desired, the logDir variable should be in quotes like this:
'logDir="c:\temp"
logDir=defaultTempDir
'Set to false to disable logging
logInstall=True
'----------------------------------------------------------------------------------------------------
strKeyPath = "SOFTWARE\Microsoft\Windows\CurrentVersion\Uninstall\"
& ICApp(AppToUninstall,0) & "\"
objRegistry.GetStringValue HKEY_LOCAL_MACHINE,strKeyPath,strValueName,dwValue
'gets msi file's root name (used in naming the logfile)
rootName=mid(ICAPP(AppToUninstall,1),1,len(ICAPP(AppToUninstall,1))-4)
'creates a timestamp to make log name unique
makeTimestamp=Year(Now) & Month(Now) & Day(Now) & Hour(Now)
& Minute(Now) & Second(Now)
'Installs the product if it is not installed. If it is installed, does
nothing.
If Not IsNull(dwValue) Then
'command line to uninstall the product
commandLine="msiexec /x " & ICApp(AppToUninstall,0)
'adds logging to command line if LogInstall is set to
"true"
If(logInstall) Then
commandLine=commandLine & "
/l*vx " & Chr(34) & logDir & "\" & rootName
& "_uninstallLog_" & makeTimeStamp & ".log"
& Chr(34)
End If
'adds switch for quiet execution (no UI)
commandLine=commandLine & " /qn"
'the window is hidden and the script waits until the
install is finished before continuing
r=wshell.run(commandLine,0,true)
End If
Set WShell = Nothing
Set objRegistry = Nothing
Set envShell = Nothing
Sample Upgrade script for CIC client workstation applicationsSample Upgrade script for CIC client workstation applications
This script is provided as an example of how a script can be used to upgrade 3.0 client workstation applications to 2015 R1 or later.
If the existing 3.0 client workstations are localized, the script enables the user to install 2015 R1 or later Language Plugins for the
existing installed languages.
The script is heavily commented and should be self-explanatory. There is a section titled "Configurable parameters" containing
parameters that the user can set to control which install is run as well as specify the path to the .msi file, the application to install,
a flag to disable logging and the logging directory path. Optional values that can be set are the CIC Server name, the installation
directory, and the path to the transform file, if one is used.
The script checks to see if the application is already installed and if it is, it simply exits. By default, the install log will be written to
the user's TEMP directory and will be in the form of <installName>_installLog_<timestamp>.log.
The sample upgrade script is provided below:
--------------------------------------------------------------------------------------------
This script is a modified version of the client install script. It has
been changed to install the client patch and the language plugin
21

installs.
This script installs the 2015 R1 64-bit ICUserApps product, a patch (Patch1)
and the German and Japanese ICUserApps language plugins. The script
can
be modified to install any of the client applications and any (or
all)
of the language plugins for that client application.
---------------------------------------------------------------------------------------------
Const HKEY_LOCAL_MACHINE = &H80000002
Dim ICApp(4,1), AppToInstall, strComputer, strKeyPath, strValueName, objRegistry,
WShell, r
Dim commandLine, installSharePath, defaultTempDir, rootName, ICServerName
strComputer = "."
Set WShell = Wscript.CreateObject("Wscript.Shell")
Set envShell = Wshell.Environment("User")
Set objRegistry = GetObject("winmgmts:\\" & strComputer &
"\root\default:StdRegProv")
'GUIDs for 2015 R1 installs
'GUIDs for the current release can be found in the "Additional Files\ProductCodes”
directory
'on the ISO image
'replace "{xxxxxxxx-xxxx-xxxx-xxxx-xxxxxxxxxxxx}" with the product's
GUID and
'"20XX_RX" with the release name (i.e., "2017_R4")
ICApp(0,0) = "{xxxxxxxx-xxxx-xxxx-xxxx-xxxxxxxxxxxx}" 'IC Business
Manager Apps
ICApp(0,1) = "ICBusinessManagerApps_20XX_RX.msi"
ICApp(1,0) = "{xxxxxxxx-xxxx-xxxx-xxxx-xxxxxxxxxxxx}" 'IC User
Apps (32_bit)
ICApp(1,1) = "ICUserApps_32_20XX_RX.msi"
ICApp(2,0) = "{xxxxxxxx-xxxx-xxxx-xxxx-xxxxxxxxxxxx}" 'IC User
Apps (64_bit)
ICApp(2,1) = "ICUserApps_64bit_20XX_RX.msi"
ICApp(3,0) = "{xxxxxxxx-xxxx-xxxx-xxxx-xxxxxxxxxxxx}" 'IC Server
Manager Apps
ICApp(3,1) = "ICServerManagerApps_20XX_RX.msi"
strValueName = "DisplayName"
'sets defaultTempDir to user temp directory
defaultTempDir = wshell.ExpandEnvironmentStrings(envShell("TEMP"))
'------------------------------ Configurable parameters ---------------------------------------------
'set to 0 to install ICBM, 1 to install ICUApps_32, 2 to install ICUApps_64,
3 to install ICSM, 4 to install ICWC
AppToInstall=2
'set to the network installshare folder
'installSharePath="\\MyServer\MyInstallShare\software\clientsoftware"
installSharePath="\\myserver\MyInstallShare\software\ICUserApps"
'default log directory is the user temp directory. This may be windows\temp
22

if run under LocalSystem
'if change is desired, the logDir variable should be in quotes like this:
'logDir="c:\temp"
logDir=defaultTempDir
'Set to false to disable logging
logInstall=True
'adds ICSERVERNAME property to the command line if the variable is not
empty
'if value is added, it should be surrounded by quotes like this:
'ICServername="MyICServer"
ICServerName=""
'adds installation directory property to the command line if variable is
not empty
'by default, the client applications install to "C:\Program Files\Interactive
Intelligence"
'if value is added, it should be surrounded by quotes like this:
'installDir="C:\Program Files\Interactive Intelligence"
installDir=""
'adds transform (MST) to the command line if one is used to set properties
and features to be installed
'this value should be the full path and name of the transform, surrounded
by quotes. Ex:
'transformPath="\\myserver\myInstallShare\transforms\ICUAppsInstall.mst"
transformPath=""
'this value should be the root directory of the client patch, surrounded
by quotes. Ex:
'patchRoot="\\myserver\myInstallShare\SUs"
patchRoot="\\myserver\MyInstallShare\software\ICUserApps"
'The patch name will be created in the script and is based on the product
name and Patch level.
'In this example, Patch1 will be used.
'-->Note that the language plugins require that the parent client be
installed."" Then
commandLine=commandLine & " ICSERVERNAME="
& Chr(34) & ICServerName & Chr(34)
End If
'adds INTERACTIVEINTELLIGENCE property to the command line
if a value is provided for the installDir variable
If installDir"" Then
commandLine=commandLine & " INTERACTIVEINTELLIGENCE="
& Chr(34) & installDir & Chr(34)
End if
'adds TRANSFORMS property to the command line if a value is
provided for the transformPath variable
If transformPath"" Then
commandLine=commandLine & " TRANSFORMS="
& Chr(34) & transformPath & Chr(34)
End if
'adds PATCH property to the command line if a value is provided
for the patchPath variable
If patchPath"" Then
commandLine=commandLine & " PATCH="
& Chr(34) & patchPath & Chr(34)
23

End if
'adds switch for quiet execution (no UI) to the command line
commandLine=commandLine & " /qn"
'the window is hidden and the script waits until the install
is finished before continuing
r=wshell.run(commandLine,0,true)
End If
'This section installs the language plugins specified in the "pluginArray"
variable if the
'installPlugins variable is set to true
if installPlugins=true then
for i=0 to ubound(pluginArray)
'gets msi file's root name (used in naming the
logfile)
rootName=mid(pluginArray(i),1,len(pluginArray(i))-4)
'basic command line to install the product
commandLine="msiexec /i " & Chr(34)
& pluginPath & "\" & pluginArray(i) & Chr(34)
'adds logging to command line if LogInstall is
set to "true"
If(logInstall) Then
commandLine=commandLine & "
/l*vx " & Chr(34) & logDir & "\" &
rootName
& "_installLog_" & makeTimeStamp() & ".log"
& Chr(34)
End If
'adds switch for quiet execution (no UI) to the
command line
commandLine=commandLine & " /qn"
'the window is hidden and the script waits until
the install is finished before continuing
r=wshell.run(commandLine,0,true)
next
End If
Set WShell = Nothing
Set objRegistry = Nothing
Set envShell = Nothing
'creates a timestamp to make log name unique
function makeTimeStamp
makeTimestamp=Year(Now) & Month(Now) & Day(Now) &
Hour(Now) & Minute(Now) & Second(Now)
end function
24

Client Workstation Application Installs: Feature NamesClient Workstation Application Installs: Feature Names
and Properties and Properties TablesTables
This section provides feature names and properties tables to refer to when customizing the base installation package for the
following CIC and Interaction Dialer 2015 R1 or later client workstation application installs:
IC User Applications (32-bit)
IC User Applications (64-bit)
IC Business Manager Applications.
This section includes: Features set to install level 1 (install by default) and Properties that the user can set
IC Server Manager Applications.
This section includes: Features set to install level 1 (install by default) and Properties that the user can set
Interactive Update Client.
This section includes: Features set to install level 1 (install by default) and Properties that the user can set
Interaction Scripter Client.
This section includes: Features set to install level 1 (install by default) and Properties that the user can set
IC User Applications (32-bit)IC User Applications (32-bit)
When Feature_ICNE is deployed via group policy for CIC 2015 R4 or later, only InteractionDesktop.exe is installed/updated.
InteractionClient.exe is removed.
In this section:
Features set to install level 1 (install by default)
Features set to install level 100 (enabled but not installed by default)
Properties that the user can set
Features set to install level 1 (install by default)Features set to install level 1 (install by default)
25

Feature NameFeature Name Name inName in
Feature TreeFeature Tree
DescriptionDescription
HiddenCommon_CertificateComponents Invisible in
Feature Tree
Required
HiddenCommon_ININTraceInitializer Invisible in
Feature Tree
Required
HiddenFeature_Common_NotifierDefaults Invisible in
Feature Tree
Required
HiddenFeature_Common_MSMergeModules Invisible in
Feature Tree
Required
Feature_InteractionFax Interaction Fax Enables users to send, receive, print, annotate, and rotate faxes;
as well as monitor the fax queue.
Feature_InteractionFax32NT*** Invisible in
Feature Tree
Installs the 32-bit Black Ice files.
Feature_InteractionFax32TS*** Invisible in
Feature Tree
Installs the 32-bit Black Ice files for Terminal Services.
Feature_ININQoS32 Invisible in
Feature Tree
Installs the PureConnect QoS 32-bit driver.
Feature_ININQoS32_Vista_x86**** Invisible in
Feature Tree
Installs the 32-bit PureConnect QoS Driver on Vista and
Windows Server 2008.
Feature_ININQoS32_Win7_x86**** Invisible in
Feature Tree
Installs the 32-bit PureConnect QoS Driver on Windows 7.
Feature_ININQoS32_Win10_x86**** Invisible in
Feature Tree
Installs the 32-bit PureConnect QoS Driver on Windows 10.
Feature_ININQoS32_XP_x86**** Invisible in
Feature Tree
Installs the 32-bit PureConnect QoS Driver on Windows XP.
HiddenFeature_Common Invisible in
Feature Tree
Required
HiddenFeature_Common_Essentials Invisible in
Feature Tree
Required
Feature_InteractionClient Interaction
Desktop
Select Interaction Desktop and additional client features.
ICNE_ExtraFeature** Invisible in
Feature Tree
Feature_ICNE* Interaction
Desktop
Standard version of the CIC client. Feature-rich, provides low
bandwidth usage for larger deployments.
Feature_TAPI_Cleanup Invisible in
Feature Tree
Feature_InteractionVM Interaction
Voicemail Player
Enables users to play voicemail messages directly from email
and control message playback.
*Feature_InteractionClient sub-feature
**Feature_ICNE sub-feature
***Feature_InteractionFax sub-feature (should be left at level 1)
****Feature_ININQoS32 sub-feature (should be left at level 1)
26

Note:Note:
For more information about the PureConnect QoS driver, see KB article
https://genesyspartner.force.com/customercare/pkb_Home?id= kA50B0000008R5H.
Feature NameFeature Name Name in FeatureName in Feature
TreeTree
DescriptionDescription
Feature_InteractionSIPBridge Interaction SIP
Bridge
Enables at-home workers to use a SIP-enabled telephone to make
and receive calls from CIC through a remote connection.
Feature_SIPSoftStation SIP Soft Phone Delivers audio through a USB headset on a workstation or laptop.
Works with Interaction Desktop or a basic call control interface.
Feature_ScreenRecorderCaptureClient Interaction Screen
Recorder Capture
Client
Installs the Interaction Screen Recorder Capture Client
components.
Feature_ININClientAdditionalFeature* Additional Features Select additional Interaction Desktop features.
Feature_OutlookDialing** Outlook Dialing Dial from Microsoft Outlook and TAPI/TSP-compatible
applications.
*Feature_InteractionClient sub-feature
**Feature_ICNE sub-feature
***Feature_InteractionFax sub-feature (should be left at level 1)
****Feature_ININQoS32 sub-feature (should be left at level 1)
PropertyProperty ValueV alue DescriptionDescription
ICSERVERNAME <xIC
servername>
INTERACTIVEINTELLIGENCE <installation
directory>
Default is C:\Program Files\Interactive Intelligence
FORCEOLDCLIENTAPPREMOVAL 1 Setting this property will cause the install to remove old client
applications that are found on the client computer.
DONOTINSTALL_ININQOSDRIVER 1 Setting this property will prevent the PureConnect QoS driver from being
installed.
For more information about the PureConnect QoS driver, see KB article
https://genesyspartner.force.com/customercare/pkb_Home?id=
kA50B0000008R5H .
DO_NOT_BACKUP_CURRENT_INSTALL 1 Setting this property will prevent the currently-installed client from being
backed up on the Rx upgrade install. Note that setting this property
means that no downgrade to the previous product will be possible.
REINSTALL_BACKUP_PRODUCT 1 Setting this property will cause the backed-up client to be reinstalled
when the Rx product is removed. By default a silent uninstall does not
reinstall the backed-up product and instead removes the product so set
this property if a downgrade install is desired when the Rx product is
removed.
Features set to install level 100 (enabled but not installed by default)Features set to install level 100 (enabled but not installed by default)
Properties that the user can setProperties that the user can set
27

IGNORE_MISSING_KBS 1 Setting this property will cause the install to ignore a launch condition
that checks for SHA-256 certificate support on Windows 7 and Windows
2008 R2 systems (only).
SHA-256 support is required to use the PureConnect QoS driver and
without it, the ICUserApps installation will be blocked. Windows 7 and
Windows 2008R2 require two Microsoft KBs be applied to enable SHA-
256 support. Windows 8, 10, 2012 R2 (and beyond) have SHA-256 support
built into the OS.
Note:Note:
Setting the IGNORE_MISSING_KBS property could cause
connectivity issues if the PureConnect QoS driver is installed on the
computer and the required KBs are not installed because without
SHA-256 support, Windows will not load a driver signed with a SHA-
256 certificate.
It is recommended that the DONOTINSTALL_ININQOSDRIVER property
also be set to ensure that the PureConnect QoS driver is not installed if
the IGNORE_MISSING_KBS property is set.
INSTALL_SRCC_FOR_ICONNECT 1 Setting this property disables all other features except the Interaction
Screen Recorder Capture Client. Use this property to install only
Interaction Screen Recorder Capture Client.
Note:Note:
Use this property if you want to install Interaction Screen Recorder
Capture Client and used an HTTP connection.
SRCC_HTTP_CONNECTION_URL
The HTTP(S) URL of the server. If you do not use this property, the default
server will be used.
Format:
"http://servername:<portNumber>"
or
"https://servername:<portNumber>"
Example:
SRCC_HTTP_CONNECTION_URL="https://srccserver.com:8019"
Note:Note:
This property is not required to install Interaction Screen Recorder
Capture Client. Use this property if you want to use Interaction
Screen Recorder Capture Client and an HTTP connection.
ALT_SRCC_HTTP_CONNECTION_URL
The alternative server name. (for example, the backup server in a
Switchover pair). This property is optional.
Example:
ALT_SRCC_HTTP_CONNECTION_URL="ICServerB"
Note:Note:
This property is not required to install Interaction Screen Recorder
Capture Client. Use this property if you want to use Interaction
Screen Recorder Capture Client and an HTTP connection.
SRCC_ICUSERNAME
The CIC username of the user. This property is optional.
Example:
SRCC_ICUSERNAME=MyCICUsername
Note:Note:
This property is not required to install Interaction Screen Recorder
Capture Client. Use this property if you want to use Interaction
Screen Recorder Capture Client and an HTTP connection.
28

IC User Applications (64-bit)IC User Applications (64-bit)
When Feature_ICNE is deployed via group policy for CIC 2015 R4 or later, only InteractionDesktop.exe is installed/updated.
InteractionClient.exe is removed.
In this section:
Features set to install level 1 (install by default)
Features set to install level 100 (enabled but not installed by default)
Features set to install level 0 (disabled)
Properties that the user can set
Features set to install level 1 (install by default)Features set to install level 1 (install by default)
29

Feature NameFeature Name Name inName in
Feature TreeFeature Tree
DescriptionDescription
HiddenCommon_CertificateComponents Invisible in
Feature Tree
Required
HiddenCommon_ININTraceInitializer Invisible in
Feature Tree
Required
HiddenFeature_Common_NotifierDefaults Invisible in
Feature Tree
Required
HiddenFeature_Common_MSMergeModules Invisible in
Feature Tree
Required
Feature_InteractionFax64NT*** Invisible in
Feature Tree
Installs the 64-bit Black Ice files.
Feature_InteractionFax64TS*** Invisible in
Feature Tree
Installs the 64-bit Black Ice files for Terminal Services.
Feature_ININQoS64 Invisible in
Feature Tree
Installs the PureConnect QoS 64-bit driver.
Feature_ININQoS64_Vista_x64**** Invisible in
Feature Tree
Installs the 64-bit PureConnect QoS Driver on Vista and
Windows Server 2008.
Feature_ININQoS64_Win7_x64**** Invisible in
Feature Tree
Installs the 64-bit PureConnect QoS Driver on Windows 7 and
Windows 2008R2.
Feature_ININQoS64_Win10_x86**** Invisible in
Feature Tree
Installs the 64-bit PureConnect QoS Driver on Windows 10.
HiddenFeature_Common Invisible in
Feature Tree
Required
HiddenFeature_Common_Essentials Invisible in
Feature Tree
Required
Feature_InteractionClient64 Interaction
Desktop
Select Interaction Desktop and additional client features.
ICNE_ExtraFeature** Invisible in
Feature Tree
Feature_ICNE* Interaction
Desktop
Standard version of the CIC client. Feature-rich, provides low
bandwidth usage for larger deployments.
Feature_TAPI_Cleanup Invisible in
Feature Tree
Feature_InteractionFax64 Interaction Fax Enables users to send, receive, print, annotate, and rotate faxes;
as well as monitor the fax queue.
Feature_InteractionVM Interaction
Voicemail Player
Enables users to play voicemail messages directly from email
and control message playback.
*Feature_InteractionClient64 sub-feature
**Feature_ICNE sub-feature
***Feature_InteractionFax64 sub-feature (should be left at level 1)
****Feature_ININQoS64 sub-feature (should be left at level 1)
Note:Note:
For more information about the PureConnect QoS driver, see KB article
https://genesyspartner.force.com/customercare/pkb_Home?id= kA50B0000008R5H.
30

Feature NameFeature Name Name in FeatureName in Feature
TreeTree
DescriptionDescription
Feature_InteractionSIPBridge Interaction SIP
Bridge
Enables at-home workers to use a SIP-enabled telephone to
make and receive calls from CIC through a remote connection.
Feature_SIPSoftStation SIP Soft Phone Delivers audio through a USB headset on a workstation or laptop.
Works with Interaction Desktop or a basic call control interface.
Feature_ScreenRecorderCaptureClient Interaction Screen
Recorder Capture
Client
Installs the Interaction Screen Recorder Capture Client
components.
Feature_ININClientAdditionalFeature64* Additional Features Select additional Interaction Desktop features.
Feature_OutlookDialing64** Outlook Dialing Dial from Microsoft Outlook and TAPI/TSP-compatible
applications.
*Feature_InteractionClient64 sub-feature
**Feature_ICNE sub-feature
***Feature_InteractionFax64 sub-feature (should be left at level 1)
****Feature_ININQoS64 sub-feature (should be left at level 1)
Feature NameFeature Name Name in Feature TreeName in Feature Tree DescriptionDescription
Fax64DummyFeature -- ---
*Feature_InteractionClient64 sub-feature
**Feature_ICNE sub-feature
***Feature_InteractionFax64 sub-feature (should be left at level 1)
****Feature_ININQoS64 sub-feature (should be left at level 1)
PropertyProperty ValueV alue DescriptionDescription
ICSERVERNAME <xIC
servername>
INTERACTIVEINTELLIGENCE <installation
directory>
Default is C:\Program Files\Interactive Intelligence
FORCEOLDCLIENTAPPREMOVAL 1 Setting this property will cause the install to remove old client
applications that are found on the client computer.
DONOTINSTALL_ININQOSDRIVER 1 Setting this property will prevent the PureConnect QoS driver from being
installed.
For more information about the PureConnect QoS driver, see KB article
https://genesyspartner.force.com/customercare/pkb_Home?id=
kA50B0000008R5H.
Features set to install level 100 (enabled but not installed by default)Features set to install level 100 (enabled but not installed by default)
Features set to install level 0 (disabled)Features set to install level 0 (disabled)
Properties that the user can setProperties that the user can set
31

DO_NOT_BACKUP_CURRENT_INSTALL 1 Setting this property will prevent the currently-installed client from being
backed up on the Rx upgrade install. Note that setting this property
means that no downgrade to the previous product will be possible.
REINSTALL_BACKUP_PRODUCT 1 Setting this property will cause the backed-up client to be reinstalled
when the Rx product is removed. By default a silent uninstall does not
reinstall the backed-up product and instead removes the product so set
this property if a downgrade install is desired when the Rx product is
removed.
IGNORE_MISSING_KBS 1 Setting this property will cause the install to ignore a launch condition
that checks for SHA-256 certificate support on Windows 7 and Windows
2008 R2 systems (only).
SHA-256 support is required to use the PureConnect QoS driver and
without it, the ICUserApps installation will be blocked. Windows 7 and
Windows 2008R2 require two Microsoft KBs be applied to enable SHA-
256 support. Windows 8, 10, 2012 R2 (and beyond) have SHA-256 support
built into the OS.
Note:Note:
Setting the IGNORE_MISSING_KBS property could cause
connectivity issues if the PureConnect QoS driver is installed on the
computer and the required KBs are not installed because without
SHA-256 support, Windows will not load a driver signed with a SHA-
256 certificate.
It is recommended that the DONOTINSTALL_ININQOSDRIVER property
also be set to ensure that the PureConnect QoS driver is not installed if
the IGNORE_MISSING_KBS property is set.
INSTALL_SRCC_FOR_ICONNECT 1 Setting this property disables all other features except the Interaction
Screen Recorder Capture Client. Use this property to install only
Interaction Screen Recorder Capture Client.
Note:Note:
Use this property if you want to install Interaction Screen Recorder
Capture Client and used an HTTP connection.
SRCC_HTTP_CONNECTION_URL
The HTTP(S) URL of the server. If you do not use this property, the default
server will be used.
Format:
"http://servername:<portNumber>"
or
"https://servername:<portNumber>"
Example:
SRCC_HTTP_CONNECTION_URL="https://srccserver.com:8019"
Note:Note:
This property is not required to install Interaction Screen Recorder
Capture Client. Use this property if you want to use Interaction
Screen Recorder Capture Client and an HTTP connection.
ALT_SRCC_HTTP_CONNECTION_URL
The alternate server name. (for example, the backup server in a
Switchover pair). This property is optional.
Example:
ALT_SRCC_HTTP_CONNECTION_URL="ICServerB"
Note:Note:
This property is not required to install Interaction Screen Recorder
Capture Client. Use this property if you want to use Interaction
Screen Recorder Capture Client and an HTTP connection.
32

SRCC_ICUSERNAME
The CIC username of the user. This property is optional.
Example:
SRCC_ICUSERNAME=MyCICUsername
Note:Note:
This property is not required to install Interaction Screen Recorder
Capture Client. Use this property if you want to use Interaction
Screen Recorder Capture Client and an HTTP connection.
IC Business Manager ApplicationsIC Business Manager Applications
Feature NameFeature Name Name inName in
Feature TreeFeature Tree
DescriptionDescription
HiddenCommon_CertificateComponents Invisible in
Feature Tree
Required
HiddenCommon_ININTraceInitializer Invisible in
Feature Tree
Required
HiddenFeature_Common_NotifierDefaults Invisible in
Feature Tree
Required
HiddenFeature_Common_MSMergeModules Invisible in
Feature Tree
Required
HiddenFeature_Common Invisible in
Feature Tree
Required
HiddenFeature_Common_Essentials Invisible in
Feature Tree
Required
Feature_FaxCoverPageEditor Interaction Fax
Cover Page
Editor
Design Interaction Fax cover pages and edit standard templates
available to users.
Feature_ICBusinessManagerApps IC Business
Manager
Applications
Installs IC Business Manager, providing access to business
manager applications such as Interaction Recorder and IPA.
Feature_Supervisornet Invisible in
Feature Tree
Interaction Supervisor
Feature_ReportAssistant* Invisible in
Feature Tree
Installs Interaction Report Assistant
Feature_Reports* Invisible in
Feature Tree
Installs the Reports subsystem.
* Feature_InteractionSupervisor sub-features
Features set to install level 1 (install by default)Features set to install level 1 (install by default)
33

PropertyProperty ValueV alue DescriptionDescription
ICSERVERNAME <xIC
servername>
INTERACTIVEINTELLIGENCE <installation
directory>
Default is C:\Program Files\Interactive Intelligence
FORCEOLDCLIENTAPPREMOVAL 1 Setting this property will cause the install to remove old client
applications that are found on the client computer.
DO_NOT_BACKUP_CURRENT_INSTALL 1 Setting this property will prevent the currently-installed client from being
backed up on the Rx upgrade install. Note that setting this property
means that no downgrade to the previous product will be possible.
REINSTALL_BACKUP_PRODUCT 1 Setting this property will cause the backed-up client to be reinstalled
when the Rx product is removed. By default a silent uninstall does not
reinstall the backed-up product and instead removes the product so set
this property if a downgrade install is desired when the Rx product is
removed.
IC Server Manager ApplicationsIC Server Manager Applications
Properties that the user can setProperties that the user can set
34

Feature NameFeature Name Name inName in
FeatureFeature
TreeTree
DescriptionDescription
HiddenCommon_CertificateComponents Invisible in
Feature Tree
Required
HiddenCommon_ININTraceInitializer Invisible in
Feature Tree
Required
HiddenFeature_Common_NotifierDefaults Invisible in
Feature Tree
Required
HiddenFeature_Common_MSMergeModules Invisible in
Feature Tree
Required
HiddenFeature_Common Invisible in
Feature Tree
Required
HiddenFeature_Common_Essentials Invisible in
Feature Tree
Required
Feature_Designer Interaction
Designer
Design tool for creating, modifying, and debugging handlers.
Feature_InteractionAdministrator Interaction
Administrator
Administrator application for configuring most behavior in CIC
including users, workgroups, stations, lines, ACD, dial plans, client
appearance, etc.
Feature_InteractionAttendant Interaction
Attendant
Administrator application for configuring auto-attendant
functionality for the PureConnect Platform.
Feature_ICSystemManager IC System
Manager
Manages subsystems when CIC is started as service. IC System
Manager can query, stop, restart, configure, and trace CIC
subsystems.
Feature_HostRecorderClient Interaction
Host
Recorder
Client
Required on administrator workstations when using the Host tools.
Feature_SOAPTracer Interaction
SOAP Tracer
Debugs SOAP messages between CIC and SOAP Notifier COM or
ISAPI listener. Required on administrator workstations when using
SOAP tools.
Feature_ICServerManager IC Server
Manager
Applications
Installs IC Server Manager, providing access to server manager
applications such as IC Server Manager Administrator and IPA.
Feature_InteractionProcessAutomation Invisible in
Feature Tree
Interaction Process Automation.
Features set to install level 1 (install by default)Features set to install level 1 (install by default)
35

PropertyProperty ValueV alue DescriptionDescription
ICSERVERNAME <xIC
servername>
INTERACTIVEINTELLIGENCE <installation
directory>
Default is C:\Program Files\Interactive Intelligence
FORCEOLDCLIENTAPPREMOVAL 1 Setting this property will cause the install to remove old client
applications that are found on the client computer.
DO_NOT_BACKUP_CURRENT_INSTALL 1 Setting this property will prevent the currently-installed client from being
backed up on the Rx upgrade install. Note that setting this property
means that no downgrade to the previous product will be possible.
REINSTALL_BACKUP_PRODUCT 1 Setting this property will cause the backed-up client to be reinstalled
when the Rx product is removed. By default a silent uninstall does not
reinstall the backed-up product and instead removes the product so set
this property if a downgrade install is desired when the Rx product is
removed.
Interactive Update ClientInteractive Update Client
Feature NameFeature Name Name in Feature TreeName in Feature Tree DescriptionDescription
HiddenCommon_CertificateComponents Invisible in Feature Tree Required
HiddenCommon_ININTraceInitializer Invisible in Feature Tree Required
HiddenFeature_Common_NotifierDefaults Invisible in Feature Tree Required
HiddenFeature_Common_MSMergeModules Invisible in Feature Tree Required
HiddenFeature_Common Invisible in Feature Tree Required
HiddenFeature_Common_Essentials Invisible in Feature Tree Required
IUpdateClient Invisible in Feature Tree Retrieves PureConnect software updates.
Certificates2009Info Invisible in Feature Tree
Properties that the user can setProperties that the user can set
Features set to install level 1 (install by default)Features set to install level 1 (install by default)
36

PropertyProperty ValueV alue DescriptionDescription
PROVIDERSERVERNAME <IUpdate
Provider
name>
--
INTERACTIVEINTELLIGENCE <installation
directory>
Default is C:\Program Files\Interactive Intelligence
DO_NOT_BACKUP_CURRENT_INSTALL 1 Setting this property will prevent the currently-installed client from being
backed up on the Rx upgrade install. Note that setting this property means
that no downgrade to the previous product will be possible.
REINSTALL_BACKUP_PRODUCT 1 Setting this property will cause the backed-up client to be reinstalled when
the Rx product is removed. By default a silent uninstall does not reinstall
the backed-up product and instead removes the product so set this
property if a downgrade install is desired when the Rx product is removed.
Interaction Scripter ClientInteraction Scripter Client
Feature NameFeature Name Name in Feature TreeName in Feature Tree DescriptionDescription
HiddenCommon_CertificateComponents Invisible in Feature Tree Required
HiddenCommon_ININTraceInitializer Invisible in Feature Tree Required
HiddenFeature_Common_NotifierDefaults Invisible in Feature Tree Required
HiddenFeature_Common_MSMergeModules Invisible in Feature Tree Required
HiddenFeature_Common Invisible in Feature Tree Required
HiddenFeature_Common_Essentials Invisible in Feature Tree Required
Feature_ScripterDotNet Interaction Scripter Interaction Scripter
Properties that the user can setProperties that the user can set
Features set to install level 1 (install by default)Features set to install level 1 (install by default)
37

PropertyProperty ValueV alue DescriptionDescription
ICSERVERNAME <xIC
servername>
INTERACTIVEINTELLIGENCE <installation
directory>
Default is C:\Program Files\Interactive Intelligence
FORCEOLDCLIENTAPPREMOVAL 1 Setting this property will cause the install to remove old client
applications that are found on the client computer.
DO_NOT_BACKUP_CURRENT_INSTALL 1 Setting this property will prevent the currently-installed client from being
backed up on the Rx upgrade install. Note that setting this property
means that no downgrade to the previous product will be possible.
REINSTALL_BACKUP_PRODUCT 1 Setting this property will cause the backed-up client to be reinstalled
when the Rx product is removed. By default a silent uninstall does not
reinstall the backed-up product and instead removes the product so set
this property if a downgrade install is desired when the Rx product is
removed.
Properties that the user can setProperties that the user can set
38

Client Plugin Installs: Product CodesClient Plugin Installs: Product Codes
Client plugin installs have no user-configurable properties. They rely on the client workstation application installs for their
installation properties. This section lists the client plugin installs and corresponding product codes (GUID), to be added to the
scripts, as appropriate:
IC Client Language Plugins
Microsoft Outlook Interaction Desktop Plugin for IC User Applications
Interaction Dialer Client Plugins
Interaction Dialer Client Language Plugins
Client Language PluginsClient Language Plugins
This section provides the CIC client Language Plugin names:
Tier 1 Client Language Plugins
Tier 2 Client Language Plugins
Tier 3 Client Language Plugins
Notes:Notes:
For complete information on supported languages in CIC, their current availability, and scope of localization for each language,
see the
CIC Language Pack Technical Reference
at
https://help.genesys.com/cic/mergedProjects/wh_tr/mergedProjects/wh_tr_language_pack/desktop/cic_language_packs.htm .
The tables below list the client language plugins for each. The product code changes with each release so to get the product codes
for your current release look at the Additional Files\ProductCodes directory on the CIC 2015 R1 or later .iso image.
39

The following table shows the client language plugin install names.
Client Language Plugin NameClient Language Plugin N ame
Dutch Plugin for IC Business Manager Applications 20
XX
R
X
French Plugin for IC Business Manager Applications 20
XX
R
X
German Plugin for IC Business Manager Applications 20
XX
R
X
Japanese Plugin for IC Business Manager Applications 20
XX
R
X
Polish Plugin for IC Business Manager Applications 20
XX
R
X
Portuguese (Brazil) Plugin for IC Business Manager Applications 20
XX
R
X
Spanish Plugin for IC Business Manager Applications 20
XX
R
X
German Plugin for IC Server Manager Applications 20
XX
R
X
Japanese Plugin for IC Server Manager Applications 20
XX
R
X
Polish Plugin for IC Server Manager Applications 20
XX
R
X
Spanish Plugin for IC Server Manager Applications 20
XX
R
X
Dutch Plugin for IC User Applications 20
XX
R
X
French Plugin for IC User Applications 20
XX
R
X
German Plugin for IC User Applications 20
XX
R
X
Japanese Plugin for IC User Applications 20
XX
R
X
Polish Plugin for IC User Applications 20
XX
R
X
Portuguese Plugin for IC User Applications 20
XX
R
X
Spanish Plugin for IC User Applications 20
XX
R
X
Tier 1 Client Language PluginsTier 1 Client Language Plugins
40

The following table shows the client language plugin names.
Client Language Plugin NameClient Language Plugin N ame
Chinese (Simplified) Plugin for IC Business Manager Applications 20
XX
R
X
Chinese (Traditional) Plugin for IC Business Manager Applications 20
XX
R
X
Italian Plugin for IC Business Manager Applications 2015 R1
Korean Plugin for IC Business Manager Applications 2015 R1
Norwegian Plugin for IC Business Manager Applications 2015 R1
Swedish Plugin for IC Business Manager Applications 2015 R1
Turkish Plugin for IC Business Manager Applications 2015 R1
Chinese (Simplified) Plugin for IC Server Manager Applications 20
XX
R
X
Chinese (Traditional) Plugin for IC Server Manager Applications 20
XX
R
X
Arabic Plugin for IC User Applications 20
XX
R
X
Chinese (Simplified) Plugin for IC User Applications 2015 R1
Chinese (Traditional) Plugin for IC User Applications 2015 R1
Hebrew Plugin for IC User Applications 20
XX
R
X
Italian Plugin for IC User Applications 20
XX
R
X
Korean Plugin for IC User Applications 20
XX
R
X
Norwegian Plugin for IC User Applications 20
XX
R
X
Russian Plugin for IC User Applications 20
XX
R
X
Serbian Plugin for IC User Applications 20
XX
R
X
Swedish Plugin for IC User Applications 20
XX
R
X
Turkish Plugin for IC User Applications 20
XX
R
X
The following table shows the client language plugin names.
Client Language Plugin NameClient Language Plugin N ame
Danish Plugin for IC User Applications 20
XX
R
X
Microsoft Outlook Interaction Desktop Plugin for IC User ApplicationsMicrosoft Outlook Interaction Desktop Plugin for IC User Applications
The Microsoft Outlook Interaction Desktop Add in is a plugin for IC User Applications. For more information about this plugin, see
Working with the Microsoft Outlook Interaction Desktop Add-In.
Client Plugin NameClient Plugin Name
Outlook Plugin for IC User Applications 20
XX
R
X
Tier 2 Client Language PluginsTier 2 Client Language Plugins
Tier 3 Client Language PluginsTier 3 Client Language Plugins
41

Interaction Dialer Client PluginsInteraction Dialer Client Plugins
This section provides the Interaction Dialer client language plugin names.
When Feature_ICNE is deployed via group policy for CIC 2015 R4 or later, only InteractionDesktop.exe is installed/updated.
InteractionClient.exe is removed.
Client Plugin NameClient Plugin Name
Dialer Plug-ins for IC Business Manager Applications 20
XX
R
X
Dialer Plug-ins for IC Server Manager Applications 20
XX
R
X
Dialer Plug-ins for IC Session Manager Server 20
XX
R
X
Interaction Dialer Client Language PluginsInteraction Dialer Client Language Plugins
This section provides the Interaction Dialer client language plugin names.
Tier 1 Client Language Plugins
Note:Note:
For complete information on supported languages in Interaction Dialer, their current availability, and scope of localization for
each language, see the PureConnect Outbound:Interaction Dialer and Interaction Scripter page at
https://help.genesys.com/cic/desktop/interaction_dialer_landing.htm.
The following table shows the Interaction Dialer Client language plugin install names for Interaction Dialer Language Packs.
Client Language Plugin NameClient Language Plugin N ame
German Plugin for Interaction Scripter.NET 20
XX
R
X
Spanish Plugin for Interaction Scripter.NET 20
XX
R
X
French Plugin for Interaction Scripter.NET 20
XX
R
X
Japanese Plugin for Interaction Scripter.NET 20
XX
R
X
Dutch Plugin for Interaction Scripter.NET 20
XX
R
X
Polish Plugin for Interaction Scripter.NET 20
XX
R
X
Portuguese (Brazil) Plugin for Interaction Scripter.NET 20
XX
R
X
Chinese (Simplified) Plugin for Interaction Scripter.NET 20
XX
R
X
Tier 1 Client Language PluginsTier 1 Client Language Plugins
42

Appendix A: Base Installation Package DeploymentAppendix A: Base Installation Package Deployment
Genesys currently recommends deployment of CIC workstation applications using a script.
However, for reference purposes, the formerly recommended base installation package method of group policy deployment of CIC client workstation
applications is provided in this appendix. This method can still be used, but is not recommended.
In this section:
Create and deploy the base installation package
Customize the base installation package
Create and deploy the base installation packageCreate and deploy the base installation package
This section describes how to create and deploy a base installation package with the default feature components and default directory location to specified
workstations for the IC User Applications installation program ( .msi) file. The procedure is equally applicable to the other client workstation installs.
Note:Note:
If you plan to customize the base installation package, take special notice of step 10, as you will make a selection needed for the customization.
1. On the domain controller, open Active Directo ry Users Active Directory Users and C omputersand Co mputers .
2. Define a new organization unit (OU) under the Domain. In this example, the ICUserAppsU sersICU serAppsUs ers OU was created.
3. In the new OU, add the workstations that you wish to receive the software installation, in this case, the IC User Applications installation.
4. Right-click on the ICUserAppsUsers OU, and select Pro pertiesPro perties .
43

5. Select the Group Po licyGroup Policy tab.
6. Select NewNew to create a Group Policy Object and give it an appropriate name, for example, ICUserAppsInstallation.
7. Highlight the ICUserAppsInstallation Group Policy Object and select E ditEdit to open the Group Policy Editor.
44

8. Select Computer Configuration…Software Settings…So ftware Co mputer Confi guratio n…Software Settings…Software i nstallatio nins tal lation.
9. Right-click So ftware installationSo ftware installation and select PropertiesProperties .
10. Browse to the network share containing the installation program. In this case, the ICUserApps.msi file is located in the ICUserApps share on the
domain controller. Be sure to use the UNC path.
Under N ew packagesNew packages , select AssignA ssi gn.
Note:Note:
If you plan to customize the base installation package, select AdvancedAdvanced instead of As signA ssign. This selection becomes important when you apply the
customized
transform
to the base installation package.
Under Installatio n user interface options,Installation user interface options, selectMaximumMaxi mum .
Click ApplyApply to return to the Group Policy Editor.
11. Right-click in the empty pane on the right and select New…PackageNew…Pack age.
45
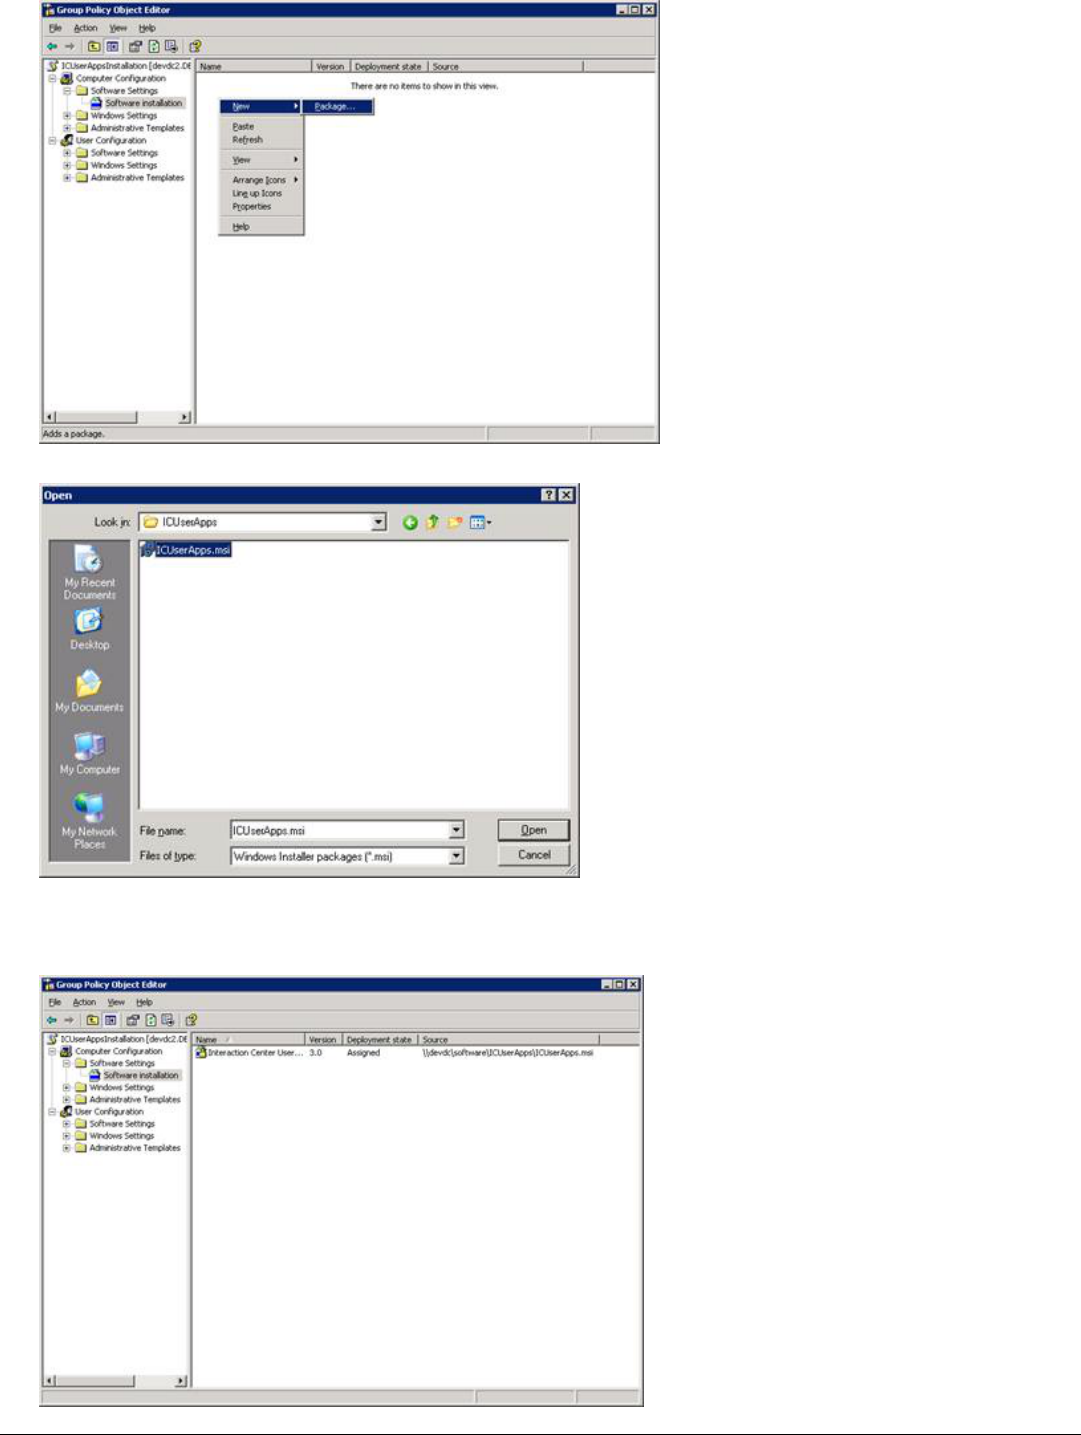
12. Select the installation program ( ICUserApps.msi) from the network share ( ICUserApps) and click OpenOpen.
13. The Group Policy Editor shows the installation package (Interaction Center User Applications) that you created for the ICUserAppsUsers OU.
Note:Note:
If you plan to customize the base installation package, do so now before you deploy the installation package. Follow the instructions in "Customize the
base installation package" and return to this step when you are finished.
46

Right-click on the Interaction Center User Applications package, and select PropertiesProperties .
14. Select the DeploymentDeployment tab.
15. Under Deplo yment optionsDeployment o ptions , click Install Ins tal l this application at logo nthis application at logo n.
Click ApplyApply to return to the Gro up Poli cy Group Policy E ditorEditor, and exit the Group Policy Editor.
16. The next time that users in the ICUserApps OU log on to their workstations, the Interaction Center User Applications installation package launches.
After the installation is completed, the user’s desktop appears.
17. You can choose to apply CIC releases and patches using Interactive Update or by manual download. See C IC CIC Server Install ationServer Installation in the
PureConnect
Installation and Configuration Guide
at
https://help.genesys.com/cic/mergedProjects/wh_tr/mergedProjects/wh_tr_installation_and_configuration/desktop/chapter_11_cic_server_installation.htm.
You may also wish to refer to
Interactive Update Technical Reference
in the PureConnect Documentation Library.
Customize the base installation packageCustomize the base installation package
If you want to specify different feature components and/or default directory, you can customize the base installation package by creating and applying a
transform
file (.mst). A transform is a collection of changes applied to an installation. By applying a transform to a base installation package, the installer can
add or replace data in the installation database. The transform will be applied at the same time that you deploy the installation package.
Note:Note:
Refer to "Client Workstation Application Feature Names and Properties" for detailed feature name and property tables for customizing the base installation
package for 3.0 client workstation application installs.
In this section:
Install the Orca database editor
Create a transform
Verify the changes that the transform will make
Apply the transform to the base installation package
47

Use the Orca database editor to create the transform file. The Orca database editor is a table-editing tool available in the Windows Installer SDK that can be
used to edit .msi files.
The Orca database editor is available from Microsoft as part of the Windows Server 2003 R2 Platform SDK (available at
http://www.microsoft.com/downloads/details.aspx?FamilyID=0baf2b35-c656-4969-ace8-e4c0c0716adb&DisplayLang=en). Once the Windows Server 2003 R2
Platform SDK is installed, the Orca database editor installation program (orca.msi) is available in C:\Program Files\Microsoft Platform SDK for
Windows Server 2003 R2\Bin.
The Orca database editor installation program is also available as a free, individual download from various other Web sites.
We recommend that you install the Orca database editor on the domain controller, for security purposes. However, it can be installed on any machine on the
network. If you use another machine, you may wish to copy the .msi you intend to edit, for example, the ICUserApps.msi, to this machine also.
For an overview of how to use Orca, see http://support.microsoft.com/kb/255905.
This section presents a sample procedure for creating a transform that will be used change various selections in the IC User Applications installation.
The default Notifier (CIC Server) name will be specified.
The default directory location will be changed from C:\Program Files\Interactive Intelligence to D:\icuserapps.
The default Interaction Fax feature will be deselected.
The Interaction Screen Recorder Capture Client feature will be selected.
The Outlook Dialing feature will be selected.
To create the transform
1. On the machine where Orca is installed, open Windows Explorer, locate the ICUserApps.msi file, right-click, and select Edit with OrcaEdit with Orca to open the Orca
database editor.
2. Select New TransformNew Transform from the Transfo rmTransform menu.
Install the Orca database editorInstall the Orca database editor
Create a transformCreate a transform
48

3. In the TablesTables column, click on the Pro pertyPro perty table, right-click in the right-side window and select Add Add RowRow.
4. Click on PropertyPro perty in the Add Ro wAdd Ro w dialog, and type the name of the first property to change: the default Notifier (CIC Server). The property that contains
the Notifier (CIC Server) name is ICSERVE RNAMEICSERVERNAME . Type ICSERVERNAME in the Pro pertyProperty field.
5. Click on V alueValue in the Add Ro wAdd Ro w dialog, and type the name of the CIC server in the ValueV alue field. In this example, MyIC ServerMyICServer is used.
49

6. Click OKOK to close the Add Ro wAdd Ro w dialog, and right-click in the right-side window again and select Add Row.Add Row.
7. Enter the PropertyProperty name and V alueValue name for the second property to change: the default directory location.
The property that contains the default directory is named INTE RACTIVEINTE LLIGENC EINTERACTIVEINTELLIGE N CE . Click PropertyProperty, and type INTE RACTIVEINTE LLIGE N CEIN TERAC TIV E IN TELLIGENCE
in the Pro pertyProperty field.
Click V alueValue and type the new directory location, for example, D:\icuserapps.
8. Close the Add RowAdd Ro w dialog and click the FeaturesFeatures table in the TablesTables column. Whether or not a feature is installed is determined by the value found in the
LevelLevel column in the FeaturesFeatures table. A value of 00 means a feature is disabled; a value of 11 means the feature is installed and a value of 100100 means a
feature is not installed.
Note:Note:
By default, Interaction FaxInteractio n Fax is selected for install because its install Level value is 1. Interaction Screen Recorder Interactio n Screen Recorder Capture Cli entCapture Client and OutlookOutlo o k
DialingDialing are not selected for install because their install Level value is 100.
50

9. Make the desired Feature changes:
De-select Feature_InteractionFaxFeature_InteractionFax so that the Level value is 100100.
Select Feature_ScreenRecorderC aptureClientFeature_ScreenRecorderCaptureClient so that the Level value is 11.
Select Feature_OutlookDialingFeature_Outlo o k Dialing so that Level the value is 11.
Note that changes made to the selections are surrounded by green boxes.
10. When all desired changes are made, select Generate Transform…Generate Transfo rm… from the Trans formTransfo rm menu.
51

11. Orca will generate the transform and prompt for the transform filename (.mst) and location where it will be saved. In this example, the transform filename
is MyTransform.mst and it is saved in the \ICUserAppsInstall directory on the local machine.
12. Select Clo se Transfo rmClo se Transform from the Transfo rmTransform menu.
52

This section describes how to apply the transform from within Orca to verify the changes contained within the transform.
To verify the changes contained within the transform
1. Select Apply TransformApply Transform from the Transfo rmTransform menu.
2. Select the transform to open, in this example, MyTransform.mstMyTransform.ms t .
Verify the changes that the transform will makeVerify the changes that the transform will make
53

3. Note that changed table names - FeatureFeature and PropertyPro perty - in the TablesTables column are tagged with a green bar.
4. Click FeatureFeature in the TablesTables column and verify that the changes you made are present in the FeatureFeature table, indicated by green boxes.
5. Click PropertyPro perty in the TablesTables column and verify that the changes you made are present, indicated in the PropertyPro perty table, indicated by green boxes.
54

6. Close the transform and exit Orca.
Copy the transform to the network share where the base ICUserApps.msi is located.
1. From the domain controller, use Active Directo ry Users Active Directory Users and C omputersand Co mputers to select and open the base installation package you created in the "Create
and deploy the base installation package" section. In this example, it is Interaction Center User Applications installation package.
2. Right-click the Interaction Center User Applications installation package and select PropertiesProperties .
3. Select the Mo dificatio nsModificatio ns tab.
Apply the transform to the base installation packageApply the transform to the base installation package
55

4. Click the AddAdd button to add the transform to the IC User Applications installation package.
Note:Note:
If the AddAdd button is disabled in the Modifications tab, it is because you did not select AdvancedAdvanced on the Software Installation PropertiesSo ftware Installatio n Properties dialog
when the base installation package was created, as described in step 10 of "Create and deploy the base installation package". You will need to
recreate the base installation package in order to continue.
5. Browse to the transform you created and click the OpenOpen button.
6. The transform is added to the installation package and is displayed in the ModificationsModifications tab.
56


Change LogChange Log
The following changes have been made to this document since it was first distributed.
58

DateDate ChangesChanges
28-March-2012 Updated the document for Client Language Plugins for IC Language Packs, available in IC 4.0 SU 1.
27-November-2012 Revised the "Client Workstation Application Installs: Feature Names and Properties Tables" and created new section "Client
Plugin Installs: Product Codes" to include the following new information:
Windows 8 support for client workstation applications, available in IC 4.0 SU 3 or later.
Interaction SIP Bridge plugin for IC User Applications, available in IC 4.0 SU 2.
Microsoft Outlook Interaction Client Addin plugin for IC User Applications, available in IC 4.0 SU 3.
Interaction Dialer client workstation installs and Client Plugins, available in Interaction Dialer 4.0 GA.
Interaction Dialer Client Language Plugins, available in Interaction Dialer 4.0 SU 1.
27-November-2012 Added these new sections for IC 3.0 to IC 4.0 client workstation application migrations:
"Upgrade IC 3.0 client workstation applications to IC 4.0" in "Other uses for a group policy running a script" in "Create the
Group Policy".
"Sample Upgrade script for CIC client workstation applications" in "Sample Scripts".
22-October-2014 Updated documentation to reflect changes required in the transition from version 4.0 SU# to CIC 2015 R1, such as updates to
product version numbers, system requirements, installation procedures, references to Interactive Intelligence Product
Information site URLs, and copyright and trademark information.
31-March-2015 In "Client Workstation Application Installs: Feature Names and Properties Tables", updated the "IC User Applications (32-bit)"
and "IC User Applications (64-bit)" sections for transition from Interaction Client .NET Edition to Interaction Desktop in CIC
2015 R3 or later.
09-September-2015 Made the following updates for removal of Interaction Client. NET Edition in CIC 2016 R1:
"Client Workstation Application Installs: Feature Names and Properties Tables", updated the "IC User Applications (32-
bit)" and "IC User Applications (64-bit)" sections.
"Client Plugin Installs: Product Codes", update for "Microsoft Outlook Interaction Desktop Plugin for IC User Application"
title.
09-September-2015 Updated document to reflect rebranding in CIC 2016 R1.
21-March-2016 Made the following updates:
Updated copyright page.
"Client Workstation Application Installs: Feature Names and Properties Tables", updated the "IC User Applications (32-
bit)" and "IC User Applications (64-bit)" sections for new property IGNORE_MISSING_KBS (Microsoft SHA-256 support
and Interaction Intelligence QoS driver issue for Windows 7 and Windows 2008 R2).
07-April-2017
Added notes to indicate that Interaction Client Web Edition was removed starting with CIC 2017 R4.
Updated copyright page.
Added clarification to "Uninstall the software" section.
May-11-17
Removed references to Interaction Client Web Edition and .NET Edition for CIC 2017 R4.
Updated copyright page.
Added clarification to "Uninstall the software" section.
September-27-17
Rebranding.
Updated title page, copyright page, terminology.
05-October-2017 Added install command-line options to configure capture client to 32-bit and 64-bit properties that the user can set.
06-February-2018 Conversion to HTML.
04-October-2018 Updated links to KB articles.
26-July-2019 Reorganized the content only, which included combining some topics and deleting others that just had an introductory
sentence such as, "In this section...".
26-August-2019 In the Microsoft Outlook Interaction Desktop Plugin for IC User Applications topic, added link to to
https://help.genesys.com/cic/mergedProjects/wh_icde/desktop/working_with_the_microsoft_outlook_interaction_client_add-
in.htm.
30-April-2020 Updated links from my.inin.com to new locations.
03-June-2020 Removed "Upgrade CIC 3.0 client workstation applications to CIC 2015 R1 or later." Most, if not all, customers have already
migrated from CIC 2.4/3.0 to a later release.
04-August-2020 Added QoS Features for Windows 10 to both "Features set to install level 1 (Install by default)" topics.
59
