
www.netsupportschool.com
Quick guide to
top teacher tools
Technical Document
Power on and log on computers
From the teacher’s machine, simultaneously switch on all of the
computers in the classroom and log them in to save valuable time at
the beginning of the lesson.
To power on student machines
The student machines must have a Wake-on-LAN network adapter and a BIOS that will support it.
1. Select the Administer tab in the ribbon and click Power On.
2. The student machines will now power on.
To log in to student machines
If a generic naming convention is used for your classroom PCs, you can automatically log the students in.
1. Select the student machines to log in.
2. Select the Administer tab in the ribbon and click Login.
3. The Login dialog will appear.
4. Enter the user name, password and domain for the required students and click Login.
5. The user name will appear once the login has been successful.

www.netsupportschool.com
Record student attendance
Request standard and custom information from each student at the start of class and keep an accurate record of
attendance.
1. Select the Class tab in the ribbon and click Student Register.
2. The Student Register dialog will appear.
3. Enter the required class details (these will appear on the Student Toolbar). This will be completed if you have
already entered the information in the Class wizard. Decide which student details to prompt the students for -
two custom elds can also be added.
4. The student registration details can be viewed in a report, but this will be lost when the Tutor disconnects.
If you want to store a copy of the report, select Auto save Register. You will be prompted for a le name,
location and le format (CSV, HTML or XML).
5. Click Register to send the form to student machines. You can monitor progress as the students respond, and
view and chat to students. Click Close when all students have signed in; the student icon in the Tutor will now
display the registered name.

www.netsupportschool.com
Arranging Student icons in the Tutor Console
Student icons can be rearranged to reect the layout of the physical classroom.
Note: When using Room mode, the classroom layout will be automatically saved against the room selected. When you
start the Tutor and select your room, the layout will automatically load.
To arrange Student icons
1. Select the Student icon and drag it to the desired position.
To lock a layout
Once the Student icons are in the required positions, they can be xed in place.
1. Select the View tab in the ribbon and click Lock Layout.
2. Student icons will be xed in position and unable to be moved.

www.netsupportschool.com
Organising students into groups
Students can be organised into groups, allowing teachers to perform certain functions on groups as a whole.
Creating a group
1. Click the Group options icon in the group bar and click Add.
2. The Add a group wizard will appear. Follow the steps to create a new group and add the required students.
3. Click Finish.
4. The new group will appear on the group bar.
Working with a group
Once your groups have been created, you can now select a group to work with.
1. Select the required group from the group bar.
2. The students in the group will be displayed, allowing you to perform functions on the group as a whole.
Group leaders
A student can be assigned certain Tutor rights and act as a group leader until such privileges are revoked. This
feature includes a visual layout of leaders and their assigned group members.
Assigning a group leader
1. Select the required group from the group bar.
2. Select the required Student icon.
3. Right-click the required Student and select Assign group leader.
4. The Student icon will be highlighted to indicate that they are the group leader. A connection bar showing the
link from the group leader to the students is displayed.
The student will receive a message indicating that they have been given group leader status. They can choose to
run the Group Leader Control immediately or later by clicking on the Group Leader icon that is created in their
system tray or Student Toolbar.

www.netsupportschool.com
Keep students on task and avoid distraction
To stop students from being distracted while you teach them, you can prevent them from using their machines
altogether using the Lock Mouse and Keyboard feature. You can also gain student attention by blanking all
students’ screens.
To lock students’ keyboards and mice
1. Select the students you wish to lock.
2. Select the Class tab in the ribbon and click Lock.
3. Student machines will now be locked.
4. A lock image will be displayed at student machines.
Select the Class tab in the ribbon and click Unlock to unlock student machines.
To blank all students’ screens
1. Select the Class tab in the ribbon and click Blank All.
2. All students’ screens will be blanked.
3. To restore the screens, click the Blank All icon again.

www.netsupportschool.com
Launch applications and websites for students
Save time by launching applications or websites simultaneously on all student desktops.
To launch an application or website at student machines
1. Select the Class tab in the ribbon and click Quick Launch.
2. The Quick Launch pane will appear.
3. To add an application, click Add Application. Browse to the required desktop application – on Windows 8 and
above machines, you can also add Windows Store Applications.
4. To add a website, click Add URL. Enter the required URL; you can view this if required.
5. The application or website will appear in the Quick Launch pane.
6. Select the required application or website and click Send to Students.
7. The required application or website will be launched at student machines.

www.netsupportschool.com
Monitor all student activity in real-time
See what students are doing using intuitive thumbnail views of each student computer. Screenshots of a student’s
desktop can be captured to record their progress or highlight something that they should not be doing.
View a thumbnail of student screens
1. Select the Monitor View
icon on the left-hand side of the Tutor Console.
2. The student thumbnails will be displayed.
3. Student thumbnails can be resized using the slider bar on the status bar.
4. Mousing over a student thumbnail will zoom into that screen; double-clicking will open a View session; and
right-clicking provides access to a range of student features.
Capture a screenshot of a student’s desktop
1. Double-click on the required student to open a View window.
2. Select the Home tab in the ribbon.
3. Click Screenshot.
4. The current Student screen is captured and automatically saved as a .png to NetSupport School\Screenshots in
your local Documents folder.
Note: An indicator appears on the Screenshot icon showing the number of screenshots taken (up to a maximum of
nine).
5. Clicking the Screenshot icon drop-down arrow lists the last nine screenshots taken (you can view or delete
them as required) and you can open the folder where the images are stored.
Viewing a student’s screen
1. Double-click the required student.
Or
Select the required student, select the Class tab in the ribbon and click View Client.
2. The View window will appear. To aid navigation of the student screen, a navigation panel with a thumbnail
image of the screen is displayed, enabling you to scroll the student’s desktop more easily. Click inside the
thumbnail to view specic areas.

www.netsupportschool.com
You can choose to Share (you can both use the keyboard and mouse), Watch (only the student has use of the
keyboard and mouse) or Control (the student is unable to use the keyboard and mouse) the student’s screen.
Select the required option from the Home tab in the ribbon.
Scanning students’ screens
Teachers can ‘scan’ through each connected student’s screen in turn, displaying their screen in a Scan window at
the Tutor. In addition, multiple student screens can be scanned simultaneously in one Scan window.
1. Select the Group tab in the ribbon.
2. In the List view, select the Students to include in the scan (if you select a group, all Students are included).
3. Select the One Client at a time
icon.
Or
Select the number of Student screens to be displayed in the Scan window by clicking the relevant icon:
[2x2 scan icon]
Students are arranged 2x2.
[3x3 scan icon]
Students are arranged 3x3.
[4x4 scan icon]
Students are arranged 4x4.
4. Use the slider to specify the interval before the scan is advanced to the next Student. The scan period can be
set anywhere between ve seconds and two minutes.
5. Click Start.
6. The Scan window will appear.

www.netsupportschool.com
Scan window showing multiple student screens.
If you are scanning one student at a time, the window will cycle through the selected students, showing their
screens until you end the scan. If you are scanning multiple students, the specied number of screens will be
displayed in the window. If you are viewing more students than the number of screens displayed, you can switch
between the displayed screens by clicking Next, Auto or Previous.

www.netsupportschool.com
Show students the teacher’s desktop, a video le, an application or another student’s screen
Emphasise key learning points by showing students your screen, a video le, a selected application on your
machine or even another student’s screen.
Showing the teacher’s screen to students
1. Select the students that you wish to show your screen to.
2. Select the Class tab in the ribbon and click the Show icon.
3. Show options can be set by clicking the relevant option in the Show menu. To set further Show properties,
click the More icon.
Note: If you are running multiple monitors, you can choose which monitor to show Students by clicking the relevant
icon.
4. Click Quick Show. To end the show, double-click the Showing
icon in your taskbar and click End.
Show a video to students
1. Select the students to show the video to.
2. Select the Class tab in the ribbon, click the Show icon and choose Show Video.
3. The Show Video dialog will appear.
4. Select Open and browse for the video le.
5. Click Show.
A video player control panel will be displayed, providing you with controls to play the video. Student machines will
be locked while the video is playing.
Show an application to students
1. Select the students that you wish to show the application to.
2. Select the Class tab in the ribbon and click the Show icon.
3. Click Show Application.
4. The Show Application dialog will appear.
5. Click Select and choose the application to show from the list of running applications.
6. Click Show.
7. The application will be displayed on the selected students’ screens.
8. To stop showing the application, double click the Showing
icon in your taskbar and click End.
Show a student’s screen
1. Select the Student whose screen you want to show to the other Students.
2. Select the Class tab in the ribbon and click Show.
3. Click Exhibit.
4. The selected student’s screen will then be displayed on the screens of the teacher and the other students. Only
the teacher and the exhibiting student will be able to change the screen.
5. To stop showing the student’s screen, select the Home tab in the Exhibit window ribbon and click Stop.

www.netsupportschool.com
Annotating screens
While showing or viewing a student’s screen, a range of tools is available which allow you to annotate the screen.
These can be used to highlight the relevant part of the screen.
To annotate while showing
1. While showing, right-click on the Showing
icon in the taskbar and select Annotate Screen.
2. The Annotate toolbar will appear.
3. Select the tool, colour, etc and use the mouse to draw over the relevant part of the screen.
Note: You can suspend or end the show by clicking the relevant icon in the toolbar.
To annotate a screen while viewing a student
Note: In Share and Watch mode, the student can also use the Annotate toolbar options.
1. View the required student.
2. Select the Tools tab in the View window ribbon and click Annotate.
3. The Annotate toolbar will appear.
4. Select the tool, colour, etc and use the mouse to draw over the relevant part of the screen.

www.netsupportschool.com
Recording teacher and student activity for playback
Activity on the teacher machine can be recorded and saved as a replay le which can be played back to students.
You can also record when showing and viewing students’ screens.
Record a replay le at the teacher machine
1. Select the Administer tab in the ribbon and click Replay Files.
2. The Replay Files dialog will appear.
3. Click the Create Replay icon to start recording.
4. A dialog will appear. You can choose Include audio if the machine is congured for audio. Click OK.
5. The Recording
icon will appear in the taskbar. To stop recording, double click this.
6. By default, the le name will be prexed with ‘Local’ and the date and time of the recording. You can rename
the le by overtyping the default name. Click OK.
7. The replay le will appear in the list.
Note: By default, a replay le is saved as a .rpf le. These can be converted to AVI or WMV video les. Click the Convert
File icon and follow the steps in the Replay File Conversion wizard.
Record a replay le when viewing students’ machines
You can record a replay le when viewing all students’ machines or just for individual student’s.
All students
1. Click Options in the Tutor Console, select Settings from the drop-down menu and choose Replay Files.
2. Enable the Record Replay Files checkbox.
3. Choose whether to include audio, prex the le with the Student name and specify where the les are stored.
4. Click OK.
5. Each time the teacher opens a view session at any student machine, a replay le will be created. The replay le
will be available in the Replay Files dialog.
Individual student’s
1. View the required student machine.
2. Click the Settings icon in the caption bar and select Replay Files.
3. Enable the Record Replay Files checkbox.
4. Choose whether to include audio, prex the le with the Student name and specify where the les are stored.
5. Click OK.
6. Each time the teacher opens a View session at this student machine, a replay le will be created. The replay le
will be available in the Replay Files dialog.

www.netsupportschool.com
Record a replay le when showing
1. Select the Class tab in the ribbon and click the Show icon.
2. Ensure the Create a replay le of the show at the student option is selected.
3. This will be recorded and stored as a replay le when you start a Show session.
Showing replay les
1. Select the Class tab in the ribbon, click the Show icon and choose Show Replay.
2. The Replay Files dialog will appear.
3. Select the required replay le from the list.

www.netsupportschool.com
Tutor Toolbar
When the Tutor application is minimised, a convenient toolbar is provided for quick access to key features within
NetSupport School.
Student Toolbar
The Student Toolbar is a single point where students can access relevant lesson information, access their own
personal resources, take notes, request help from the teacher and be aware of any restrictions that are currently in
place. It can be set to be always visible at the top of the student screen or to auto-hide.
All features included on the Student Toolbar can be customised by the teacher. To select the features to be made
available, click Options in the Tutor Console, select Settings from the drop-down menu and choose Student
Toolbar.

www.netsupportschool.com
Planning the contents of a lesson
A lesson plan enables a teacher to structure a session around a pre-dened set of tasks with appropriate timings
and prompts allocated to each part of the plan.
Common NetSupport School functionality can be built into the plan, such as running a test, sending/collecting
work, scanning and showing.
To create a lesson plan
1. Select the Work Planner tab in the ribbon and click Manage Plans.
2. The Lesson Plan window will appear.
3. To create a new lesson, click the New Plan icon.
4. From the Available Items list, drag the required task and drop it into This Lesson Plan pane. Enter any additional
properties that are required. You can edit and move tasks in the lesson plan using the appropriate icons on the
toolbar.
5. If required, enter the author and a description for the lesson plan.
6. Click Save Plan and enter a name for the plan.
7. Click Save.
8. The Lesson Plan window will display the lesson content, total time, author and description of the lesson.
9. To start the currently loaded lesson, click OK or click Cancel to close the window.
Running a lesson plan
1. Select the Work Planner tab in the ribbon and click Execute Plan.
2. The Lesson Plan window will appear, showing the lesson content, total time, author and description of the
lesson.
3. Click OK.
4. The Lesson Plan bar will be displayed and a dialog showing the rst item in the plan will appear. Click Next to
start this.

www.netsupportschool.com
Easily share content with students
Transfer les and folders from the teacher PC to student machines; simply drag and drop les or folders to the
student’s desktop or document libraries.
Transfer a le to a student
1. Select the student to transfer the le to.
2. Select the Class tab in the ribbon and click File Transfer.
3. The File Transfer window will appear.
4. From the student’s Tree view (lower pane), select the drive or folder for the le to be transferred to.
5. Navigate to the required le on the teacher’s PC (top pane) and select the le.
6. You can now drag and drop the le from the Tutor view to the appropriate destination at the student or click
the Copy File icon on the toolbar.
You can also share les with multiple students using the File Distribution feature.

www.netsupportschool.com
Sending and collecting work
Teachers can send a document or a number of documents to students. Once students have completed the work,
the document(s) can be retrieved.
Sending work to all students
1. Select the Work Planner tab in the ribbon and click Send Work.
2. The Quick Send dialog will appear.
3. Click Browse to locate the required le(s).
4. In the Location to Send section, specify the folder at the student machine to copy the les to. You can select
Desktop or Documents from the drop-down list. A new folder will be created if necessary.
5. Click Send.
6. The results will be displayed, allowing you to check that the work has been sent successfully.
Once work has been sent to the Students, a Send work status pane appears in the ribbon showing the current
status. You can show Students who have completed their work or those with items remaining by clicking the
appropriate option. The overall progress allows you to keep track of how many Students have completed the work.

www.netsupportschool.com
Collecting work from all students
1. Select the Work Planner tab in the ribbon and click Collect Work.
2. The Quick Collect dialog will appear.
3. By default, the le(s) that you have previously sent will be listed to collect. If you want to collect dierent les,
overtype the le name.
4. Specify the folder in which the le(s) are stored and whether you want to remove the le from the student
machine after it has been collected.
5. Specify the folder on the teacher machine to collect the le(s) in.
6. Click Collect.
7. The results will be displayed for you to check that the work has been collected successfully.
Communicate eectively with students
Send students a message and chat with them discreetly.
To send a message
1. Select the students to send the message to.
2. Select the Class tab in the ribbon and click Message.
3. The Send Message dialog will appear.
4. Choose whether to send the message to all connected students, the currently selected students (this option
will be disabled if you did not select any students) or group. Enter the message (any URLs entered are clickable
at the Student), you can choose an icon to be displayed alongside the message from the drop-down list and
decide whether to show it at Student machines for a specied time. You can further highlight the message by
playing a sound at the Student’s machine. Click the Play a sound
icon. Click Send.
5. The message will appear at the selected students’ machines.

www.netsupportschool.com
To chat to students
1. Select the Class tab in the ribbon and click Chat.
2. The Create Discussion dialog will appear.
3. Enter a topic name for the chat session and select the relevant options.
4. Select any additional properties that should apply.
5. Click OK.
6. The Chat window will appear.
7. The members of the chat session will be listed. Enter your message and click Send. Your message and any
replies will be displayed in the main body of the window.
8. Click Invite to add students to the chat session.
Students can also initiate a chat session by clicking the Chat icon on the Student Toolbar.

www.netsupportschool.com
Using audible communications
Teachers can use audible communications to connected students via microphones, headphones and speakers
while viewing and showing to students, allowing a two-way audible chat session. Teachers can also send an audio
announcement to the selected students’ headphones or speakers. They will be able to hear the teacher but will not
be able to speak back.
To use audio support while viewing
1. The audio options are displayed in the Audio tab of the View window ribbon. From here, you can:
• Turn audio on or o.
• Enable only the teacher or the student to talk.
• Listen to the Student.
Note: Click the Settings
icon to access the Audio settings. From here, you can also set the microphone sensitivity and
select the audio quality.
To use audio support while showing
1. Select the Class tab in the ribbon, click the Show icon and select the Enable audio during show option.
2. During a show, only the teacher has announce functionality.
To make an announcement to students
1. Select the Class tab in the ribbon and click Announce.
2. The Announce dialog will appear. Include or exclude students from the announcement and click Announce.
3. A dialog box will appear, indicating that you can now announce. Click OK when you have nished speaking.

www.netsupportschool.com
Playing video les to students
A video player is provided, allowing teachers to play video les on student machines. All standard video les, for
example, avi and mpg, are supported.
Playing a video le at a student machine
1. Select the Class tab in the ribbon, click the Show icon and choose Show Video.
2. The Show Video dialog will appear.
3. Click the Open
icon to browse for the required video le.
4. Click Show.
5. A check will be made to ensure that the video le is available at the student. If not, the video le will be
automatically copied to the student machine.
6. When the video le is launched, the Video Player control panel appears. Standard operations are available,
play, stop, pause, etc.
Note: While the video is running, the student machine is locked.

www.netsupportschool.com
Rewarding students during a lesson
During a lesson, a teacher can reward individual students in the form of a star, which is reected on the Student
Toolbar. The number of rewards a student has can be viewed by mousing over the Student icon.
Note: The Student Toolbar must be switched on to use this feature.
Giving rewards to students
1. Select the required student.
2. Select the Feedback & Wellbeing tab in the ribbon and click Give Reward.
3. A star will appear on the Student Toolbar.
Removing rewards
1. Select the required student.
2. Select the Feedback & Wellbeing tab in the ribbon and click Remove.
3. A star will be removed from the Student Toolbar.
Note: All rewards can be removed from a Student by selecting the Feedback & Wellbeing tab in the ribbon and clicking
Remove All.
Student stickers
You can also send animated stickers to Students recognising students’ good behaviour. During a lesson, you can
send a sticker to individual Students, which is reected on the Student Toolbar.
1. Select the Feedback & Wellbeing tab in the ribbon.
2. A selection of stickers is available to choose from. Select the required sticker from the gallery (click the Show
drop-down
icon to see all stickers in the gallery) and click Send Sticker.
3. A large version of the sticker appears on the Student screen before animating to the Student Toolbar.
www.netsupportschool.com
Students requiring help from the teacher
Students can request help from a teacher. Once they have raised a help request, an alert will be displayed at the
Tutor Console (a help request icon is displayed next to the Student icon and a badge indicating the number of
outstanding help requests displayed in the ribbon and the teacher can deal with the request.
How students raise a help request
1. Click the Help Request
icon on the Student Toolbar.
Or
If the Student Toolbar is not running, right click the Student icon in the taskbar and select Request Help.
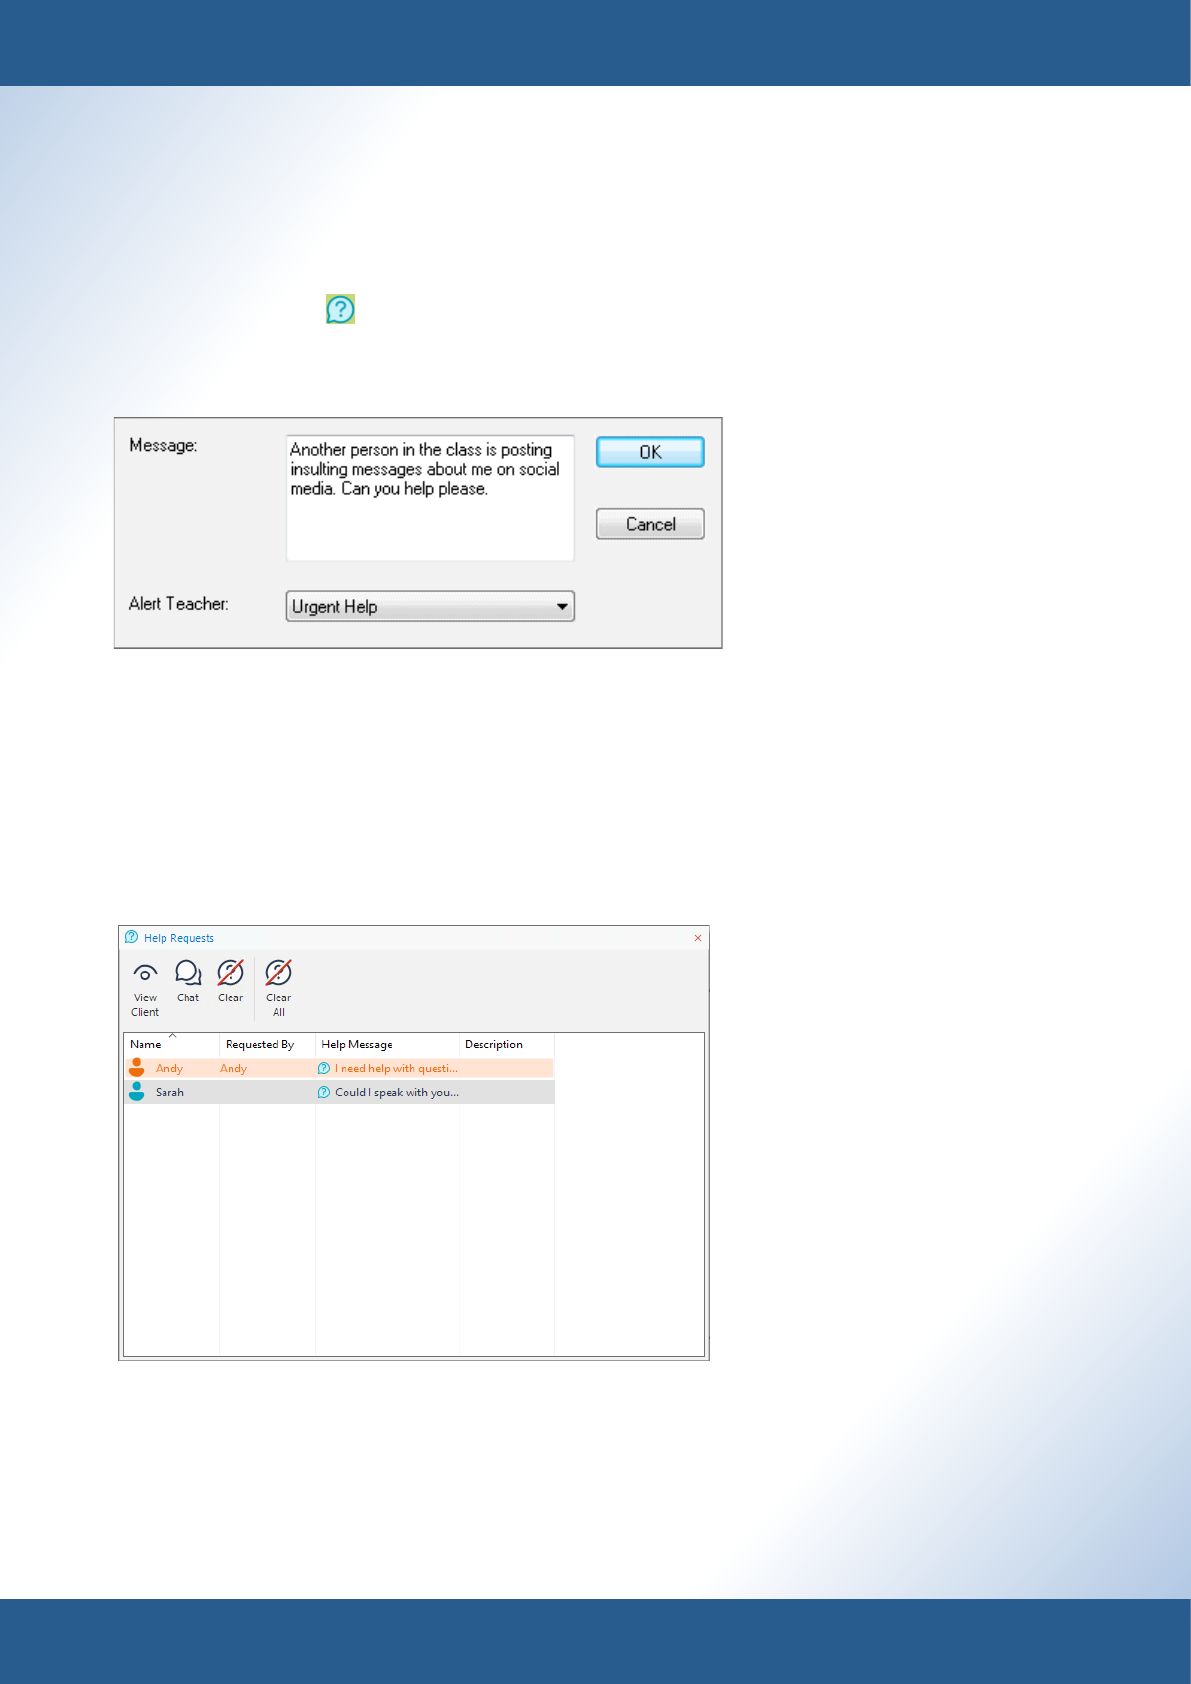
2. This opens a dialog box into which the student can type their message.
3. If the student requests help via the icon on the Student Toolbar, they can use the Alert Teacher drop-down list
to select what type of help is required and how urgent it is.
4. Click OK.
5. The help request will be sent to the connected Tutor.
To display current help requests
1. Select the Class tab in the ribbon and click Help Requests.
2. The Help Request pane will open and list the requests. You can switch between Student icons and a List view
using the icons at the bottom of the pane.
3. By clicking on the View Client or Chat icons, you can reply to a student’s help request.
Note: If a student has raised a help request and specied the type of alert it is, the Student icon will change colour to
notify the teacher what type of help request has been raised; green for work is complete, amber for help needed and
red for urgent help needed.
4. Once the help request has been dealt with, right-click on the required student’s request and select Clear. To
clear all help requests, click the Clear All icon.

www.netsupportschool.com
Student feedback and wellbeing
Teachers can receive feedback from students, helping to capture how students are feeling, their condence in a
topic and whether they need extra support.
1. Select the Feedback & Wellbeing tab in the ribbon and click Feedback and Wellbeing.
2. The Feedback and Wellbeing dialog will appear.
3. Enter the question to ask students in the Ask students eld (a drop-down list of the previous ten entries will
appear, or you can type a new one - there is a 128 character limit), or you can verbally ask the question. Select
the visual indicators to send to students. If you want the results to be anonymous, click Anonymise results.
4. Click OK.
5. At the student, the Student Toolbar will switch to Feedback mode and a dialog will appear showing the
question (if entered) and a selection of icons for them to choose from. The student simply clicks on the
required icon.
6. At the Tutor, a Feedback and Wellbeing Results dialog will appear, allowing you to see the results as they come
back. The results can be viewed in a list or bar chart. To switch between views, use the List or Chart buttons.
The results can be saved or printed by clicking the appropriate icon.
7. Click Close when nished.

www.netsupportschool.com
Managing student resources
The teacher can create a resource list and add links to websites, applications and documents. This list is then
displayed in the Student Toolbar, providing students with a quick and easy way to access the required resources
during a lesson.
To create a resource list
1. Select the Work Planner tab in the ribbon and click Student Resources.
2. The Resources List window will appear.
3. Select the required resource from the Available Items list and either drag and drop to the Resource List or click
the Add icon. You will be prompted to enter a description and location for the resource.
4. The order of the list can be sorted using the appropriate arrows.
5. Click Save and specify a le name for the list. Once saved, the resources will be displayed in the Student
Toolbar.

www.netsupportschool.com
Monitoring and controlling internet and application usage
Teachers can monitor applications students are using and the websites they are visiting. In addition, access to
certain applications and websites can be restricted.
Monitor websites students are visiting
1. Select the Web View
icon on the left-hand side of the Tutor Console.
2. If a student is currently viewing a website, an icon will be displayed on the Student icon - hovering over this
will show you full details of the website.
3. To view all open websites at students, click the Details
icon on the status bar.
Restrict access to websites
Access to all websites can be restricted.
1. Select the Class tab in the ribbon and click Restrict All.
Creating approved/restricted website lists
Approved and restricted lists can be created, allowing teachers to approve or restrict the use of specic websites.
Adding websites to the approved/restricted list
1. Click the Add
icon.
2. The Website Properties dialog will appear.
3. Type in the website address.
4. A description can be added if required.
5. By default, websites added to the Approved Websites list appear in the Student Toolbar. If you don’t want
Students to see this website, you can hide it by clearing the Visible at Student option.
6. Click OK.
7. The website icon and description will appear under the approved or restricted website list.
Once the appropriate websites have been added to the lists, you can enable either list by clicking Approved Only
or Block Restricted in the Class tab of the ribbon.
www.netsupportschool.com
Monitor the applications students are using
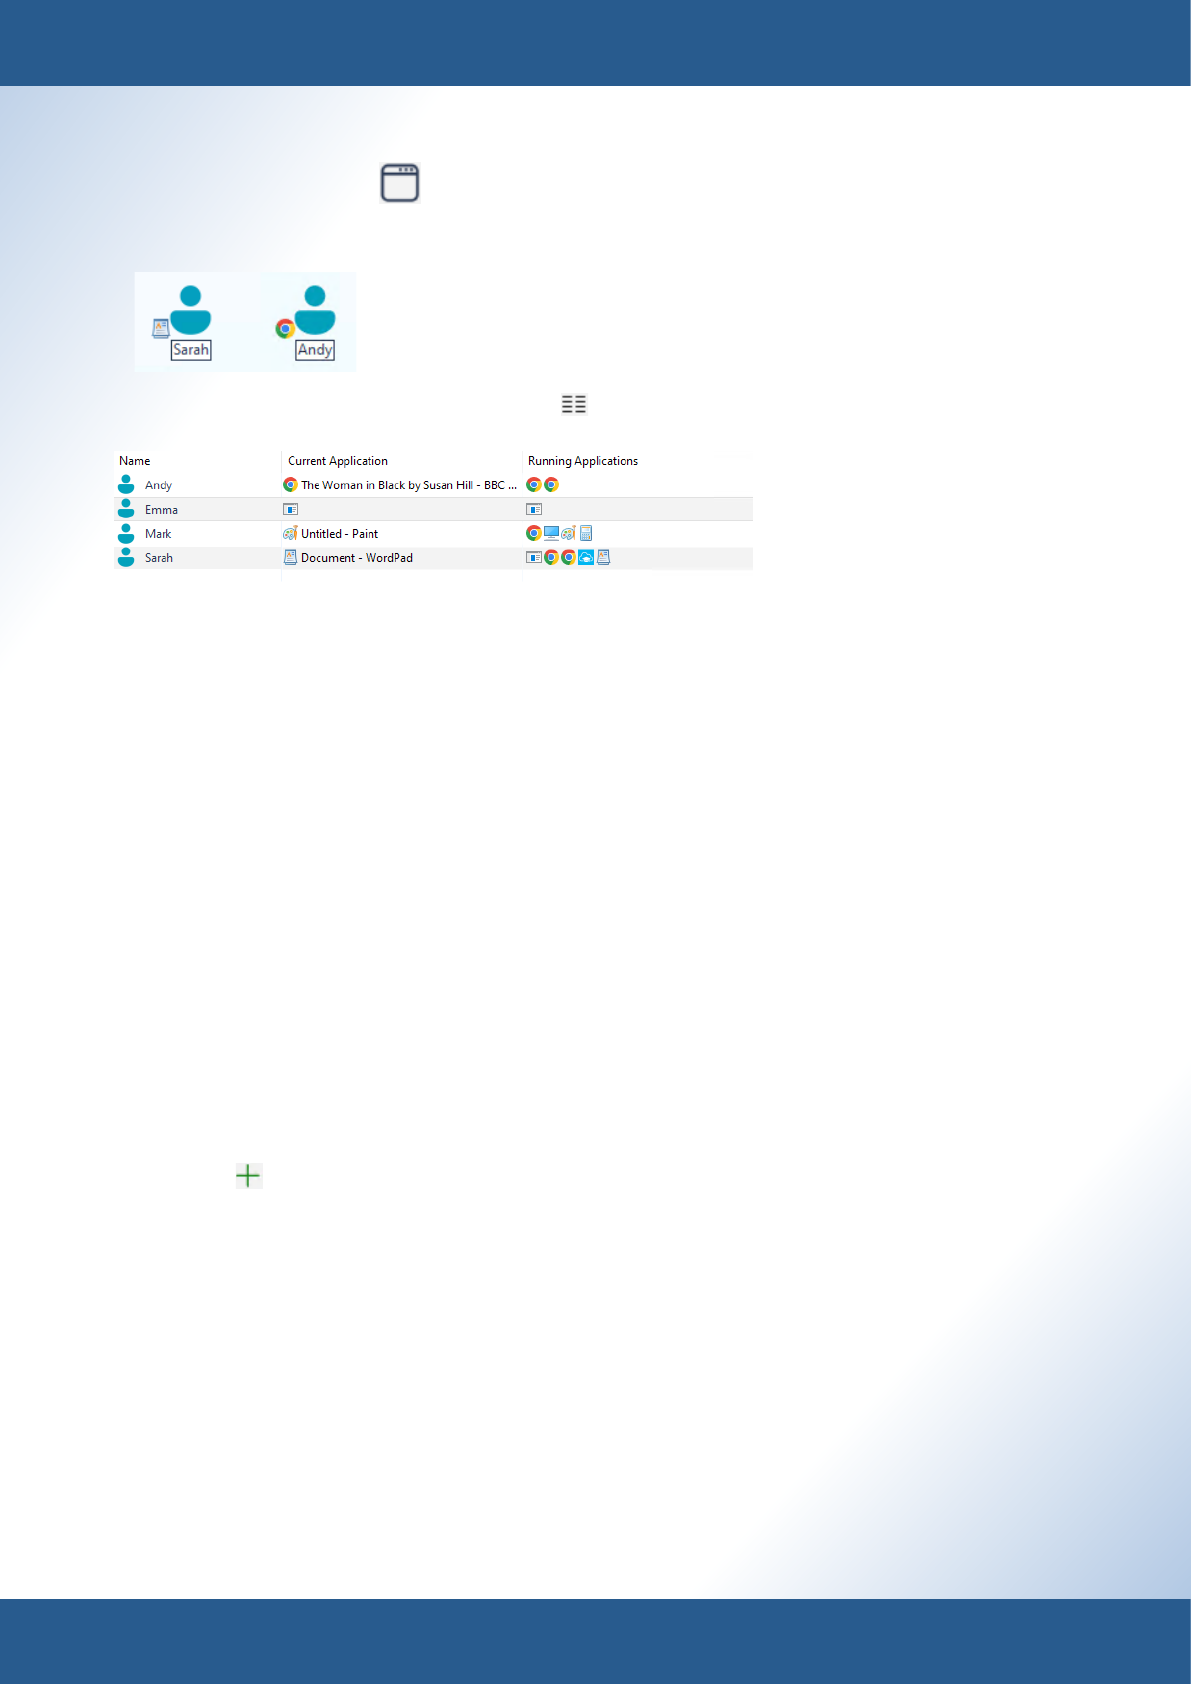
1. Select the Application View
icon on the left-hand side of the Tutor Console.
2. An icon will be displayed on the Student icon, showing the application the student is currently using -
hovering over this will show you full details of the application.
3. To view all running applications, click the Details
icon on the status bar.
Close an application
You can close running applications at the student. Any application requests will be respected, e.g. to save a le
before closing.
Note: You also have the option to ‘kill’ an application. This will force the application to close without any application
prompts.
1. Ensure you are viewing the students in details view.
2. Right-click the required application icon.
3. Choose Close Application.
4. The application will be closed at the student workstation.
Note: By right-clicking an application in the approved or restricted list, you can close a running application on all
connected students.
Creating approved/restricted application lists
Approved and restricted lists can be created, allowing teachers to approve or restrict the use of specic
applications.
Adding applications to the approved/restricted list
1. Click the Add
icon.
2. The Application Properties dialog will appear.
3. To add a desktop application, type in the .exe le name (e.g. winword.exe) or browse for your chosen
application.
4. A Windows Store Application tab will be displayed when adding applications on Windows machines that have
the Microsoft Store. From here, you can select the required application to add to the list.
5. If required, enter a description.
6. Click OK.
7. The application icon and description will appear under the approved or restricted application list.
Once the appropriate applications have been added to the lists, you can enable either list by clicking Approved
Only or Block Restricted in the Class tab of the ribbon.

www.netsupportschool.com
Monitor students’ keyboard usage
Teachers can monitor students’ keyboard usage while they are using any approved application, providing real-
time insight into student activity during a class. You can ensure students are on track during the lesson by creating
target or inappropriate word lists. When a student types a word on the list, it will be immediately highlighted at
the Tutor.
1. Select the Typing View
icon on the left-hand side of the Tutor Console.
2. Select the Class tab in the ribbon and click Monitor Activity.
3. An icon showing the current application running will be displayed next to each student, along with any typed
content.
Add words to your target or inappropriate list
1. Click the Add
icon to add a word to your target or inappropriate list.
2. The Add Words dialog will appear.
3. Type the word to be added.
4. Click OK.
5. The word will appear in the appropriate list.
When a student types a word on the list, it will be highlighted green (target) or red (inappropriate).

www.netsupportschool.com
Monitoring students’ audio activity
Allows teachers to monitor audio activity on all students’ machines. The teacher is instantly alerted to any
microphone or speaker/headphone activity at the student and can select one of the displayed Student thumbnails
to listen to the audio being played on that PC. Audio activity can also be recorded and played back to students.
Listen to student audio
1. Select the Audio View
icon on the left-hand side of the Tutor Console.
2. Select the required student.
3. Select the Class tab in the ribbon and click Listen.
4. Details of the Student you are listening to and how long you have been listening is displayed on the status bar.
5. To stop listening, click Listen again.
Record audio activity
1. While listening to audio activity, select the Class tab in the ribbon and click Record.
2. A red ashing icon is displayed on the status bar to show you are recording the audio.
3. To stop recording and carry on listening to the audio, click Stop.
Note: Once you have stopped recording, an indicator on the Recordings icon in the ribbon shows that a recording has
been saved. Click the Recordings icon to access the saved recordings.
www.netsupportschool.com
Monitoring and controlling print usage
Teachers can monitor and control printer usage within the classroom. Students can be prevented from printing, be
assigned page limits per lesson or require teacher authorisation to print.
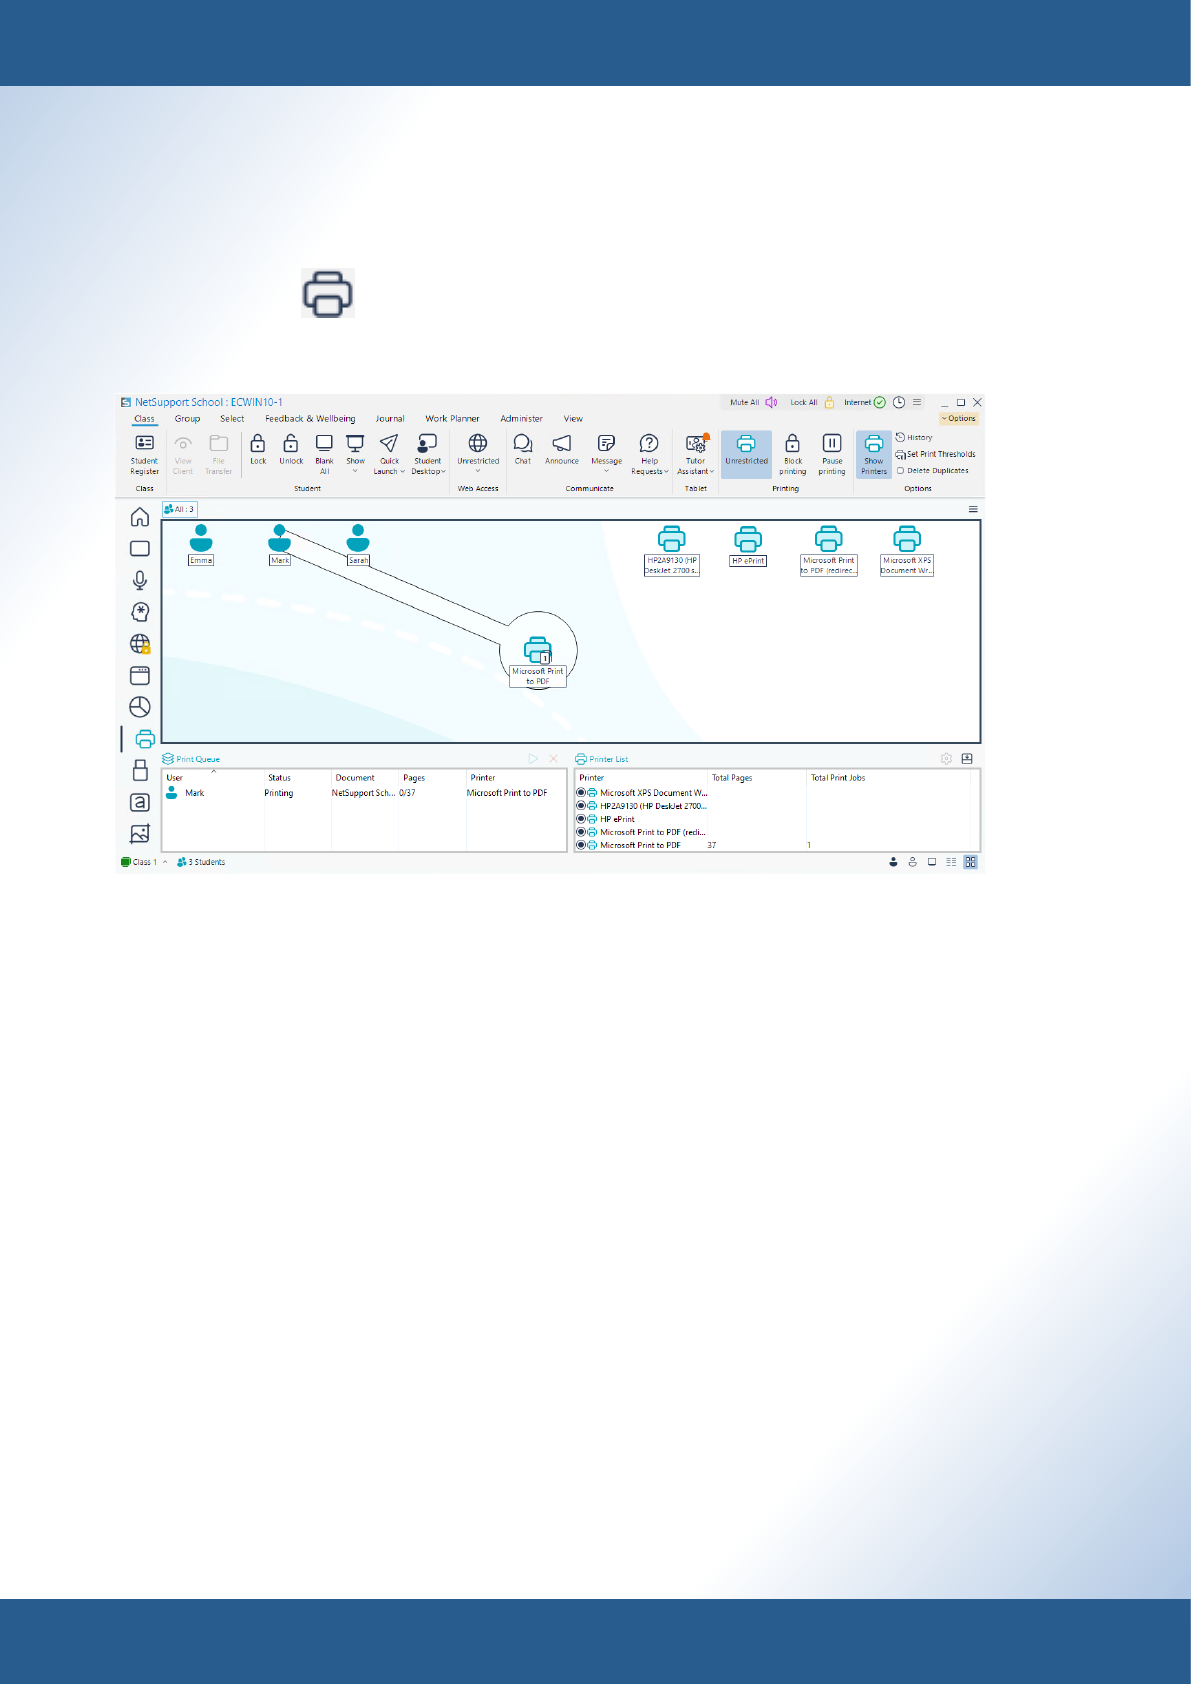
Monitor student print usage
1. Click the Print View
icon on the left-hand side of the Tutor Console.
2. Printers will be listed in the Printer List pane and you can see the total print jobs and pages that have been
printed for each printer.
3. When a student prints, they will appear in the Print Queue pane.
Block printing
1. Select the required student(s)
2. Select the Class tab in the ribbon and click Block printing.
3. The Print status for the selected student(s) will now show as blocked.
Setting print thresholds
Print thresholds can be applied for an individual print job, allowing the teacher to specify the maximum number of
pages students can print. If a student exceeds this limit, the print job will be automatically paused or deleted.
1. Select the Class tab in the ribbon and click Set Print Thresholds.
2. The Print Thresholds dialog will appear, allowing you to apply the relevant settings.

www.netsupportschool.com
Protect against external sources during a lesson
Teachers can prevent data from being copied to or from USB devices and CD/DVD drives. The teacher can also
prevent students from using the webcam on their devices.
Block access to CD/DVD or USB devices
1. Click the Device View
icon on the left-hand side of the Tutor Console.
2. Select the required students.
3. Select the Class tab in the ribbon, click the USB or CD/DVD icon and choose Block Access from the drop-
down menu.
Read-only access to CD/DVD or USB devices
Provide students with read-only access to CD/DVD or USB devices.
1. Select the required students.
2. Select the Class tab in the ribbon, click the USB or CD/DVD icon and choose Read Only from the drop-down
menu.
Disable the webcam on student workstations
Prevent students from using the webcam.
1. Select the required students.
2. Select the Class tab in the ribbon and click Disable Webcam.
3. The webcam at the selected students will be disabled.

www.netsupportschool.com
Provide eective end of lesson review
During a typical class, all appropriate items relating to the subject can be captured and automatically included in a
PDF le for post-lesson review by each student. These include:
• Lesson details and objectives.
• Teacher notes.
• Individual student notes.
• Screenshots (and supporting explanation).
• Class or group survey results.
• Virtual whiteboard screens.
• Individual student test results.
• Individual student notes.
• Student rewards.
• Student stickers.
• Copies of any class chat transcripts.
• Add information to an existing ‘master’ journal.
• Add chapters and bookmarks.
• Synchronise missing content for absent students.
• Include school branding.
To start a student journal
1. Select the Journal tab in the ribbon and click Start.
2. The Start Journal dialog will appear.
3. Enter the lesson details (these will be taken from the Class wizard if you entered the details there).
4. Click OK.
5. The student journal will start and you can now add resources.
Add items to the journal
1. Select the Journal tab in the ribbon.
2. From here, you can add a new chapter heading for dierent sections of the journal and add items such as: the
student register, notes, screenshots, approved website lists, survey results, target word lists and the contents of
a whiteboard.
When using certain features, you will nd an Add to journal icon
that quickly allows you to add the resource
directly to the journal.
View a journal
1. Select the Journal tab in the ribbon and click View Journal.
2. The journal can be printed from here, if required.
Students can view and add their own notes to the journal from the Student Toolbar.

www.netsupportschool.com
Question and assess students
Use class surveys for instant feedback, conduct student and peer assessment with Question and Answer module
and design tests to run at students’ machines.
To send a survey
1. Select the Survey View
icon on the left-hand side of the Tutor Console.
2. In the Survey pane, enter the survey question and the responses (each response needs to be separated by a
comma).
3. Send the survey to Students by clicking Send in the Survey pane or selecting the Class tab in the ribbon and
clicking Send.
4. The question will be sent to students and a dialog will appear showing the question and the possible answers.
5. Once students have selected their answer, you can see the results as they come in.
6. Once the question has been sent to Students, it will be stored in the Select Survey dialog. To access saved
questions, select the Class tab in the ribbon and click Question. From here, you can view and edit existing
questions and add new questions. To use a question, highlight the question and click OK.

www.netsupportschool.com
Using the Question and Answer module
1. Select the Q&A View
icon on the left-hand side of the Tutor Console.
2. Select the Class tab in the ribbon and click Question Types.
3. A list of question types will appear.
4. Select the question type you want to ask students.
5. The Ask the Question dialog will appear (the options available will vary depending on the type of question
selected).
6. You can choose to include a thinking time limit (the Answer button will be disabled, allowing students time to
think before they answer); a time limit (how long the students have to answer the question); and if you want
the question automatically bounced to the next quickest student who answered.
7. Click Options to set further options such as, if a student receives a reward for a correct answer and whether to
show results to students.
8. Click OK.
9. An Ask the Question dialog will appear; you can then ask the question, or if you selected ‘enter the answer
question’ type, you will be prompted to enter the answer. Click Go.
10. A dialog will appear at student machines and they click when they are ready to answer.
11. The Tutor Console will display the Student thumbnails and you will see which students have answered and
in what order. You can then mark the rst student to answer and the question can be bounced to the next
student or be peer assessed.
A Question and Answer dialog is displayed at the student, showing the current question type and any awards the
student has received. Students will be able to see the current state of all students for each question.

www.netsupportschool.com
Creating and running tests at students
NetSupport School’s Testing Module is a powerful utility that enables teachers to design tests with the minimum of
eort. Teachers can create customised tests, including text, picture, audio and video questions. Once the students
have completed the test in the pre-set time, the results are automatically collated, marked and made available to
the teacher.
Creating a questions
1. Select the Feedback & Wellbeing tab in the Tutor Console ribbon and click Test Designer.
2. The Test Designer logon screen will appear. Enter your user name and password.
Note: The Test Designer provides a default administrator ID for use the rst time you log on (user name admin,
password admin).
3. The Test Designer interface will appear.
4. To create a question, choose {Questions}{Create Question} from the Test Designer drop-down menu.
5. Select the required question type. The question types available are:
• Multi choice
The student is required to pick the correct answer from up to four possible options.
• Drag and drop text
Students must try to complete a statement by adding a word or phrase from the alternatives provided.
• Drag and drop image
Students must match an image with the appropriate statement.
• Combo list
Students are presented with up to four questions and need to select the correct answer from the drop-
down list. You can insert additional ‘decoy’ answers into the list.
• Label image
You provide students with a picture that has various areas marked. The student needs to label each area
correctly.

www.netsupportschool.com
• True or false
The students are provided with a statement and they must decide whether this is true or false.
• Multi true or false
Students are presented with up to four statements and must decide whether they are true or false.
• Order items
The students are required to place the items in the correct order.
• Highlight text
Students must highlight a word or phrase to answer the question.
1. Click Create. Enter the question and answer(s) depending on the chosen question type and click Next.
2. Additional resources can be added if required. Click Browse to add an image, audio or video le. Click Next.
3. Select where to store the question. A selection of pre-dened subjects and topics are provided or you can
create your own. You can now add author and question information.
4. Click Finish.
5. Repeat the process to add additional questions.
Creating an exam
Once you have created the required questions, you can now add them to an exam.
1. Choose {Exams}{Create Exam} from the Test Designer drop-down menu.
2. Enter the general details for the exam and decide whether this will be timed or not. You can use your own
grading system by selecting from the Grading Schema drop-down list and decide whether to use the default
scoring system (you can assign your own scores to questions in stage two). You can then add some optional
information, such as the age range or class group that the exam is aimed at. Click Next.
3. Select the questions for the exam. Expand the Tree view in the left-hand pane, highlight the required question
and click the Add a Question icon. Repeat this process until all questions are selected.
4. The selected questions appear in the right-hand pane. From here, you can use the buttons to sort the
questions into the required order, preview the question, assign a new score to the question or even create a
new question.
5. Click Finish. The exam will be stored in the Exams Tree view.
To publish an exam
Before an exam can be run at Student machines, it must be published.
1. Select the exam in the Tree view.
2. Choose {Exams}{Publish Exam} from the Test Designer drop-down menu.
3. The Publishing Exam dialog will appear, conrming the exam properties. Click Publish.
4. The Publish Exam dialog will appear. Give the exam a suitable name. This is the name that will appear in the
Testing Console when selecting an exam to run. Click OK to create the zip le.

www.netsupportschool.com
Running an exam
1. Select the Feedback & Wellbeing tab in the ribbon and click Assessments.
2. The Test Modules dialog will appear. From the list of connected students, indicate which ones should
participate in the exam by checking or unchecking the box next to their name. Click Next.
3. Details of the published exams are listed. Choose the one that you want to run at the selected students. If
required, you can alter the time limit for the exam. To preview the exam, click Preview. Click Finish when ready
to run the exam.
4. The NetSupport School Test Player will automatically launch at the student machines and a dialog enabling
you to administer the exam will appear on the Tutor screen. Click Start Test to run the exam. You will be able
to monitor how the students are progressing through the exam.

www.netsupportschool.com
Whiteboard
A full page whiteboard is integrated directly within the Tutor and is supported by a wealth of drawing tools for
improved collaboration within the classroom.
1. Select the Whiteboard View
icon on the left-hand side of the Tutor Console.
2. A blank whiteboard will be displayed. Use the range of annotation tools in the ribbon to prepare the screen to
show the students. Images can be included.
3. To display the whiteboard to students, select the Whiteboard tab in the ribbon and click Show.
4. The whiteboard will be displayed on student screens. Any annotations made from this point will be
automatically updated on all students’ screens.
To remove the whiteboard from student screens, select the Show icon again.
To save the contents of the whiteboard for future use, the Save drop-down arrow and selecting Save Selection.

