
ACTIVINSPIRE
USER GUIDE TO HELP STAFF TRANSITION FROM ACTIVSTUDIO
SUMMER 2010
MONTGOMERY COUNTY PUBLIC SCHOOLS
TECHNOLOGY CONSULTING TEAM

MONTGOMERY COUNTY PUBLIC SCHOOLS Technology Consulting Team
2
CONTENTS
ACTIVINSPIRE DASHBOARD .............................................................................................. 5
Changes and Additions ............................................................................................... 5
Comparing the Dashboards........................................................................................ 6
What the ActivInspire Icons mean.............................................................................. 7
ActivInspire Menu Items ............................................................................................... 8
ACTIVINSPIRE WINDOW .................................................................................................. 10
Changes and Additions ............................................................................................. 10
The ActivInspire Window ............................................................................................ 10
PROFILES ............................................................................................................................ 12
Types of Profiles ............................................................................................................ 12
Customizing a Profile: .................................................................................................. 13
MAIN TOOLBOX ............................................................................................................... 14
DESKTOP TOOLS ............................................................................................................... 16
ExpressPoll/Wonderwheel .......................................................................................... 17
Wonderwheel Options................................................................................................ 18
Screen Recorder.......................................................................................................... 19
More Tools ..................................................................................................................... 19
Camera Tools ............................................................................................................... 20
FORMATING AND EDITING TEXT ..................................................................................... 21
LOCATING THE OBJECT EDIT TOOLBOX ......................................................................... 22
Locating Object Edit Tools ......................................................................................... 22
CUSTOMIZING THE MARQUEE HANDLES TOOLSTRIP .................................................... 25
Customizing the Marquee Handles toolstrip ........................................................... 25
ACTIVINSPIRE PAGE BROWSER ....................................................................................... 27
Changes and Additions ............................................................................................. 27
Accessing the Page Browser ..................................................................................... 27
Viewing your Flipchart Pages .................................................................................... 28
Using Additional Page Browser Tools ........................................................................ 29
Using Additional Page Browser Tools Continued .................................................... 30

MONTGOMERY COUNTY PUBLIC SCHOOLS Technology Consulting Team
3
RESOURCE BROWSER ....................................................................................................... 31
ACTIVINSPIRE OBJECT BROWSER ................................................................................... 34
Changes and Additions ............................................................................................. 34
Accessing the Object Browser .................................................................................. 35
Viewing Objects Using the Object Browser ............................................................. 36
Understanding Layers ................................................................................................. 37
Reordering Objects Using the Object Browser ....................................................... 37
Locking and Hiding Objects Using the Object Browser ........................................ 38
Accessing Additional Tools Using the Object Browser........................................... 39
ACTIVINSPIRE NOTES BROWSER...................................................................................... 40
Changes and Additions ............................................................................................. 40
Accessing the Notes Browser .................................................................................... 40
Creating Page Notes .................................................................................................. 41
ACTIVINSPIRE PROPERTY BROWSER ............................................................................... 42
Changes and Additions ............................................................................................. 42
Accessing the Property Browser ................................................................................ 42
Viewing the Property Browser .................................................................................... 43
Using the Properties Browser to Work with a Page ................................................. 44
Using the Properties Browser to Work with Objects ................................................ 45
Using the Properties Browser to Work with Additional Object Features .............. 46
Using the Properties Browser to Work with Additional Object Features .............. 47
ACTIVINSPIRE ACTION BROWSER ................................................................................... 48
Changes and Additions ............................................................................................. 48
Accessing the Action Browser ................................................................................... 49
Accessing the Action Categories on the Current Selection Tab ........................ 50
Applying an Action ..................................................................................................... 51
Drag and Drop an Action onto an Object or a Page .......................................... 52
Edit or Delete the Actions of an Object or a Page................................................ 53
ACTIVINSPIRE VOTING BROWSER ................................................................................... 54
Changes and Additions ............................................................................................. 54
Accessing the Voting Browser ................................................................................... 54
Using the Voting Browser ............................................................................................ 55

MONTGOMERY COUNTY PUBLIC SCHOOLS Technology Consulting Team
4
REGISTERING AND USING ACTIVOTES ........................................................................... 56
Registering ActiVotes .................................................................................................. 56
Naming ActiVotes ....................................................................................................... 61
Using ActiVotes ............................................................................................................ 65
REGISTERING AND USING ACTIVEXPRESSIONS ............................................................ 67
Registering ActivExpressions ...................................................................................... 67
Naming ActivExpressions ............................................................................................ 73
Using ActivExpressions................................................................................................. 79
CONDUCTING A VOTING SESSION ................................................................................ 81
Choosing a Device Type ............................................................................................ 81
Conducting a Voting Session Using Express Poll ..................................................... 82
Conducting a Voting Session using a Prepared Question ................................... 84
Viewing the Results...................................................................................................... 89
Exporting Results .......................................................................................................... 93
MANAGING DEVICES USING THE VOTING BROWSER .................................................. 95
The Voting Browser ...................................................................................................... 95

MONTGOMERY COUNTY PUBLIC SCHOOLS Technology Consulting Team
5
ACTIVINSPIRE DASHBOARD
The dashboard in ActivInspire has a new look and feel. No longer is tabbed
browsing available. The ActivInspire dashboard is driven by icons.
Changes and Additions
The table below provides a quick reference of similarities and differences
between the dashboards in ActivStudio and ActivInspire.
Item
In ActivStudio
In ActivInspire
Icon Navigation
No
Yes
Tab Browser for Navigation
Yes
No
Create a new Flipchart
Yes
Yes
Open a flipchart
Yes
Yes
Import from PowerPoint
Yes
Yes
Configure Devices
Yes
Yes
Calibrate Board
Yes
No
Annotate over Desktop
No
Yes
Express Poll
No
Yes
Link to Promethean Planet
Yes
Yes
Training and Support
Yes
Yes
Question Master
Yes
No
Activity Wizard
Yes
No

MONTGOMERY COUNTY PUBLIC SCHOOLS Technology Consulting Team
6
Comparing the Dashboards
The old Dashboard in ActivInpire had tab browsing across the top.
The New ActivInspire Dashboard has point and click icons.

MONTGOMERY COUNTY PUBLIC SCHOOLS Technology Consulting Team
7
What the ActivInspire Icons mean
Quick links to flipcharts.
Immediately opens desktop flipchart.
Immediately opens the ExpressPoll.
Goes directly to Promethean Planet.
Quick links for profiles and device registration.
Opens Promethean’s Web Support.

MONTGOMERY COUNTY PUBLIC SCHOOLS Technology Consulting Team
8
ActivInspire Menu Items
The menu items on the right side of the dashboard change when different icons are selected.
Menu Items for the Flipcharts Icon:
Number
Description
Create a New Flipchart- Opens a brand new flipchart.
Open Flipchart- Lets users navigate to and open a saved flipchart.
Recently viewed Flipcharts- Flipcharts that have been viewed recently will
be displayed in this area.
Import from PowerPoint- Converts a PowerPoint slideshow directly into a
ActivInspire Flipchart.
4
3
2
1
1
2
3
4

MONTGOMERY COUNTY PUBLIC SCHOOLS Technology Consulting Team
9
Menu Items for the Configure Icon:
Number
Description
Register Devices- Click to begin registering Activotes, ActivExpressions, and
ActivSlates.
Manage Profiles- Where users can go to edit profiles.
Check for Updates- Software updates can be downloaded from here.
Note: Annotate over the Desktop, ExpressPoll, Promethean Planet, and Training and
Support do not have submenu items. Users are directed right to those areas.
3
2
1
1
2
3

MONTGOMERY COUNTY PUBLIC SCHOOLS Technology Consulting Team
10
ACTIVINSPIRE WINDOW
When a new flipchart is created in ActivInspire, one of the first changes users
notice is the ActivInspire window is different than the ActivStudio window. The
new window is menu driven, and includes File, Edit, View, Insert, and Tools
menus. There is also a tabbed browsing feature that allows users to have
multiple flipcharts open at one time and easily tab from one flipchart to another.
Changes and Additions
Item
In ActivStudio
In ActivInspire
Tabbed Browsing
No
Yes
File Menu
Yes
No
Page Scale
Yes
Yes
Browser
Yes
Yes
Trash Can
Yes
Yes
The ActivInspire Window
8
5
A
l
l
s
u
b
s
e
q
u
e
n
t
t
e
x
t
b
o
x
e
s
w
4
1
2
3
6
7
9

MONTGOMERY COUNTY PUBLIC SCHOOLS Technology Consulting Team
11
Number
Description
Browser- ActivInspire has 7 different browsers- Page browser, Resource
browser, Object Browser, Notes Browser, Property Browser, Action Browser,
and Voting Browser.
Menubar- The ActivInspire menu has a File, Edit, View, Insert, Tools, and Help
menus.
Flipchart Name
Notes Icon- Is only visible if there is a note attached to the flipchart page
Snowflake Icon- toggles between design and presentation mode.
Notes Icon- Is only visible if there is a note attached to the flipchart page.
Sizing Details- Can adjust the height and width or leave at “Best Fit”.
Main Toolbox- Contains the most commonly used tools in ActivInspire
Trashcan- The trashcan in ActivInspire can be moved around the Flipchart
page or removed from the page altogether.
Note: The different ActivInspire Browsers are explained in detail in later sections of this guide.
5
4
3
2
1
6
7
8
9

MONTGOMERY COUNTY PUBLIC SCHOOLS Technology Consulting Team
12
PROFILES
In ActivInpire access to profiles has been made easier. Profiles are used to have
tools and other setting available to the user depending on what functions are
desired. There are five default profiles within ActivInspire.
Types of Profiles
Below are the five profiles.
AT the Board
Authoring
Languages
Math
Media

MONTGOMERY COUNTY PUBLIC SCHOOLS Technology Consulting Team
13
Customizing a Profile:
Tools can be added or removed to any of the profiles. To customize a profile or
create an additional profile:
1. Click on View. The drop down menu will open.
2. Click on Customize. The Edit Profiles window will appear.
Edit Profiles
3. Verify you are customizing the correct profile in the upper left hand
corner. To change the profile click on the pull down arrow and select the
profile to customize. Note: If you have to change profiles you will need to
start at step one again.
4. In the All Commands column click on the tool to be added to the profile.
5. Click on the Add button at the bottom of the window. The tool gets
added to the bottom of the toolbox. The move up and move down
button help place the tool on the toolbox where desired.
6. Click on the Save icon at the top to save the profile with the same name.
7. Click on the Save As icon (the one with the pencil) to save the profile with
a new name.

MONTGOMERY COUNTY PUBLIC SCHOOLS Technology Consulting Team
14
MAIN TOOLBOX
The main toolbox gives on screen access to the tools in ActivInspire. The tools
from the tool strip in ActivStudio can now be found on the Main Toolbox as well.
The look and feel is different but many of the functions are the same.
The Main Toolbox
Authoring Profile
Note: The marquee Select tool (arrow), pen tool, highlighter, fill bucket, clear tool (spray
bottle), page refresh, undo and redo, are all the same as they were in ActivStudio.
1
2
3
4
8
7
9
6
11
12
13
14
15
16
5
18
19
17
20
MONTGOMERY COUNTY PUBLIC SCHOOLS Technology Consulting Team
15
Number
Description
Toolbox options - The first icon on the top allows the user to position the main
toolbox.
Roll up - The second icon allows the main toolbox to roll up and down.
Pin Toolbox - The last icon which looks like a pushpin allows the toolbar to be
pinned in place anywhere on the flipchart page.
Main Menu - The main menu option is organized the same as the menu bar.
This is different from the main menu in ActivStudio because the menu titles
have changed to reflect that of the menu bar.
Switch Profile - This icon allows you to switch from one profile to the other.
Desktop Annotate - The Desktop Annotate creates a desktop flipchart and
works the same as it did in ActivStudio. When you return to a regular
flipchart a tab will display called desktop flipchart.
Desktop Tool – This feature is a collection of tools that can be used outside of
the ActivInspire flipchart. Hover over the tool to reveal other tools.
Navigating Pages – The arrows are the undo and redo tools and are used
the same way as they were in ActivStudio. They were previously located on
the Tool strip.
Voting - The arrow, which is grayed out, starts the vote on a flipchart page
when the page is set for a pre-prepared question.
Express Poll - The icon to the right of the green arrow will activate the green
arrow when needed to conduct a vote that is not pre-prepared.
Pen Width Indicator & Slider- The dots have replaced the preset numbers
that were in ActivStudio however the slider is the same.
Eraser – The eraser tool has changed to truly erase annotations; whereas
previously in ActivStudio it appears to erase but the annotation was still
there. This feature/technique of hiding annotations is now available through
magic ink.
Shapes Tool - The shapes tool is completely new to the toolbar. It allows the
user to easily access shapes instead of navigating into the resource browser,
formally known as the Resource Library. The shapes are objects not
annotations.
Media File - With a few clicks media such as video clips, sounds, and
animated files can be link to flipcharts.
Undo and Redo – These tools were once located on the Tool Strip. They
have a new look but perform the same.
Rollout Toolbar – The Rollout Toolbar holds a collection of the most recent
tools at the bottom and at the top the Edit User Defined Buttons is still an
option to add frequently used objects and pages.
Connector Tool - Links objects and shapes together to assist in creating
graphic organizers.
Tools – Now the hammer and wrench is called Tools not Power Tools. Other
tools like the camera tool, the shade tool, and magic ink can be accessed
from this menu.
The Express Poll tool replaced the Activote Icon. This icon is used to start the
voting on a flipchart where the question is not pre-prepared.
9
8
7
6
5
4
3
2
1
10
13
11
12
14
16
17
18
19
20
15

MONTGOMERY COUNTY PUBLIC SCHOOLS Technology Consulting Team
16
DESKTOP TOOLS
Desktop Tools is a new addition to ActivInspire. Desktop Tools are a collection of
commonly used ActivInspire tools which can be useful when working in other
applications, especially when the tools found in Desktop Annotate are not
needed.
When you click on the Desktop Tools icon,
ActivInspire is minimized and the floating
Desktop Tools toolbox is displayed.
This toolbox can be moved around the
desktop by dragging the icon to the
required position, where it remains showing
over other applications.
You can click on the icon to expand the
Desktop Tools.
Restore Inspire
Closes the Desktop Tools Toolbox and
returns you to the main ActivInspire
application.
ExpressPoll
Provides access to the voting
Wonderwheel. See below for use and
options.
Screen Recorder
Provides access to Screen Recorder
Options listed below.
More Tools
Provides access to More Tools options
listed below.
Camera
Provides access to Camera Options listed
below.
On-screen keyboard
Opens the on-screen keyboard.
Promethean Planet
Opens the Promethean Planet web site in
your web browser.

MONTGOMERY COUNTY PUBLIC SCHOOLS Technology Consulting Team
17
ExpressPoll/Wonderwheel
At any time during your lesson, you can ask your students a question and click
on ExpressPoll. This displays the voting „Wonderwheel‟. The design of the
Wonderwheel helps you communicate your question clearly allowing your
students quickly understand how they are expected to answer.
Using the Wonderwheel
8. Hover over the Wonderwheel and highlight a question style.
9. Move the pen radially and outward to show the options for
the style you just highlighted.
10. Click to select one of the options.
The picture on the right shows the Wonderwheel for ActiVote
devices. The highlighted question style is 'True/False/?'. This
question style has four answering options. The option selected
allows the possible answers, 'True', 'False' and 'Don’t know'.
These possible answers are shown in the displayed 'Voting
Summary' Box. You can set a timeout now, next to the red Stop
Vote button, by entering a number or using the arrows.

MONTGOMERY COUNTY PUBLIC SCHOOLS Technology Consulting Team
18
Wonderwheel Options
Tool
Icon
Description
Click To List Likert
Scale
Displays 'Likert Scale' answering options in the 'Voting
Summary' Box and sends them to ActivExpression
devices.
Number Question
Displays 'Number entry' answering options in the 'Voting
Summary' Box and sends them to ActivExpression
devices.
Text Question
Displays 'Text entry' answering options in the 'Voting
Summary' Box and sends them to ActivExpression
devices.
Multiple Choice
Displays 'Multiple choice' answering options in the
'Voting Summary' Box and sends them to
ActivExpression devices.
Sort in Order
Displays 'Sort in Order' answering options in the 'Voting
Summary' Box and sends them to ActivExpression
devices.
Yes/No - True/False
Displays 'Yes/No or True/False' answering options in the
'Voting Summary' Box and sends them to
ActivExpression devices.
Actions
Device
Registration
Opens the 'Device Registration' Dialog Box to let you
begin registering ActiVote or ActivExpression devices.
Assign Students
To Devices
Opens the 'Assign students to devices' Dialog Box to let
you import student names from a database.
Close
Closes the voting Wonderwheel.
Target
ActivExpression
Devices
Sets the type of device from which votes will be
accepted in the current voting session.
Target ActiVote
Devices

MONTGOMERY COUNTY PUBLIC SCHOOLS Technology Consulting Team
19
Screen Recorder
More Tools
More Tools
When you move the cursor over the More Tools
icon a further level of the Desktop Tools
Toolbox open.
11. You can select the following tools:
Tickertape
Starts the ActivInspire Tickertape
feature.
Clock
Displays the ActivInspire Clock.
Sound Recorder
Starts the ActivInspire Sound Recorder.
Calculator
Opens your chosen Calculator
program.
Dice Roller
Displays the Dice Roll feature.
Screen Recorder Options
When you move the cursor over the Screen Recorder icon a further
level of the Desktop Tools Toolbox opens displaying the recording
options.
Area Screen Recorder
Fullscreen Recorder

MONTGOMERY COUNTY PUBLIC SCHOOLS Technology Consulting Team
20
Camera Tools
Camera Tool Options
When you move the cursor over
the Camera icon a further level of
the Desktop Tools Toolbox opens.
You can select the following
snapshot types:
Fullscreen Snapshot
Window Snapshot
Freehand Snapshot
Point to Point Snapshot
Area Snapshot

MONTGOMERY COUNTY PUBLIC SCHOOLS Technology Consulting Team
21
FORMATING AND EDITING TEXT
Texting editing has been simplified in ActivInspire. A Format Toolbar opens when
you activate the Text Tool. The toolbar has a different look and feel but all of
the same features as in ActivStudio.
This toolbar is available when creating text and again when ready to edit text.
Format Toolbar
Number
Description
Select the font stlye and size.
Apply style to text. For example; bold, italic, underline, sub and super script.
Change the color of the text and the background color of the textbox.
Change the alignment, identation and/or spacing; Create lists with bullets
Utilities area – provide access to the on-screen keyboard, select all, and
symbols
5
4
3
2
1
3
4
1
2
5

MONTGOMERY COUNTY PUBLIC SCHOOLS Technology Consulting Team
22
LOCATING THE OBJECT EDIT TOOLBOX
Once an object has been placed on the flipchart you will see the rounding
Sizing Handles that surround the selected object. These indicate that you can
move or resize the object. The row of square icons alongside the object is the
Object Edit Menu and other Marquee Handles for working on the object.
Marquee Handles Toolstrip
Locating Object Edit Tools
1. Go to the Resource Browser to find an object.
2. Drag and drop the object onto the flipchart page. The Marquee Handles
will display above the object as shown below. The sizing handles
surrounding the object allow the object to be resized. The bottom right
handle will maintain the aspect of the size.
Marquee and Sizing Handles
3. Click on the Object Edit Menu to access more tools, such as delete,
cut, drag a copy and locked. The Property and Action Browser will be
explained in detail in the Browser category lesson.

MONTGOMERY COUNTY PUBLIC SCHOOLS Technology Consulting Team
23
Labeled Marquee Handles
4. Group objects together by dragging a box around desired objects and/or
text and select the Grouped icon. The Grouped icon will turn yellow
when objects are grouped on page.
5. The Drag a copy will allow you to drag multiple objects onto the
flipchart page very quickly.
6. Insert a link allows users to add sound, video or a link to a document
directly to the desired object. Disable links by removing existing links the
Action Browser.
7. Lock objects and/or text boxes onto the page by selecting the Lock icon
from the Object Edit Menu. Once an object is locked, it can be
unlocked in design mode.

MONTGOMERY COUNTY PUBLIC SCHOOLS Technology Consulting Team
24
8. Click the Design Mode icon in top right corner of page. You are in
Design Mode when icon is red.
9. Right-click on object and de-select locked.
Grouped object with text
Note: New tools such as Hidden, Transform and Reorder will be explained in the What’s New
With Object Tools topic.

MONTGOMERY COUNTY PUBLIC SCHOOLS Technology Consulting Team
25
CUSTOMIZING THE MARQUEE HANDLES TOOLSTRIP
The object edit toolbox has been replaced with the Marquee Handles toolstrip.
There is now an option to add commands you often use and remove
commands you don‟t use within this toolbar.
Marquee Handles Toolstrip
Customizing the Marquee Handles toolstrip
1. Click on File and choose Settings.
File Menu
2. Click the Commands icon.
3. From the drop-down menu on left, choose Edit Tools.
4. From the drop-down menu on the right, choose Marquee Handles.
5. Click and select tools to add to your Marquee Handles.
6. Click Done when finished.

MONTGOMERY COUNTY PUBLIC SCHOOLS Technology Consulting Team
26
Settings Window
Note: Once you had modified the Marquee Handles, there is no way to restore the original
settings are directed right to those areas.
MONTGOMERY COUNTY PUBLIC SCHOOLS Technology Consulting Team
27
ACTIVINSPIRE PAGE BROWSER
The Browser window automatically opens when you open ActivInspire and
contains seven different browsers: Page Browser, Resource Browser, Object
Browser, Notes Browser, Properties Browser, Action Browser, and Voting Browser.
The Page Browser in ActivInspire incorporates the features from the Page
Organizer and Page Selector tools on the Toolstrip in Activstudio.
Changes and Additions
The Page Browser replaces the Page Organizer and Page Selector tools in
Activstudio and incorporates them into one place.
Item
In ActivStudio
In ActivInspire
Page Browser
Used the Page Selector tool on the
Toolstrip to access flipchart page
thumbnails
Use the Page Browser to
access and change the
view size of flipchart page
thumbnails
Page Browser
Used the Page Organizer tool on the
Toolstrip to copy, delete, or reorganize
flipchart pages
Use the Page Browser to
copy, delete, or reorganize
flipchart pages
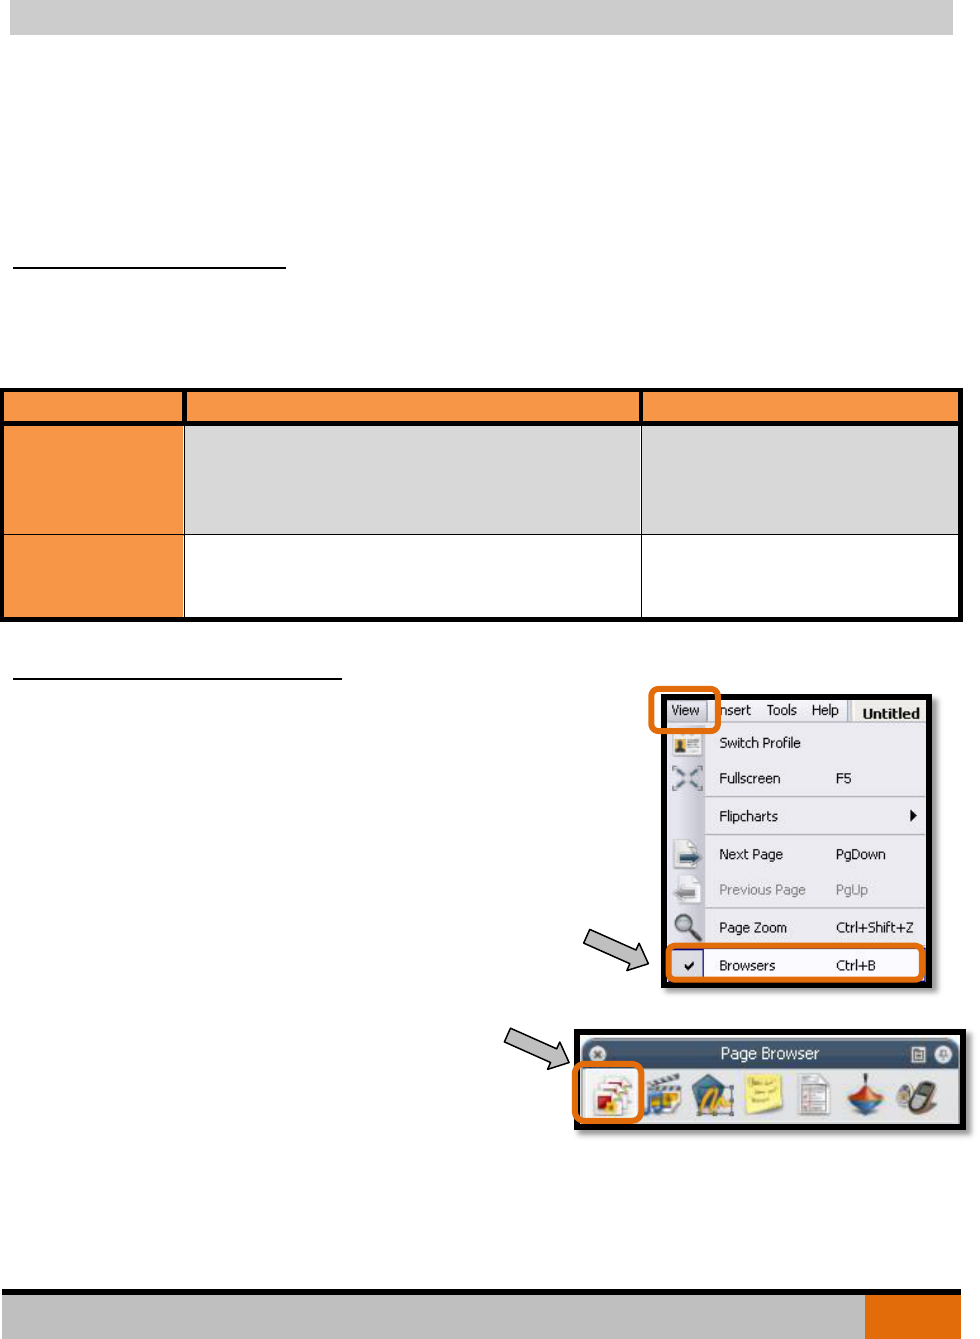
Accessing the Page Browser
If you do not see the Browser window when you open
ActivInspire, click on View on the Menubar and then
click Browsers. The shortcut key is Ctrl + B.
Close the Browser window by unchecking it or using
Ctrl + B.
Next, click on the Page Browser icon. The
Page Browser allows you to view your flipchart
pages and to maneuver through them,
rearrange them, copy and paste them, or
delete them. Page Browser also allows you to copy items from one page to
another.

MONTGOMERY COUNTY PUBLIC SCHOOLS Technology Consulting Team
28
Viewing your Flipchart Pages
Number
Description
Increase the size of the Page Browser by placing the mouse cursor on the
side of the Browser, holding down the left mouse button and dragging it
larger.
Use the scroll bar to scroll through your page thumbnails.
Use the slider at the bottom of the Page Browser to make the page
thumbnails larger or smaller.
Rearrange pages by dragging them and dropping them in this view.
4
3
2
1
1
2
3
4

MONTGOMERY COUNTY PUBLIC SCHOOLS Technology Consulting Team
29
Using Additional Page Browser Tools
In Page Browser mode, each page thumbnail also contains a Toolbox Option
that opens a Popup Menu which contains many additional tools, such as Insert
Page, Cut, Copy, Paste, Delete, etc.
2. Choose Insert Page
to insert a blank
page before or after
the selected page,
to take a Desktop
Snapshot and insert it
into your flipchart, or
to change the page
template.
3. Find commonly used
functions here: Cut,
Copy, Paste,
Duplicate, Delete.
1. On the page
thumbnail,
click the small
Toolbox
Option icon
at the top
right-hand
side to see
the Popup
Menu.

MONTGOMERY COUNTY PUBLIC SCHOOLS Technology Consulting Team
30
Using Additional Page Browser Tools Continued
4. Set Background allows
you to fill the page
background with a
color, to browse for an
image to use for the
background or to
create a Desktop
Overlay.
6. Quickly add
the current
page,
background
or grid to your
Resource
Library.
5. Access grid
tools.
7. Remove an
ActiVote or
ActivExpression
question
created using
the Question
Wizard.

MONTGOMERY COUNTY PUBLIC SCHOOLS Technology Consulting Team
31
RESOURCE BROWSER
This Browser helps you to quickly view, navigate and use the resources provided
with ActivInspire to enrich your flipcharts. The Resource Library contains a huge
range of games and activities, annotations, assessments, backgrounds, concept
maps, images, shapes, sounds and other items too numerous to list.
You can easily extend the library with your own and other people's resources
and add resource packs from the Promethean Planet website
on www.prometheanplanet.com, or from our partners.
By default, the Resource Browser opens the Shared Resources folder. All
resources provided with ActivInspire are arranged by category and stored in
clearly named folders.
The Resource Browser has two panes, each with its own Popup Menu and tools:
The Folders Pane in the top half of the Browser shows the folders in the
chosen resource area.
The Items Pane in the bottom half shows thumbnails of the resources in the
selected subfolder and their filenames. When no subfolder has been
selected, this pane is blank.
Use the Folders Pane to:
Quickly navigate to and view all the resources in a particular folder, for
example My Resources, Shared Resources or other locations on disk or on
the network.
Index your resources for faster searching.
Search for resources by file name or keyword.
Search all types of resources or search only particular types of resources.
Search for resources on Promethean Planet.
Use the Items Pane to:
See at a glance how many files a folder contains.
Display thumbnails and filenames of selected resources in the Browser.
Change the view mode and thumbnail size of the resources in the
selected folder.
Drag and drop resources such as page templates, activity pages and
question pages from the browser into your flipchart.
Make the background color of an image resource transparent at the time
you drag it onto the page.
Rubberstamp multiple copies of a resource into a flipchart.

MONTGOMERY COUNTY PUBLIC SCHOOLS Technology Consulting Team
32
To add your own items to the Resource Library, you can drag them from a flipchart
page and drop them onto either of the two parts of the Resource Browser.
Use either of the two panes to drag and drop your own creations from a
flipchart page into a folder in the Resource Library.
Example
The picture below on the left shows the Resource Browser. The list on the right
identifies each numbered component.
In this example:
The Folders Pane shows Shared Resources with the Animals subfolder
selected.
The Items Pane shows two graphics files in the Animals subfolder. The
musical note symbol on the second file indicates that it has a sound
effect.
Number of files in the selected folder.
'Search Term' entry field
My Resources
Shared Resources
Another resource folder
Location of currently selected folder.
Browse to another folder.
Search current folder
Set search options
Search for resources on
Promethean Planet

MONTGOMERY COUNTY PUBLIC SCHOOLS Technology Consulting Team
33
Folders Popup Menu Options:
Export to Resource Pack
Import Resource Pack Here...
Index this Folder for Searching
Create New Folder
'Import' and 'Index' functions are only
available when a top level folder is
selected.
Items Menu Options to
change:
View Mode
Thumbnail Size
Item Transparency
Rubberstamp On/Off
Quickly insert multiple copies of a
resource into your flipchart.
You need ActivInspire Professional to
use the Rubberstamp.

MONTGOMERY COUNTY PUBLIC SCHOOLS Technology Consulting Team
34
ACTIVINSPIRE OBJECT BROWSER
The Browser window automatically opens when you open ActivInspire and
contains seven different browsers: Page Browser, Resource Browser, Object
Browser, Notes Browser, Properties Browser, Action Browser, and Voting Browser.
The Object Browser in ActivInspire allows the user to see the order of objects on
a specific flipchart page. It also allows the user to move objects to different
layers easily and to lock or unlock them quickly. The Object Browser also has a
feature that provides access to other commands, such as Cut, Copy, Paste,
Lock, Transform, Reorder, and others.
Changes and Additions
The Object Browser combines features that were located in multiple places in
Activstudio. Instead of using the Object Edit menu or right click feature in
Activstudio to arrange objects, the Object Browser allows the user to easily see
and maneuver all objects on a flipchart page.
Item
In ActivStudio
In ActivInspire
Object Browser
Used the Object Edit menu and
the Properties pop-up or the right
click > Edit > menu to change
the layer of an object.
Use the Object Browser to drag
and drop objects onto different
layers.
Object Browser
Used the Object Edit menu or the
right click > Edit menu to change
the stacking order of objects.
Use the Object Browser to
change the stacking order of
objects by dragging and
dropping.

MONTGOMERY COUNTY PUBLIC SCHOOLS Technology Consulting Team
35
Accessing the Object Browser
If you do not see the Browser window when you open
ActivInspire, click on View on the Menubar and then
click Browsers. The shortcut key is Ctrl + B.
Close the Browser window by unchecking it or using
Ctrl + B.
Next, click on the Object Browser icon. The
Object Browser allows the user to view all
objects on a flipchart page at once and to
change their stacking order or layer by
dragging and dropping.

MONTGOMERY COUNTY PUBLIC SCHOOLS Technology Consulting Team
36
Viewing Objects Using the Object Browser
Number
Description
In the Object Browser, the Objects column allows the user to see the tool
that created each object, the name of each object, the layer where each
object resides, and the stacking order of all objects on each layer.
The Hidden column allows the users to see which objects are hidden and
which are visible. Hidden objects are marked with the image of an eye with
a red X over it. The user can hide and unhide objects here as well.
The Locked column allows the user to see which objects are locked and
which are not. Locked objects are marked with the image of a lock.
The user can lock and unlock objects here as well.
The Toolbox Option opens a popup menu that gives the user additional
options, such as Cut, Copy, and Paste, as well as others.
4
3
2
1
3
2
1
4

MONTGOMERY COUNTY PUBLIC SCHOOLS Technology Consulting Team
37
Understanding Layers
Reordering Objects Using the Object Browser
1. To reorder or change the stacking order of objects within a single layer,
click on the object you want to move, hold down your left mouse button
or the Activpen, and drag the object to the desired location. For
example, in the flipchart page above, the Text2 textbox needs to be
dragged in front of Shape1 so that it shows on the page.
2. To change the layer of an object, click on the object you want to move,
hold down your left mouse button or the Activpen, and drag the object to
the desired layer.
Number
Description
The Top Layer contains annotations or anything created with the Pen,
Highlighter or Magic Ink tool.
The Middle Layer contains images, shapes, and text objects.
The Bottom Layer does not automatically contain anything, but the user can
drag objects to the bottom layer if desired.
The Background Layer contains backgrounds, grids and page color.
Objects placed on the Background Layer are automatically locked into
place and must be moved to a different layer to be manipulated.
4
3
2
1
2
3
1
4

MONTGOMERY COUNTY PUBLIC SCHOOLS Technology Consulting Team
38
Locking and Hiding Objects Using the Object Browser
4. Use the same process to hide or unhide an object using the Object Browser.
1. To lock or unlock an
object using the
Object Browser, click
on the object to select
it and then move your
mouse or Activpen
under the Locked
column and double
click to bring up the
dropdown menu.
2. Single click to see the
dropdown, which
contains the choice to
Lock or Unlock.
3. To quickly lock or
unlock ALL the objects
on a flipchart page,
click on Locked in the
Locked column
header.

MONTGOMERY COUNTY PUBLIC SCHOOLS Technology Consulting Team
39
Accessing Additional Tools Using the Object Browser
To access additional tools, such as Cut, Copy,
Paste, and more, click on an object and then click
the Toolbox Option to open the popup menu. The
popup menu gives the user access to a multitude
of tools as well as another way to lock and unlock
or to hide and unhide an object.

MONTGOMERY COUNTY PUBLIC SCHOOLS Technology Consulting Team
40
ACTIVINSPIRE NOTES BROWSER
In ActivInspire the user creates, views, and edits notes by clicking on the Notes
Browser. The Format Toolbar allows the user to easily format the text. You can
add notes to each page of a flipchart and print them, either with the flipchart
pages or separately.
Changes and Additions
The Notes Browser is the new location for Page Notes.
Item
In ActivStudio
In ActivInspire
Create Page Note
Click on the N in the Title bar
Click on the Notes Browser
View Page Note
Click on Page Notes icon above
the Toolstrip
Click on Page Notes icon in
the Menubar
Edit Page Note
Click T in the left corner of the
note to open the Text Edit
toolbox.
Click Format Toolbar button to
open the Format Toolbar.
Accessing the Notes Browser
If you do not see the Browser window when you open
ActivInspire, click on View on the Menubar and then click
Browsers. The shortcut key is Ctrl + B.
Close the Browser window by unchecking it or using Ctrl +
B.
Next, click on the Notes Browser icon. The
Notes Browser allows you to create, edit, and
view Page Notes.

MONTGOMERY COUNTY PUBLIC SCHOOLS Technology Consulting Team
41
Creating Page Notes
You can create, view, and edit page notes with the Notes Browser.
1. Click on the Notes Browser. The Browser opens.
2. Type your notes. To format your text, click on the Format Toolbar button at
the bottom of the Browser window.
3. Highlight the text to format it. Click on any other tool to close the Format
Toolbar.
By default, your notes appear as plain text.

MONTGOMERY COUNTY PUBLIC SCHOOLS Technology Consulting Team
42
ACTIVINSPIRE PROPERTY BROWSER
The Browser window automatically opens when you open ActivInspire and
contains seven different browsers: Page Browser, Resource Browser, Object
Browser, Notes Browser, Property Browser, Action Browser, and Voting Browser.
The Property Browser in ActivInspire allows the user to see all the properties of a
page or object at a glance and to modify the properties quickly and easily to
enhance the design or to add interactivity and engagement.
Changes and Additions
The Property Browser combines features that were accessed using the Page Edit
Menu or the Object Edit Menu in Activstudio. Instead of using the Page or
Object Edit menu (or right click in Activstudio) to manipulate pages or objects,
the Property Browser allows the user to easily see and change page or object
properties.
Item
In ActivStudio
In ActivInspire
Property Browser
Used the Page or Object Edit menu
and the Properties pop-up or the
right click > Edit > menu to change
the properties of a page or object.
Use the Property Browser to
change the appearance
and interactivity of a page
or object.
Accessing the Property Browser
If you do not see the Browser window when you open
ActivInspire, click on View on the Menubar and then
click Browsers. The shortcut key is Ctrl + B.
Close the Browser window by unchecking it or using
Ctrl + B.
Next, click on the Property Browser icon. The
Property Browser allows the user to view all of
the properties of a page or object and to
make changes quickly and efficiently.

MONTGOMERY COUNTY PUBLIC SCHOOLS Technology Consulting Team
43
Viewing the Property Browser
When the Property Browser opens, the categories for the selected page or
object appear. If a plus sign is beside a category name, then the category
is collapsed.
Click once on the plus sign, which changes to a minus sign , to expand the
category and see all of the different options available for that category. Use
the scroll bar on the Property Browser window to scroll up or down through the
various categories and options.

MONTGOMERY COUNTY PUBLIC SCHOOLS Technology Consulting Team
44
Using the Properties Browser to Work with a Page
Number
Description
The Identification section allows the user to give the page a name,
keywords, and/or a description to make searching and identification easier.
The Page section allows the user to change the size of a page, to add
frames and to create a background using fill, an image, or a desktop
overlay. Adding frames acts as a type of ruler for easier and more
attractive placement of text and images.
The Tools section allows you to apply the following to a page:
As Before applies the same tool as the previous page,
Revealer applies the Revealer tool and the drop-down below gives
the user options for customizing the Revealer tool,
Spotlight applies the spotlight and gives the user options,
Tools Off turns off all tools.
The Grid option allows the user to make the default page grid visible or
invisible by using True to see the grid or False to hide the grid. The user can
also change the grid settings or open and use the Grid Designer.
4
3
2
1
2
1
3
4

MONTGOMERY COUNTY PUBLIC SCHOOLS Technology Consulting Team
45
Using the Properties Browser to Work with Objects
Number
Description
The Identification section allows the user to give a selected object a name,
keywords, description or question tag to make searching and identification
easier.
The Appearance section allows the user to change the object‟s layer,
translucency, and visibility.
The Position section allows the user to change the object‟s position or size,
or to invert, angle, reflect, or lock it.
3
2
1
1
2
3

MONTGOMERY COUNTY PUBLIC SCHOOLS Technology Consulting Team
46
Using the Properties Browser to Work with Additional Object Features
Number
Description
The Label section allows the user to add a caption or text box to an object,
format the text box, and make it visible or invisible.
The Container section allows the user to make the object a container.
The Rotate section allows the user to change the object‟s position or size, or
to invert, angle, reflect, or lock it.
6
5
4
5
6
4

MONTGOMERY COUNTY PUBLIC SCHOOLS Technology Consulting Team
47
Using the Properties Browser to Work with Additional Object Features
Number
Description
The Restrictors section allows the user to have the selected object block,
snap, move, or size a certain way.
The Miscellaneous section allows the user to make a certain color of an
object or the background of an object transparent. The user can also
apply the Drag a Copy command here.
8
7
7
8

MONTGOMERY COUNTY PUBLIC SCHOOLS Technology Consulting Team
48
ACTIVINSPIRE ACTION BROWSER
The Browser window automatically opens when you open ActivInspire and
contains seven different browsers: Page Browser, Resource Browser, Object
Browser, Notes Browser, Properties Browser, Action Browser, and Voting Browser.
The Action Browser in ActivInspire allows the user to associate an action with an
object or page.
Changes and Additions
The Action Browser makes adding actions quicker and easier because they can
all be accessed from the Action Browser rather than the Properties menu in
Activstudio.
Item
In ActivStudio
In ActivInspire
Action
Browser
Select the object, double click to
reveal the Object Edit toolbox,
select the Properties button, and
then select Actions.
Click on the Action Browser icon to
see available actions to attach to
an object or a page.
Categories
of Actions
Select the object, double click to
reveal the Object Edit toolbox >
Properties button > Actions.
Select radio button for All or
select one of 6 categories.
Category actions are arranged
by similar functions.
Select the object, click on the
Action Browser. Click on the All
Actions drop-down menu to select
All or one of 5 action categories,
which are arranged in an
alphabetical list, most preceded by
icons.
Complete
the Action
Click the OK button on the
menu.
Click the Apply Changes button on
the bottom of the Action Browser.
Pre-made
Action
Objects
In Resource Library, select Share
Collections > Lesson Building
Tools > Action Objects to see a
list of pre-made actions.
In Action Browser, select Drag and
Drop tab to drag an action to a
page or an object.

MONTGOMERY COUNTY PUBLIC SCHOOLS Technology Consulting Team
49
Accessing the Action Browser
If you do not see the Browser window when you open
ActivInspire, click on View on the Menubar and then
click Browsers. The shortcut key is Ctrl + B.
Close the Browser window by unchecking it or using
Ctrl + B.
Next, click on the Action Browser icon. The Action
Browser allows the user to associate an action
with an object or page quickly and easily.

MONTGOMERY COUNTY PUBLIC SCHOOLS Technology Consulting Team
50
Accessing the Action Categories on the Current Selection Tab
Number
Description
All Actions – view all available actions
Command Actions – view actions which run a command or start a tool
Page Actions – view actions which work with flipchart pages
Object Actions – view actions, such as show/hide, to apply to an object
Voting Actions – view actions which start the Learning Response System
activities or tools
Document/Media Actions – view actions which insert or control documents
or media
2
3
1
4
5
6
6
5
4
3
2
1

MONTGOMERY COUNTY PUBLIC SCHOOLS Technology Consulting Team
51
Applying an Action
The process for applying actions remains the same, but the navigation is
different.
Note: If you select more than one object, you can use the Action Browser to apply the
same action to all objects in the selection.
1. Click on the action you
wish to apply. The Action
Properties opens allowing
you to browse to a Target
object.
2. At the bottom of the Action
Browser, click Apply
Changes. You can tell that
an action is associated with
an object when the cursor
over the object changes to
a blue Preview icon.
3. View All Actions or use the
drop-down arrow to select an
action category.
4. Click to select an object,
click on the Action Browser
and then the Current
Selection tab.
1
2
3
4
3

MONTGOMERY COUNTY PUBLIC SCHOOLS Technology Consulting Team
52
Drag and Drop an Action onto an Object or a Page
The Drag and Drop tab on the Action Browser allows the user to drag and drop
an action onto an object or a page.
1. Click on the Drag and Drop tab to see a list of available actions. Use the
scrollbar on the right-hand side to see additional actions.
2. Drag the desired action directly onto an object or onto the page. If you
drag an action onto the page, the action icon will appear.

MONTGOMERY COUNTY PUBLIC SCHOOLS Technology Consulting Team
53
Edit or Delete the Actions of an Object or a Page
1. To edit or delete actions from an object or page, you will need to enter
Design Mode.
2. On the top right-hand side of the ActivInspire Menubar, click on the
Design Mode icon, which is the blue sprocket. The Design Mode icon will
change to red to show that you are in Design Mode. This turns off the
object‟s action so that you can edit it. This replaces the Action Arrow in
Activstudio.
3. Click on the object with the action you wish to edit. If the action is set to
target another object, the Action Properties command box will appear,
allowing you to change the target object. You must click the Apply
Changes button for the change to go into effect.
4. If you wish to delete the action entirely, click on the object with the action
you wish to delete. Click the Remove Existing button at the bottom of the
Action Browser and the action will be deleted.

MONTGOMERY COUNTY PUBLIC SCHOOLS Technology Consulting Team
54
ACTIVINSPIRE VOTING BROWSER
The Browser window automatically opens when you open ActivInspire and
contains seven different browsers: Page Browser, Resource Browser, Object
Browser, Notes Browser, Properties Browser, Action Browser, and Voting Browser.
The Voting Browser allows the user to manage the ActivSlate, ActiVote, and
ActivExpression devices, conduct the voting sessions, and record the results.
Changes and Additions
The Voting Browser allows the user to access voting tools more easily since they
are located in one place.
Item
In ActivStudio
In ActivInspire
Voting Browser
Voting and registration
tools were located in many
different locations
Contains all voting and
registration tools in one
location
Accessing the Voting Browser
If you do not see the Browser window when you open
ActivInspire, click on View on the Menubar and then
click Browsers. The shortcut key is Ctrl + B.
Close the Browser window by unchecking it or using
Ctrl + B.
Next, click on the Voting Browser icon. The
Voting Browser allows easy access to the
Learner Response System tools.

MONTGOMERY COUNTY PUBLIC SCHOOLS Technology Consulting Team
55
Using the Voting Browser
For more information about using the voting tools, please see Learner Response System.
Number
Description
Opens the Device Registration window
Starts an ActiVote session
Starts an ActivExpression session
Allows the user to toggle to anonymous voting
Allows the user to assign students to devices
Opens voting results
Controls the way voting results are displayed
7
6
5
4
3
2
1
1
2
3
4
5
6
7

MONTGOMERY COUNTY PUBLIC SCHOOLS Technology Consulting Team
56
REGISTERING AND USING ACTIVOTES
ActiVotes can be used in ActivInspire; however, the registration process has
changed. Use the following procedures to learn how to set up and use
ActiVotes.
Registering ActiVotes
1. Open ActivInspire software. The Dashboard will appear. If it does not,
click the View menu and select Dashboard.
Dashboard
2. Click Configure. The menu options will change on the right side of the
Dashboard.

MONTGOMERY COUNTY PUBLIC SCHOOLS Technology Consulting Team
57
Configure Option
3. Click Register Devices. A Device Registration window will open.
Register Devices Option

MONTGOMERY COUNTY PUBLIC SCHOOLS Technology Consulting Team
58
Device Registration Window
4. Click the Activote box. The box will be selected.
Activote Box

MONTGOMERY COUNTY PUBLIC SCHOOLS Technology Consulting Team
59
5. Click the Register button. A Device Registration window will open.
Device Registration Window
6. Enter the number of ActiVotes to be registered in the text box or use the
arrows to increase or decrease the number of ActiVotes to be registered.
Number of Devices Text Box
Note: You can register more devices than you need. It is recommended that you register a
full set of 32 devices.

MONTGOMERY COUNTY PUBLIC SCHOOLS Technology Consulting Team
60
7. Click the Next button. A Device Registration window will open.
Device Registration Window
8. Follow the instructions on the screen to register the devices.
Note: ActiVotes will register with names “Device 1”, “Device 2”, etc. in the order they are
registered – in order to keep the device names matching the numbers written on the ActiVotes
themselves, register them one at a time in numerical order.
9. Register the ActiVotes. As each Activote is registered the number of
devices registered will update automatically.
Device Registration Status
10. Click Finish to end the device registration early or continue to register
devices and the Device Registration window will automatically close once
the designated number of devices has been registered.

MONTGOMERY COUNTY PUBLIC SCHOOLS Technology Consulting Team
61
Naming ActiVotes
Note: When ActiVotes are registered they are given a pin number. To name the devices
using a prefix, such as A0, or to assign each device a name use the following procedures.
1. Open ActivInspire software. The Dashboard will appear. If it does not,
click the View menu and select Dashboard.
Dashboard

MONTGOMERY COUNTY PUBLIC SCHOOLS Technology Consulting Team
62
2. Click Configure. The menu options will change on the right side of the
Dashboard.
Configure Option
3. Click Register Devices. A Device Registration window will open.
Register Devices Option

MONTGOMERY COUNTY PUBLIC SCHOOLS Technology Consulting Team
63
Device Registration Window
4. Click the Activote box. The box will be selected.
Activote Box

MONTGOMERY COUNTY PUBLIC SCHOOLS Technology Consulting Team
64
5. Click the Rename button. A Device Naming window will open.
Device Naming Window
Naming Options:
Number
Description
Double click inside the text box to the right of each device pin number.
Enter the name you would like to assign to the device.
Enter a prefix to assign to each device such as “A0”. (The prefix can only be
3 characters.)
2
1
1
2

MONTGOMERY COUNTY PUBLIC SCHOOLS Technology Consulting Team
65
6. Hit any letter on the ActiVote device to have the software accept the
name. The word “done” will appear in the committed column after each
device is renamed.
Committed Column
7. Click Finish.
Using ActiVotes
Note: ActivInspire defaults to wanting to use ActivExpressions student response units. In
order to get the ActiVotes to respond properly, use the following procedure before each use.
1. Select Express Poll from the Activinspire toolbar. The Express Poll menu will
display.
Activinspire Toolbar- Express Poll

MONTGOMERY COUNTY PUBLIC SCHOOLS Technology Consulting Team
66
Note: When Express Poll opens, it shows up as its icon in a floating circle onyour screen.
When you move the cursor over it, it will expand a radial menu (a circle of icons around the
center).
Express Poll Expanded
2. Click the Settings icon . The Express Poll menu will expand.
3. Click the ActiVote icon to target Activote devices. This will remove
options from the Express Poll menu that are designed for ActiExpressions,
such as text and numeric entry, ordering, and Likert scale response.
For more information about using ActiVotes for questioning, please see
documentation for Conducting a Voting Session.

MONTGOMERY COUNTY PUBLIC SCHOOLS Technology Consulting Team
67
REGISTERING AND USING ACTIVEXPRESSIONS
Use the following procedures to learn how to set up and use ActivExpressions in
ActivInspire.
Registering ActivExpressions
1. Open ActivInspire software. The Dashboard will appear. If it does not,
click the View menu and select Dashboard.
Dashboard
2. Click Configure. The menu options will change on the right side of the
Dashboard.

MONTGOMERY COUNTY PUBLIC SCHOOLS Technology Consulting Team
68
Configure Option
3. Click Register Devices. A Device Registration window will open.
Register Devices Option

MONTGOMERY COUNTY PUBLIC SCHOOLS Technology Consulting Team
69
Device Registration Window
4. Click the ActivExpressions box. The box will be selected.
ActivExpressions Box
5. Click the Register button. A Device Registration window will open.

MONTGOMERY COUNTY PUBLIC SCHOOLS Technology Consulting Team
70
Device Registration Window
6. Enter the number of ActivExpressions to be registered in the text box or use
the arrows to increase or decrease the number of ActivExpressions to be
registered.
Number of Devices Text Box
Note: You can register more devices than you need. It is recommended that you register a
full set of 32 devices.

MONTGOMERY COUNTY PUBLIC SCHOOLS Technology Consulting Team
71
7. Check the Allow Expression end user naming box to allow users to name
their own devices.
Allow End User Naming Options
8. Click the drop down menu to select the naming convention to be used.
Drop Down Menu
9. Enter the number of characters allowed to the right of the Maximum
Name Length in the text box or use the arrows to increase or decrease the
number of characters allowed.
Maximum Name Length
10. Check the Force Name Length box to restrict device names to the
parameters set.

MONTGOMERY COUNTY PUBLIC SCHOOLS Technology Consulting Team
72
11. Click Next. A Device Registration window will display.
Device Registration Window
12. Follow the instructions on the screen. If the option for end user naming
was selected, each device user will be prompted to enter a name on
their device.
ActivExpression Device

MONTGOMERY COUNTY PUBLIC SCHOOLS Technology Consulting Team
73
13. Click Finish to end the device registration early or continue to register
devices and the Device Registration window will automatically close once
the designated number of devices has been registered.
Naming ActivExpressions
Note: As mentioned in the previous section, instructors can set up end user naming for
devices. However, this can also be done at any time from the Device Registration window.
1. Open ActivInspire software. The Dashboard will appear. If it does not,
click the View menu and select Dashboard.
Dashboard
2. Click Configure. The menu options will change on the right side of the
Dashboard.

MONTGOMERY COUNTY PUBLIC SCHOOLS Technology Consulting Team
74
Configure Option
3. Click Register Devices. A Device Registration window will open.
Register Devices Option

MONTGOMERY COUNTY PUBLIC SCHOOLS Technology Consulting Team
75
Device Registration Window
4. Click the ActivExpressions box. The box will be selected.

MONTGOMERY COUNTY PUBLIC SCHOOLS Technology Consulting Team
76
5. Click Rename. A Device Naming window will open.
Device Naming Window

MONTGOMERY COUNTY PUBLIC SCHOOLS Technology Consulting Team
77
Naming Options:
Number
Description
Click the button to the left of “Rename devices by teacher” if the teacher will
be the one entering the names
Click Next. A Device Naming window will open.
Device Naming Window
Double click inside the text box to the right of each device pin number.
Enter the name you would like to assign to the device.
OR
Enter a prefix to assign to each device such as “A0”. (The prefix can
only be 3 characters.)
Click Finish.
Click the button to the left of “Rename devices by students” if the devices will
be renamed by students on their devices.
Rename Devices by Students Options
Click the dropdown menu to the right of Character Types to define what
types of characters may be used by students in their device names.
Enter the number of characters allowed in the text box or use the arrows
to increase or decrease the number of characters allowed.
Click the box to the left of “Force Name Length” to limit student names
to the paramaters selected in the previous step.
Click Finish. A Device Naming Window will display.
2
1

MONTGOMERY COUNTY PUBLIC SCHOOLS Technology Consulting Team
78
Students must turn on their devices.
Students will enter a device name in agreement for the parameters the
teacher set. Once a device is properly named, “done” will appear to
the right of the device in the Committed column.
Click Finish.

MONTGOMERY COUNTY PUBLIC SCHOOLS Technology Consulting Team
79
Using ActivExpressions
Text answers which are nominated „correct‟ are case sensitive. Numerical
answers which are nominated „correct‟ allow a level of error which can be set in
the Question Wizard.
Once a poll is active – students can then submit their answer via the
ActivExpression handsets. The screen will show how many students have yet to
vote.
Note: As mentioned in the previous section, instructors can set up end user naming for
devices. However, this can also be done at any time from the Device Registration window.
1. Select Express Poll from the Activinspire toolbar. The Express Poll menu will
display.
Activinspire Toolbar- Express Poll
Note: When Express Poll opens, it shows up as its icon in a floating circle onyour screen.
When you move the cursor over it, it will expand a radial menu (a circle of icons around the
center).

MONTGOMERY COUNTY PUBLIC SCHOOLS Technology Consulting Team
80
Express Poll Expanded
2. Click the Settings icon . The Express Poll menu will expand.
3. Click the ActiExpression icon to target ActivExperssion devices.
For more information about using ActivExpressions for questioning, please see
documentation for Conducting a Voting Session.

MONTGOMERY COUNTY PUBLIC SCHOOLS Technology Consulting Team
81
CONDUCTING A VOTING SESSION
Using either ActiVotes or ActivExpressions devices, you can ask your students
questions using Express Poll and prepared questions.
Choosing a Device Type
Questions for quizzes and tests can be set up differently depending on whether
the classroom has ActiVotes or ActivExpressions device. It is recommended that
you check which device is selected before you start a vote. If you are receiving
an error that your votes need registration, please follow the steps below to pick
a device type.
1. Click the Express Poll button in the Main Toolbox.
2. To set questions for ActiVotes, hover over the center of the Express Poll
circle, hover over the Actions icon, and then select the ActiVote icon. To
set questions for ActivExpressions, select the ActivExpression icon
Or
3. Go to the Voting Browser and select either the AcitVote or ActivExpression
icon.

MONTGOMERY COUNTY PUBLIC SCHOOLS Technology Consulting Team
82
Conducting a Voting Session Using Express Poll
Learners answer a quick or ad hoc question. You can hold an Express Poll at any
time, even when there is no flipchart open.
1. Click the Express Poll button in the Main Toolbox. The Express Poll
button appears on the current flipchart page.
2. When you hover over the center of the Express Poll circle, the voting
Wonderwheel appears.
Number
Button
Description
Multiple Choice
Five multiple choice options are available: A-B, A-C, A-
D, A-E, and A-F.
Yes/No – True/False
Four Yes/No and True/False options are available:
Yes/No, Yes/No/Don‟t Know, True/False, and
True/False/Don‟t Know.
Actions
Action buttons include Devise Registration, Assign
Students to Devices, Stop Voting, Target
ActivExpression Devices, and Target Activote Devices.
These action buttons can be found in the Voting
Browser as well.
3. Select a question style, either Multiple Choice or Yes/No-True/False.
3
2
1
3
1
2

MONTGOMERY COUNTY PUBLIC SCHOOLS Technology Consulting Team
83
4. Move the pen or mouse outward to show the options for the style you just
highlighted.
5. A window with the device names and voting summary box will be
displayed on your screen as the vote takes place. This window can be
resized and moved as needed.
Number
Button/Region
Description
Answers received
The numbers here change to yellow when a vote is
received.
Voting Summary box
Possible answer choices are displayed here.
Set a timeout
You can set a timeout by entering a number or
using the arrows. When you use a timeout, you also
have a Pause Vote button for extra control.
Start / Stop Vote
Stop the vote using the red Stop Vote button. Once
the vote is stopped, the green Start Vote button
appears for next vote. The Start/Stop Vote
button becomes available in the main toolbox
when you use Express Poll.
4
3
2
1
3
1
2
4

MONTGOMERY COUNTY PUBLIC SCHOOLS Technology Consulting Team
84
Note: If your profile already has a timeout set for Express Poll, the countdown starts as soon
as the summary box is displayed.
6. Click the Stop Vote button to end the voting session.
Conducting a Voting Session using a Prepared Question
You can insert one question into each flipchart page using the Question Wizard.
Once you have prepared questions this way, the Start Vote button in the
Main Toolbox will be highlighted green. You do not use Express Poll if you have
prepared questions using the Question Wizard.
To set up a question using the Question Wizard, follow the steps below:
1. Click the Insert Menu and select Question…
2. The Insert Question Wizard window appears. Choose a question type, the
number of answer options, and where you desire the question inserted.
Then, click the Next button.

MONTGOMERY COUNTY PUBLIC SCHOOLS Technology Consulting Team
85
Note: Although question types are available for both ActiVotes and ActivExpressions
devices, ActiVotes users should choose multiple choice or Yes/No True/False questions.
3. Choose a template and check off “Replace the page content with a new
design.” Then, click the Next button.
Zoom
in/out
Scroll
down/up

MONTGOMERY COUNTY PUBLIC SCHOOLS Technology Consulting Team
86
Note: If you chose a multiple choice or Yes/No True/False question type, you will need to
choose a template that has text boxes in addition to answer buttons. Templates without text
boxes are for adding pictures as answer choices. You can use the zoom in/out slider to see the
templates in a larger or smaller view. You can also enlarge the Insert Question Wizard window by
dragging the bottom right hand corner.
Note: If you want to use one of the templates from the Resource Library, drag a template to
a flipchart page and then insert a question using the Question Wizard. In Step 3 (Choose a
design), do NOT check off “Replace the page content with a new design.”
4. Enter the question text and choose how the answers will be labeled
(Alphabet A-F, a-f, or numeric 1-6). You can also set a timer for the
question.
5. Scroll down and enter answer choices in the boxes. Then, click the Next
button.

MONTGOMERY COUNTY PUBLIC SCHOOLS Technology Consulting Team
87
6. If you want the question to know the correct answer, check “Assign
correct answers” and click the box next to the right answer. Then, click the
Next or Finish button.

MONTGOMERY COUNTY PUBLIC SCHOOLS Technology Consulting Team
88
Note: You can also assign correct answers later when Vote Results are displayed.
7. Follow-on questions are designed only for ActivExpressions to get
feedback about the question itself; ActiVote users can ignore this choice
and click the Finish button to insert the question into the flipchart page.
8. The question will appear on the flipchart page. To add more questions,
repeat the steps 1 – 7. Whenever you navigate to a page with a prepared
question on it, the green Start Vote button is highlighted green. Click
the Start Vote button to conduct a voting session.
Express Poll
For prepared
questions

MONTGOMERY COUNTY PUBLIC SCHOOLS Technology Consulting Team
89
Viewing the Results
1. Once you stop the voting or time runs out, the Vote Results window will
appear.
Number
Button/Region
Description
Type of Reporting
Different types of reporting include:
Horizontal Bar Graph
Who Answered What Graph
Who Answered What List
Overall Instructor-Paced Scores
Summary
Vertical Bar Graph
Pie Chart
Text Report
Identify Correct Answers
If a prepared question didn‟t already have it,
you can select the correct answer here.
WordSeed: Copy Text into
Flipchart
This feature is available only for
ActivExpressions users. Student responses from
3
2
1
1
2
3
4

MONTGOMERY COUNTY PUBLIC SCHOOLS Technology Consulting Team
90
ActivExpressions devices can be added to the
flipchart as separate objects.
Paste Vote Results into
Flipchart
A snapshot of the current vote results will be
pasted into the current flipchart.
Note: If you don’t want the vote results window appears after each voting, you can
uncheck “Show Results After Vote” in the Settings > Learner Response System.
2. To close the Vote Results window, click the icon.
3. To view the Vote Results after you have closed the window or if “Show
results after vote” is unchecked in the settings, go to the Voting Browser.
4

MONTGOMERY COUNTY PUBLIC SCHOOLS Technology Consulting Team
91
4. Click the plus (+) sign next to Results Browser.
5. Select the question you want to display the results for.
Results of Express
Poll question
Results of
Prepared question

MONTGOMERY COUNTY PUBLIC SCHOOLS Technology Consulting Team
92
6. Click the Options drop-down menu and select View Results.
7. To return to the question page, select Navigate to Question Page.
Note: The results of an Express Poll question appear in a new flipchart page while the results
of a prepared question appear on the question page.

MONTGOMERY COUNTY PUBLIC SCHOOLS Technology Consulting Team
93
Exporting Results
1. Go to the Voting Browser.
2. Click the plus (+) sign next to Results Browser.
3. Click the Export button.
4. You will be asked to save the vote results file. Designate the location and
name the file. Then, click the Save button.

MONTGOMERY COUNTY PUBLIC SCHOOLS Technology Consulting Team
94
5. Microsoft Excel will be launched and the saved results file will open.
Note: In the sample results page above, Q1 was an Express Poll question without the correct
answer assigned while Q2 had the correct answer assigned. The % column takes Q1 into
calculation. If you don’t’ want questions without correct answers assigned to be part of the total
% calculation, you need to delete the results pages of the questions without correct answers
before exporting the results.

MONTGOMERY COUNTY PUBLIC SCHOOLS Technology Consulting Team
95
MANAGING DEVICES USING THE VOTING BROWSER
The voting browser in ActivInspire can help users manage either their Activotes
and/or ActivExpressions.
The Voting Browser
1. Open the ActivInspire Software.
2. Click the Voting Browser icon from the browsing area on the left of
the screen. The Voting Browser will display.
The Voting Browser
Number
Description
Voting Browser icon- When clicked, the browser will switch to the voting
browser.
Register Devices- When clicked, the Device Registration window will open
and the user will be able to register, add, delete or rename devices.
Device Selection- Allows user to choose between using either ActiVotes or
ActivExpressions.
Toggle Anonymous Voting- When clicked, the user can toggle between
anonymous and named voting modes.
Assign Students to Devices- Allows user to assign students to devices using a
database.
Device Display Area- Displays names of all devices registered.
Note: Users can click on the name of a device in the Device Display Area to activate or
deactivate a device. (For example, if a student is absent or steps out of class the teacher can
deactivate the student’s device so it does not skew the results of a question.)
6
5
4
3
2
1
1
2
3
4
5
6

MONTGOMERY COUNTY PUBLIC SCHOOLS Technology Consulting Team
96
For more information about using ActiVotes for ActivExpressions for questioning see
documentation on Conducting a Voting Session.
For more information about browser windows see documentation on browsers.
