
ActivInspire
User Guide

2 ActivInspire User Guide_04/23
Table of Contents
________________________________________________________________________________
Downloading ActivInspire .................................................................................................................. 6
Installation for Windows and Linux ................................................................................................... 8
Installation for Mac ........................................................................................................................... 10
Installing the Resource Pack ........................................................................................................... 12
Using ActivInspire for the First Time .............................................................................................. 15
Saving a Flipchart ............................................................................................................................. 16
Publish ............................................................................................................................................... 17
Print .................................................................................................................................................... 18
Check for Updates ............................................................................................................................ 19
Help and Support .............................................................................................................................. 20
Dashboard ......................................................................................................................................... 21
Creating Activities ............................................................................................................................ 22
Playing Activities .............................................................................................................................. 23
Desktop Annotate ............................................................................................................................. 24
Timer .................................................................................................................................................. 25
Importing a PowerPoint .................................................................................................................... 26
Importing a SMART Notebook File .................................................................................................. 27
Importing a PDF and Saving as a PDF ............................................................................................ 28
Marquee Handles .............................................................................................................................. 29
Translucency Slider .......................................................................................................................... 31
Grouping Objects .............................................................................................................................. 32
Locking Objects ................................................................................................................................ 33
Layering ............................................................................................................................................. 34
Transform .......................................................................................................................................... 35
Align ................................................................................................................................................... 36
Grids .................................................................................................................................................. 37
Reset Page......................................................................................................................................... 38
Docking Toolbox ............................................................................................................................... 39
Page Extender ................................................................................................................................... 40
Color Picker ....................................................................................................................................... 41
Browsers............................................................................................................................................ 42

3 ActivInspire User Guide_04/23
Page Browser .................................................................................................................................... 43
Adding to My Resources .................................................................................................................. 44
Shared Resources ............................................................................................................................ 45
Resource Library .............................................................................................................................. 46
Object Browser ................................................................................................................................. 47
Page Notes ........................................................................................................................................ 48
Property Browser .............................................................................................................................. 49
Background Color ............................................................................................................................. 50
Page Turn Effects ............................................................................................................................. 51
Page Tools ......................................................................................................................................... 52
Revealer Mode ................................................................................................................................... 53
Spotlight Mode .................................................................................................................................. 54
Inserting Pages ................................................................................................................................. 55
Adding Questions ............................................................................................................................. 56
Inserting Multimedia ......................................................................................................................... 57
Adding Videos ................................................................................................................................... 58
Adding Sound ................................................................................................................................... 59
Adding Text ....................................................................................................................................... 61
Shapes ............................................................................................................................................... 62
Equation Editor ................................................................................................................................. 63
Connectors ........................................................................................................................................ 64
Timestamp ......................................................................................................................................... 65
Desktop Tools ................................................................................................................................... 66
Annotation Tools .............................................................................................................................. 67
Magic Ink............................................................................................................................................ 68
Pen Modifiers .................................................................................................................................... 69
Handwriting Recognition.................................................................................................................. 70
Shape Recognition ........................................................................................................................... 71
Revealer Tool .................................................................................................................................... 72
Spotlight Tool .................................................................................................................................... 73
Camera Tool ...................................................................................................................................... 74
Sound Recorder ................................................................................................................................ 75
Screen Recorder ............................................................................................................................... 76
Clock and Timer ................................................................................................................................ 77
Tickertape .......................................................................................................................................... 78

4 ActivInspire User Guide_04/23
Spellcheck Flipchart ......................................................................................................................... 79
Teacher Lock ..................................................................................................................................... 80
Calculator .......................................................................................................................................... 81
Dice Roller ......................................................................................................................................... 82
Ruler and Protractor ......................................................................................................................... 83
Set Square and Compass ................................................................................................................. 85
XY Origin Tool ................................................................................................................................... 87
Actions ............................................................................................................................................... 88
Applying Actions to Specific Tools ................................................................................................. 89
Command Actions ............................................................................................................................ 90
Page Actions ..................................................................................................................................... 91
Object Actions ................................................................................................................................... 92
Document and Media Actions .......................................................................................................... 93
Reorder .............................................................................................................................................. 94
Another Page ..................................................................................................................................... 95
Hidden ................................................................................................................................................ 96
Rub and Reveal ................................................................................................................................. 97
Drag a Copy ....................................................................................................................................... 98
Containers ......................................................................................................................................... 99
Keyword Containers ....................................................................................................................... 101
Rubber Stamp ................................................................................................................................. 103
Profiles ............................................................................................................................................. 104
Layout .............................................................................................................................................. 105
Commands ...................................................................................................................................... 106
User Defined Buttons ..................................................................................................................... 107
Settings ............................................................................................................................................ 108
Settings: Clock Tool ....................................................................................................................... 109
Settings: Design Mode ................................................................................................................... 110
Settings: Effects .............................................................................................................................. 111
Settings: Flipchart .......................................................................................................................... 112
Settings: Flipchart Objects ............................................................................................................ 113
Settings: Language ......................................................................................................................... 114
Settings: Learner Response System ............................................................................................. 115
Settings: Multimedia ....................................................................................................................... 116

5 ActivInspire User Guide_04/23
Settings: Online Settings ............................................................................................................... 117
Settings: Profile and Resources .................................................................................................... 118
Settings: Recordings ...................................................................................................................... 119
Settings: Spell Checker .................................................................................................................. 120
Settings: Tools ................................................................................................................................ 121
Settings: User Input ........................................................................................................................ 122
ClassFlow Connect Devices .......................................................................................................... 123
Help and Support ............................................................................................................................ 125

6 ActivInspire User Guide_04/23
Downloading ActivInspire
To access your free download of ActivInspire, please visit Promethean Support. Should you require assistance
at any point, please Contact Us.
Select Downloads. Scroll down the page and select Download ActivInspire.
Select your language, then select Next.
Next, select your operating system. Enter your name,
occupation, country, and email address and confirm that
you have read and accept the terms of the Licensing
Agreement to proceed.
Select Submit.

7 ActivInspire User Guide_04/23
You will receive an email with instructions for downloading ActivInspire. If you have not received the
confirmation email after ten minutes, be sure to check your spam folder.
While the software downloads, take a moment to generate an Activation Key
for ActivInspire Professional Edition, and download your free ActivInspire
Resource Pack.
The ActivInspire Resource Pack provides you with a multitude of subject-specific lesson-building resources to
quickly and easily add to any flipchart.
8 ActivInspire User Guide_04/23
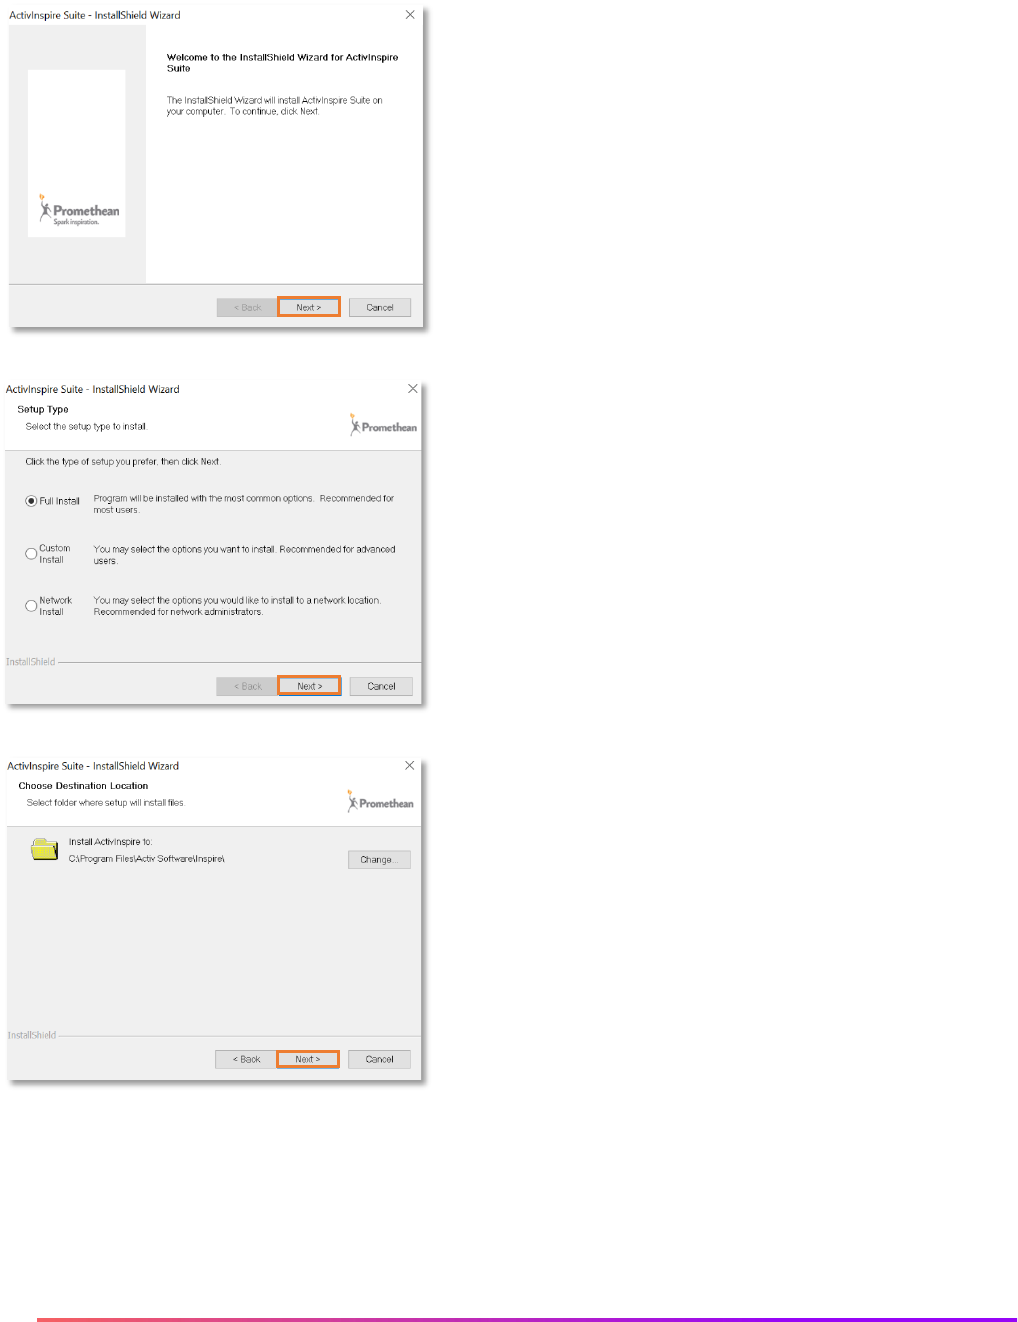
Installation for Windows and Linux
Once the software has downloaded, install it by double clicking
the file.
Select the Setup Type from the list and click Next. We
recommend you perform a Full Install.
Choose destination location and select Next.

9 ActivInspire User Guide_04/23
Choose where you would like to install the Core
Resources and select Next. Accept the terms of the
license agreement and select Next. Review settings and
select Next.
Select Install to begin the installation. The installation
may take several minutes.
Select Finish to close the window.
For instructions on downloading ActivInspire on Linux, please visit Promethean Support.

10 ActivInspire User Guide_04/23
Installation for Mac
Once the software has downloaded, open the package by double clicking the file. Inside you will find two files:
ActivInspire and ActivDriver. Double click ActivInspire to install.
If the message below appears, select Allow.
The installer will begin. Click Continue.

11 ActivInspire User Guide_04/23
Select your language and click Continue.
Read and agree to the license terms.
Click Install.

12 ActivInspire User Guide_04/23
Enter your password.
The installation may take several minutes.
When presented with this screen, select Open System Preferences.

13 ActivInspire User Guide_04/23
In the privacy tab, under Accessibility, ensure updd and UPDD Commander are checked.
Select your preferred options, then click Continue.
Once installed, you may close the window.

14 ActivInspire User Guide_04/23
Installing the Resource Pack
If you have ActivInspire software, you will also want the Shared Resources that accompany it. These include
valuable lesson building resources for a variety of subject areas. To download and install the Resource Pack,
begin by visiting support.prometheanworld.com. Select Downloads in the Header. Scroll down the page and
select Install ActivInspire and Resource Pack.
Scroll down to the link titled Resource Pack, and click the link to begin the installation.
Once your Resource Pack has downloaded, open ActivInspire’s File menu and select Import. Select
Resource Pack to Shared Resources.
Browse to the newly downloaded Resource Pack file, select it, and click Open. The resources will be imported
and indexed.
Once complete, the resources can be found in the Resource Browser, under Shared Resources, then
Subjects. If your Browsers are not visible, go to View, then Browsers.
If you need technical support, please contact us.

15 ActivInspire User Guide_04/23
Using ActivInspire for the First Time
Once ActivInspire is installed, there will be a shortcut on your desktop. Double-click it to launch ActivInspire.
Next you will see the Promethean License Agreement window. Enter a User Name, Organisation and
Activation Key. Check the box to accept the terms of the license, then click OK.
If you do not have an ActivInspire Activation Key, you can leave this field blank. You can try ActivInspire
Professional Edition for 60 days by clicking the Trial option. If you prefer to use ActivInspire Personal Edition
only, or the trial period has expired, click Run Personal Edition to proceed.
The first time you run the software you will be asked to confirm which program you are most familiar with:
ActivStudio, ActivPrimary or Microsoft Office applications (such as PowerPoint).

16 ActivInspire User Guide_04/23
Saving a Flipchart
Saving an ActivInspire flipchart is easy. Go to File, then Save or Save As.
You will be prompted to select a location on your device. Give your flipchart a name and select Save.
Note: Although you and your students may make changes to the flipchart during class, such as annotations,
you can always use Reset Page to restore your flipchart to its most recently saved version. This allows you to
save your original file for later use.
Reset Page icon

17 ActivInspire User Guide_04/23
Publish
The Flipchart Publisher in ActivInspire allows you to create a protected version of your flipchart, preventing
others from being able to copy or print its contents.
Be sure to save a copy of your flipchart in a safe place before you publish it. Once published, any restrictions
you have set for other users will also apply to you.
To access the Flipchart Publisher, go to File, and select Publish.
A menu will appear, allowing you to enter publisher information. This
information is for your own use and will not be visible to others.
Select restrictions. Selecting Cancel will close the dialogue box without saving.
Once you have finished, select Save Details to save your choices without
publishing. Finally, select Publish to apply your choices and save the flipchart
to a new location.

18 ActivInspire User Guide_04/23
Print
ActivInspire makes it easy to print your flipcharts to use as handouts, incorporate in substitute notes, and more.
To print, go to File, then Print.
The Print dialogue box opens. Select from a range of options.
If Page Notes have been added to the flipchart, the notes may be printed as well.
You also may Export to PDF.
After you have made your selections, select Print.

19 ActivInspire User Guide_04/23
Check for Updates
ActivInspire checks for software updates each time you start the program. For this to be effective, you need a
strong internet connection. If a newer version is available for automatic download, a message will display. This
will prompt you to choose whether you wish to install the new version. Click OK to download and install the
new version or Cancel to ignore the new version and continue opening ActivInspire.
You may prefer to use the manual option of updating by using Check for Updates. To access this feature, go to
Help, then Check for Updates. If your version is up to date, simply tap OK.

20 ActivInspire User Guide_04/23
Help and Support
We want you to feel supported with your ActivInspire experience. One way to get help is to begin in the
ActivInspire software. Go to Help, then Contents. This will open a new tab or window within your default web
browser. View suggested topics or search by keyword.
You may also visit support.prometheanworld.com. Select Interactive Software, then ActivInspire. View
Documents, Articles, and more. You may also contact Promethean Support.
Visit Learn Promethean for even more ActivInspire-related resources.
21 ActivInspire User Guide_04/23
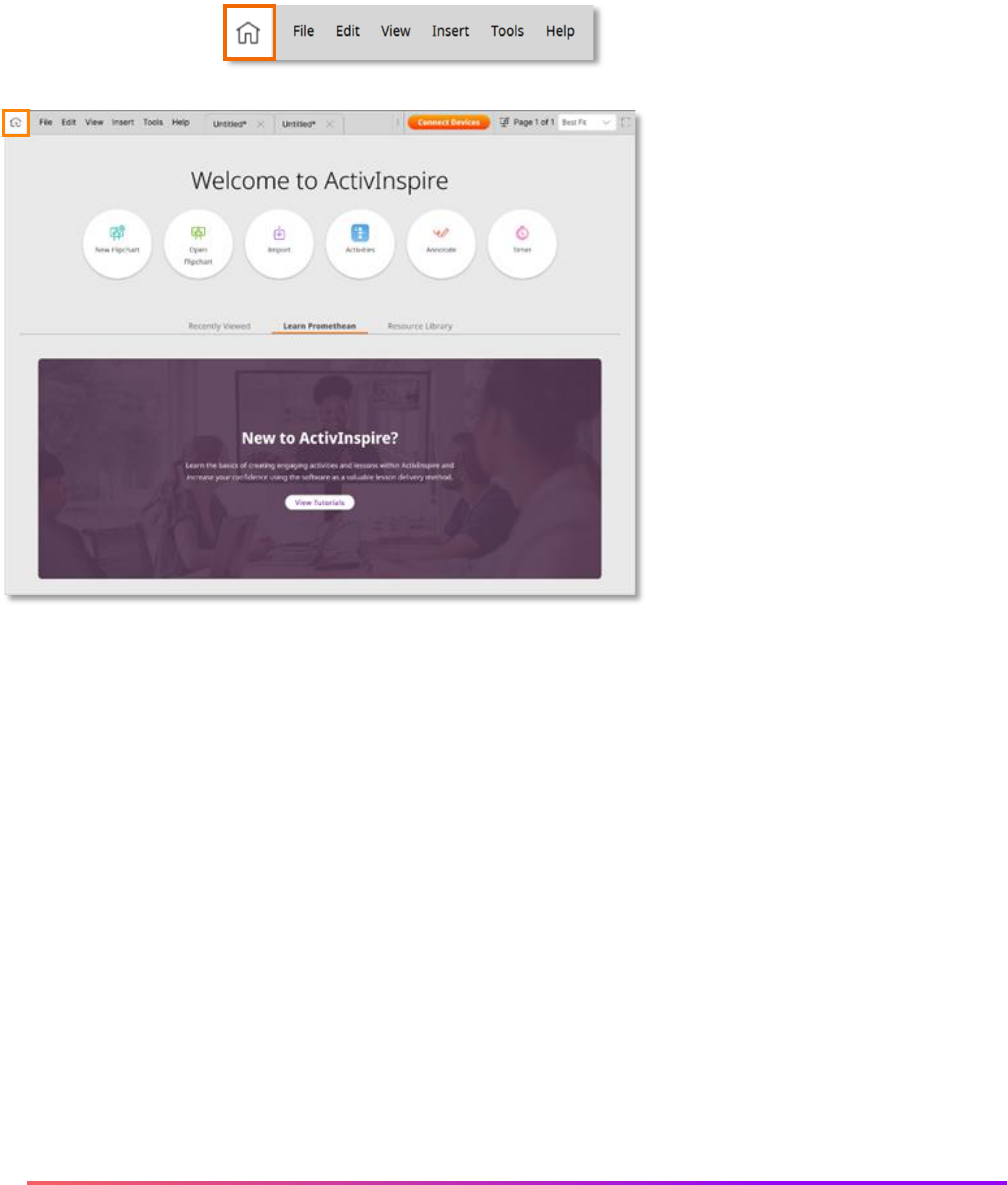
Dashboard
The ActivInspire Homepage appears on opening the software, allowing you to quickly and easily create new
resources, access existing resources, and more. To access the Homepage at any time, select the Home
button along the top of the window.
Select Flipcharts to create and access
flipcharts. Click Back to return to the
Homepage.
Select Activities to access 10 different
activity types – truly something for every
content area and grade level.
Select Desktop Annotate to initiate one
of ActivInspire users’ favorite tools.
Select the Timer to utilize a combination
of timers, stopwatches, or clocks.
The Recent area within the Homepage displays your recent Flipcharts and Activities.
Select New to ActivInspire to visit our Learn Promethean site with over one hundred short tutorial videos and
printable PDF guides.

22 ActivInspire User Guide_04/23
Creating Activities
Activities are a quick, easy way to add additional engagement to your instruction. With ten different activity
types to choose from, they’re an ideal way to help students practice skills and concepts, no matter your grade
level or content area. Activities are accessible from the Homepage. To access the Homepage at any time,
click the Home button along the top of the window. Select Activities from the Homepage.
Select the activity type you wish to create and begin
adding your content. For most activities, you can add
text and images.
Within the Activity Builder, select the three vertical
dots in the top right corner for more options.
You may use the default activity background or select
Change to use an image from your computer. You may
also choose a color scheme.
It is important to save your activity. Select Save to choose a location to save the file and give your activity a
title. It is a good idea to include the activity type in the title for easy retrieval later. Click Save when complete.
Once you have saved the activity, you will have the option to Add to Page. This adds the activity to your
current flipchart. Activities also may be accessed and played from the Homepage.

23 ActivInspire User Guide_04/23
Playing Activities
Activities may be played as stand-alone tasks or added to your flipchart. Activities are accessible from the
Homepage. To access the Dashboard at any time, click the Home button along the top of the window.
Within the Homepage, you may select Activities to create new or open existing activities.
When you open an existing activity from the Dashboard,
it will automatically launch the activity. When building an
activity, select Play to play the Activity. In both scenarios,
the arrows button will take you to a full screen view.
For existing activities, select Edit to make changes, and
add the activity to your current flipchart by selecting Add
to Page. When building an activity, you will have the
option to Add to Page once you save the activity.
Once an activity has been added to a flipchart, hover over the activity in Presentation Mode. Notice how your
cursor changes to a play icon. Click once to play the activity. In Design Mode, you may manipulate the activity
as you would other flipchart objects.

24 ActivInspire User Guide_04/23
Desktop Annotate
The Desktop Annotate tool provides you with seamless interaction with existing resources, websites, and
more. Desktop Annotate appears on your Homepage on opening ActivInspire and is also accessible from your
main toolbox.
Once you launch Desktop Annotate, ActivInspire automatically minimizes, leaving just your Page Browser,
main toolbox, and trash can.
Feel free to move or close your Page Browser or trash
can for more space. Keep your main toolbox open to
access annotation tools.
Even while annotating, you are still free to interact with
the resource. For instance, scroll or click within a website.
Annotations will stay in place, but you may use the Eraser tool or the Clear Tool (then Clear Annotations) to
remove them. Exit Desktop Annotate mode any time by clicking the button on your main toolbox.
ActivInspire automatically creates a new flipchart, titled Desktop Flipchart, allowing you to easily access your
annotations. You may wish to save this new flipchart.

25 ActivInspire User Guide_04/23
Timer
The Timer is an ideal way to manage time in your classroom – for activities, group work, assessments, and
more. The Timer is accessible from your Homepage. To access the Homepage at any time, click the Home
button along the top of the window.
Once you select Timer from the Homepage, the Timer appears. Drag to move it anywhere on your screen.
There are three modes: Clock, Timer, and Stopwatch. Tap whichever title
is currently displaying to toggle between the three modes.
Within the Timer, choose between presets, including 30 seconds, one
minute, ten minutes, or one hour, or use the arrows to customize your own
timer.
Press the start button to initiate. Use the pause button to pause and resume
the timer or the reset button to reset.
In all three modes, you may select the gear to access additional options.
Regardless of which mode you are in – Clock, Timer, or Stopwatch – simply tap the plus sign to create a new
one. This is handy for managing multiple tasks at once.
As an added bonus, you may continue using these tools even with ActivInspire minimized and other windows
in use. Tap the X to close each Clock, Timer, or Stopwatch.

26 ActivInspire User Guide_04/23
Importing a PowerPoint
ActivInspire allows you to import your existing resources, such as PowerPoints, saving you time, and providing
you and your students the ability to use features like annotation tools.
Please note: Importing PowerPoints is only available for Windows users. For Mac users, a possible solution is
to print your PowerPoint presentation as a PDF, then import it into ActivInspire as a PDF.
To import a PowerPoint, go to File, then Import.
Choose from two options.
Powerpoint as Images means each slide of your PowerPoint imports as one static image that fills a whole
flipchart page.
Powerpoint as Objects means items in your PowerPoint presentation become individual objects on each
page of the flipchart, so you may edit and manipulate them.
You will be prompted to find your file. Then select Open. Depending on the
size of your PowerPoint, it may take a moment to import.
The imported PowerPoint opens in a new flipchart file. To save, go to File, Save As.
Please note: ActivInspire does not yet support Microsoft PowerPoint 2013 or later. If this
version is installed on your computer, you may encounter an error message when you try to
import a PowerPoint file.
As a workaround, try removing any spaces or special characters from the file name and
path. You may also find it helpful to save the file on your Desktop in the 97-2003
PowerPoint version.

27 ActivInspire User Guide_04/23
Importing a SMART Notebook File
ActivInspire allows you to import your existing resources, such as SMART Notebook files, saving you time, and
providing you and your students the ability to use features like annotation tools.
To import a SMART Notebook file, go to File, Import, then SMART® Notebook File v8, v9, v9.5, v10.
You will be prompted to find your file. Then select Open. Depending on the size of your SMART Notebook file,
it may take a moment to import.
The imported SMART Notebook file opens in a new flipchart file.
Each slide of your SMART Notebook file is now its own page within the flipchart.
To save, go to File, Save As.
28 ActivInspire User Guide_04/23
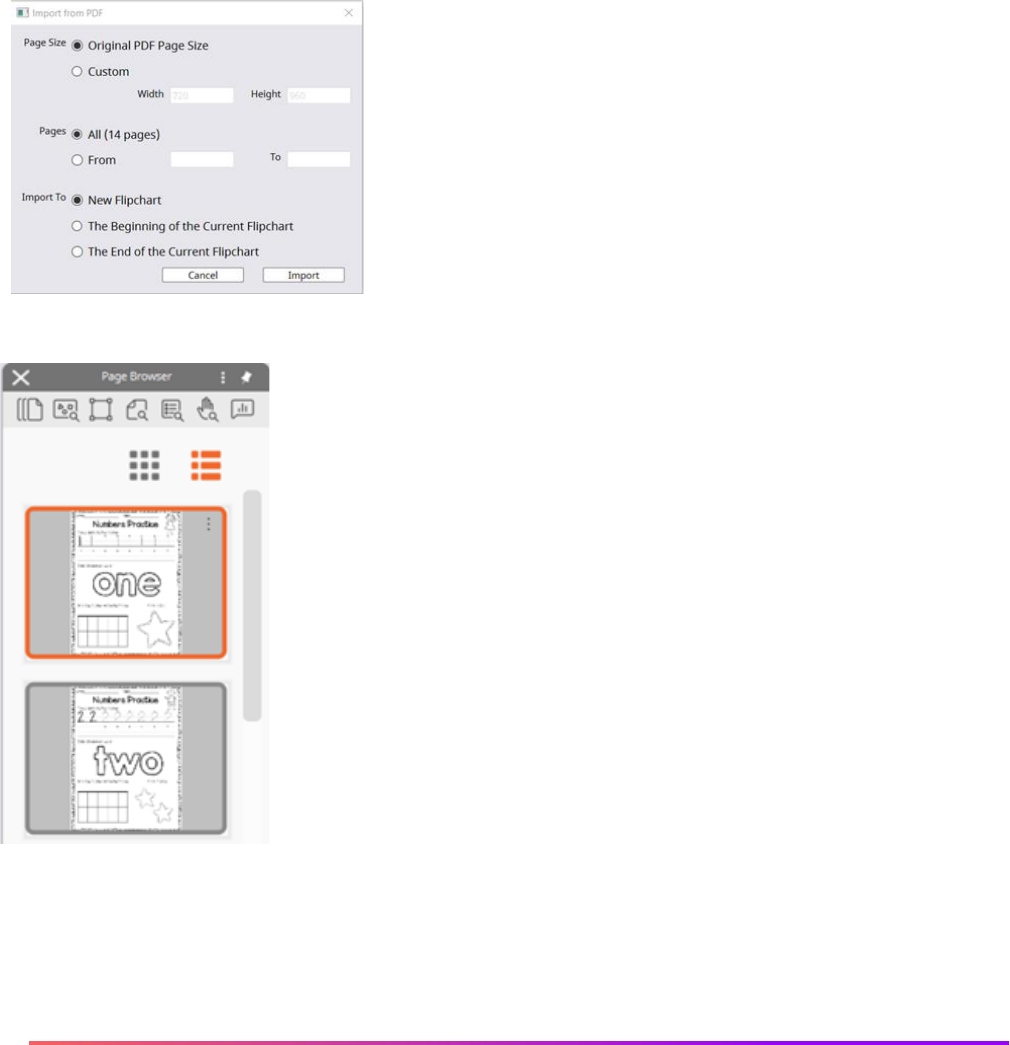
Importing a PDF and Saving as a PDF
ActivInspire allows you to import your existing resources, such as PDFs, saving you time, and providing you
and your students the ability to use features like annotation tools.
To import a PDF, simply go to File, then Import. Select PDF. You will be prompted to choose the file from your
device. Then click Open.
Once selected, you have additional options.
You can alter the page size to fit your needs, use all or part of the
document, and use the PDF to make a new flipchart or insert it into
one you currently have open.
Once you have made your selections, click Import.
Each page of the PDF becomes its own page within the flipchart.
To export your flipchart to a PDF, simply go to File, Export, All Pages to, then
PDF.
You will be prompted to choose a destination on your device to save this PDF.
Then select Save.

29 ActivInspire User Guide_04/23
Marquee Handles
When you select any object in ActivInspire, the Marquee Handles appear.
Click and drag to extend and distort the object with the sizing handles. Click and drag the sizing handle on the
bottom right to resize the object proportionately.
Object Tool Bar
Shapes and objects
Object Tool Bar
Images
1. Use Freely Move Object to move objects around the flipchart page by clicking and dragging.
2. Rotate an object by clicking and dragging.
3. Object Edit Menu expands to offer a range of options.
4. The Translucency Slider lets you increase or decrease an object’s translucency.
5. If objects are Grouped, you manipulate and edit them as a single object. This button will appear yellow
when the selected items are Grouped. Toggle this button to Group or Un-Group them.
1 2 3 4 5 6 7 8 9 10 11
1 2 3 4 5 6 7 8 9 10 12

30 ActivInspire User Guide_04/23
6. Use Bring Forward to reposition overlapping objects.
7. Use Send Backward to reposition overlapping objects.
8. Use Duplicate to replicate the selected object.
9. Increase Object Size increases an object’s size by 10% with each click.
10. Decrease Object Size decreases an object’s size by 10% with each click.
11. Use Edit Shape Points to change the shape of an object by clicking and dragging.
12. Use Crop Image to crop and edit an image.

31 ActivInspire User Guide_04/23
Translucency Slider
The Translucency Slider allows you to easily increase or decrease an object’s translucency at any time.
Once you select an object within your flipchart, look for the Marquee Handle. Translucency Slider is located
fourth from the left.
Drag the Translucency Slider at any time to conceal or reveal objects. Note: in this example, objects (labels)
are grouped.

32 ActivInspire User Guide_04/23
Grouping Objects
Grouping objects in ActivInspire is a handy way to design your flipcharts, as well as apply actions and tools to
more than one object at the same time.
One way to group objects is to use the Select tool and drag over the objects you wish to group.
Once you have selected that area, look for the Marquee Handle. Click the Grouped button, located fifth from
the right.
Once items are grouped, the icon will appear in yellow. Click the Grouped button again to ungroup.
Another way to group objects is to use the Control key if using Windows, or the Command key if using a Mac.
Select the first object, then hold down either the Control or Command key and continue selecting objects to
group. Once all desired objects are selected, use the Grouped button from the Marquee Handle.
Select tool
33 ActivInspire User Guide_04/23
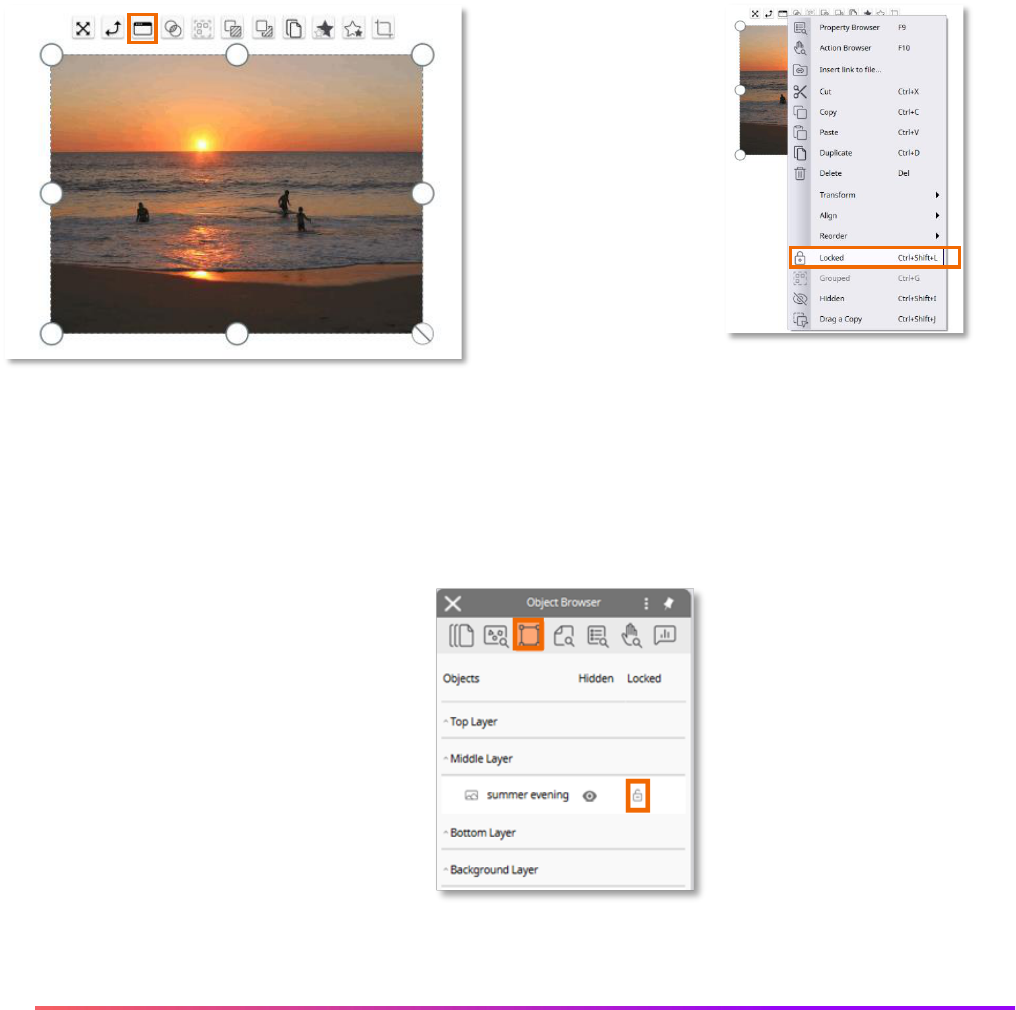
Locking Objects
Locking objects in place – like images, shapes, text, and annotations – allows you to create interactive
flipcharts for your students, but isolate objects you do not wish to be moved.
You may lock objects from either Design or Presentation Mode, but you may only unlock them in Design Mode.
To lock, simply select the object and choose Object Edit Menu from the Marquee Handle, located third from
the left. Click Locked.
Additionally, your Object Browser allows you to see all locked objects at a glance.
You may also lock or unlock objects directly from the Object Browser. Select the object and click the small
menu icon.

34 ActivInspire User Guide_04/23
Layering
In ActivInspire flipcharts, all objects – such as images, shapes, text, and annotations – are placed in layers.
You can move objects from one layer to another, allowing you to create interactive lessons and activities.
The best way to visualize layering is to view your Object Browser. If your Browsers are not visible, go to View,
then Browsers.
The Object Browser shows all objects on a page and allows you to edit layers. You can drag and reposition
objects within the same layer, or to a different layer.
The Top Layer contains objects made using the Connector, Pen, Highlighter, and Magic Ink tools.
The Middle Layer consists of images, shapes, and text.
The Bottom Layer is initially empty, but you can move objects to it.
The Background Layer consists of the background page color, as well as a
background image or grid. Objects placed on this layer will become locked
and appear below all other objects and layers.
You can also change the position of objects within the same layer by selecting an object and using the Bring
Forward or Send Backward buttons on the Marquee Handle.

35 ActivInspire User Guide_04/23
Transform
ActivInspire allows you to transform any object within your flipchart – perfect for use in math lessons, as well as
your overall flipchart design.
To resize an object, use the bottom-right sizing handle to transform objects
so they maintain their original proportions. Resizing with the other handles
may distort your objects.
Access additional transformation tools by selecting an object and clicking the
Object Edit Menu, located third from the left on the Marquee Handle.
Choose Transform from the menu to view more options.
Some of our users’ favorites include Increase Object Size and Decrease Object Size. These will increase or
decrease an object’s size by 10% with each click.
You may also Mirror in X Axis, Mirror in Y Axis, Flip in X Axis, or Flip in Y Axis.

36 ActivInspire User Guide_04/23
Align
ActivInspire allows you to align objects within your flipchart – perfect for creating student activities and for
overall flipchart design.
Use the Select tool and drag to select the objects you wish to align.
Next, choose Object Edit Menu, third from the left on the Marquee Handle. Click Align. There are several
options to choose from.
Note that for each of these actions, the alignment criteria for the whole group are always based on the first
object created in the group.
Select tool

37 ActivInspire User Guide_04/23
Grids
Use Grids to create math lessons, activities, provide organized work spaces for students, and for help with
general flipchart design. They are customizable, easy to apply, and there are several that come with
ActivInspire software.
To access Grids, go to your Resource Browser, second in your Browsers.
If your Browsers are not available, go to View, then Browsers.
In Resource Browser, select Shared Resources. Expand the Grids folder
to view subfolders.
Once you find a Grid, just drag it onto your flipchart page to apply it.
When you apply a Grid to a page, you can still change the background
color and image of your flipchart page, as well as add and manipulate
annotations and images.
To customize a Grid, right-click on any blank area of your flipchart page and select Grid Designer. You can
also go to Edit and click Grid.
Modify your Grid’s scale, color, and more. Grid settings change in real time,
so you can preview them instantly. Once you have made your changes,
click Close.
Remove a Grid at any time by right-clicking on a blank area of the flipchart
page and selecting Hide Grid.

38 ActivInspire User Guide_04/23
Reset Page
Utilizing Reset Page is the perfect way to use your flipcharts multiple times.
Reset Page resets the flipchart page to its most recently saved state. You can find Reset Page in your main
toolbox, or go to Edit, then Reset Page.
After you or your students make changes to a flipchart – for example, annotations – use Reset Page to restore
it.
Reset Page

39 ActivInspire User Guide_04/23
Docking Toolbox
ActivInspire allows you to dock and reposition the toolbox to best fit your needs.
Select the menu icon to access docking options.
Attach the toolbox to the inside edge of the ActivInspire window in the
chosen position, or leave it floating so that you can drag and drop it as
required.
Note: You can set the toolbox to Floating at any time by dragging it from a docked location into the middle of
the screen.
Roll Up condenses the toolbox to reveal only the first row of icons.
Roll In condenses the toolbox to conceal the Toolbox Shortcut Bar.
If you dock your toolbox on the top or bottom of the ActivInspire window, you can go to File, Settings, Layout,
and select the Main Toolbox dropdown menu to reposition it. Click Done when finished.

40 ActivInspire User Guide_04/23
Page Extender
The Page Extender is available to help you create more space on a page when you want to add more
information but don't want to start a new page.
To implement Page Extender, go to View, then Page Extender. The Page Extender is displayed at bottom of
the flipchart page by default but can be moved to any position on the page, so your working area is not
obstructed.
Click on the Page Extender and the current page will extend by 10% with each click. For ease of use, the new
area is always visible when you extend the page.
Use the Page Extender at any time, even in tandem with any tools selected from the Main Toolbox.
The Page Extender can be used multiple times on one flipchart page and on multiple pages within a flipchart
without affecting any other pages or the content on the pages.
To remove the Page Extender, just return to View, then Page Extender.
Page Extender

41 ActivInspire User Guide_04/23
Color Picker
The Color Picker in ActivInspire allows you to fully customize every page of your flipchart with any color you
wish.
To access the Color Picker, begin with the color palette in your Main Toolbox. Right-click
on any of the default colors within the palette and select the eyedropper icon, also known
as the Color Picker.
The cursor changes and a small window appears. Whatever you hover over with your cursor will be reflected
as close-up pixels within the Color Picker window.
When the square at the center of the box shows the desired color,
click to add it to the Color Palette. It will replace the previous color,
and the cursor will revert to the Select Tool.
You may then use the new color with the Fill Tool, the Pen Tool, the
Shapes Tool, and more. You may always go to Settings to reset your
Main Toolbox if necessary.
The Color Picker works with the Text Tool in use as well. Right-click the Text Color or the Background Color
to access.

42 ActivInspire User Guide_04/23
Browsers
ActivInspire makes customizing your flipcharts easy by providing a Browser for each major area.
If your Browsers are not visible, go to View and select Browsers.
1. Page Browser helps you put together the foundations of your flipchart. View the entire flipchart as page
thumbnails, navigate flipchart pages, and organize pages. Right click on any page for more options.
2. Resource Browser helps you to use the resources provided with ActivInspire to enrich your flipcharts.
Select Shared Resources to access a wide range of activities, images, sounds and more. From within
Shared Resources, select Search Resources on Resource Library to access thousands of pre-made
flipcharts in the Resource Library that you may search, preview, and open in ActivInspire.
3. Object Browser identifies each of the objects on your page within their respective layers. Although a page
is flat, a flipchart page has four layers. Use the Object Browser to drag and drop to reorder layering. You
can also see hidden or locked objects.
4. Notes Browser allows you to make notes for your flipchart in any way you choose. This can be helpful
when sharing resources with your colleagues.
5. Property Browser helps you to see all the properties of the flipchart page itself, as well as the properties
of each object.
6. Action Browser helps you attach actions to objects for added interactivity. All actions are clearly
categorized.
7. Voting Browser helps you manage all aspects of registering your ActivSlate, ActiVote and
ActivExpression devices.
Use the Toolbox Options and Pin Toolbox icons to change the
placement of your browsers or click the small X to close them
entirely. You may always return to View to reinstate them.
1 2 3 4 5 6 7

43 ActivInspire User Guide_04/23
Page Browser
The Page Browser in ActivInspire helps you to quickly put together the foundations of your flipchart.
The Page Browser is the first in your line of Browsers. If your browsers are not
visible, go to View, then Browsers.
Use the Page Browser to view the entire flipchart as page thumbnails, navigate
flipchart pages, and reorder pages by dragging and dropping.
Select the menu icon on any page thumbnail to access more features, such as Set
Background, Grids, and Cut, Copy, Duplicate, and Delete commands.
Changes made within the Page Browser are reflected in real time.

44 ActivInspire User Guide_04/23
Adding to My Resources
ActivInspire makes it easy to manage resources you frequently use within the My Resources area of the
Resource Browser. Begin in your Resource Browser. If your browsers are not visible, go to View, then
Browsers. Select My Resources.
Add a new folder by selecting the My Resources menu and choosing Create New Folder.
Name the folder and click OK. The new folder now appears within My Resources. You may select the folder
menu to make additional changes.
To add resources to the folder, click and drag an object from your flipchart page to the folder. Look for the plus
sign to see it will be added, then release it. The newly-added resource now appears.
To rename a resource, select the resource, then
its menu, and choose Rename Resource File.
Enter the new name and click OK.
Now that these files reside within your Resources,
you can quickly and easily add them to any
flipchart, saving you valuable time.

45 ActivInspire User Guide_04/23
Shared Resources
ActivInspire software comes complete with a range of resources to help you quickly create dynamic lessons
and activities.
To access, go to View, then Resource Browser, and select Shared Resources.
This resource library includes templates, backgrounds, grids, icons, sounds, subject-
specific materials, and more.
To add a resource to your flipchart, select and drag it onto the page.
For help or more information regarding ActivInspire’s Shared Resources, please visit
support.prometheanworld.com and search for “resource pack.”

46 ActivInspire User Guide_04/23
Resource Library
The Promethean Resource Library provides thousands of ready-made flipcharts at your fingertips.
To access, go to View, then Browsers. Select Resource Browser, then select the Search Resources on
Resource Library button.
This takes you to the Resource Library within your Promethean account, where you can search thousands of
flipcharts created by other educators and publishers.
Preview a flipchart, download it, share it with colleagues, save it to help organize your content, or rate the
resource. You may be prompted to sign into your Promethean account. Creating an account is free.

47 ActivInspire User Guide_04/23
Object Browser
The Object Browser in ActivInspire helps you to easily view and modify the objects and layers within your
flipchart.
The Object Browser is the third in your line of Browsers. If your browsers are not visible, go to View, then
Browsers.
Although a flipchart page is flat, it contains four layers. The Object Browser shows all
objects on a page and allows you to edit layers. Drag and reposition objects within the
same layer, or to a different layer. You may stack objects on top of each other within
the same layer.
The Top Layer by default contains objects made using the Connector, Pen,
Highlighter, and Magic Ink tools.
The Middle Layer consists of images, shapes, and text.
The Bottom Layer is initially empty, but you can move objects to it.
The Background Layer consists of the background page color, as well as a
background image or grid. Objects placed on this layer will become locked
and appear below all other objects and layers.
You also may use the Object Browser to view Locked and Hidden objects. Select the small menu icon of an
object to access editing options, including Locked and Hidden.

48 ActivInspire User Guide_04/23
Page Notes
As you build a flipchart, Page Notes are an ideal way to create reminders for your instruction or include
important information for colleagues.
Page Notes are accessible in the Notes Browser. If your Browsers are not visible, go to View, then
Browsers. Adjust the text font, size, and details with the text tool that appears above the notes once you begin
typing.
Use Page Notes however you wish. For instance, you can include lesson details such as standards and
learning objectives, or steps to take as you teach the lesson.
Upon adding Page Notes, a small sticky note icon appears on that flipchart page. Click that icon at any time to
open the corresponding Page Notes.
You may edit or delete Page Notes at any time.

49 ActivInspire User Guide_04/23
Property Browser
The Property Browser in ActivInspire helps you to see all of the properties of a page or an object at a glance. It
is a powerful tool for quickly adding interactivity to your lessons.
To display and edit the properties of the flipchart page itself, select any blank space within a
flipchart page. Go to your Property Browser. If your browsers are not visible, go to View, then
Browsers.
Menus can be expanded or collapsed by clicking the + or – icons.
Changes made within the Property Browser are reflected in real time.
Select any object on your flipchart page to display and edit its properties.
View and manipulate the position and appearance of an object. You may still control the
position of an object by dragging and dropping, and you may also use the toolbox to
make further changes.
Add permanently visible labels to objects or make a label appear only when the mouse
cursor runs over the object.
Control the behavior of an object by defining rules, called Restrictors, that constrain its
movement, resizing allowances, etc.
All properties are clearly categorized so that you can select properties by type.

50 ActivInspire User Guide_04/23
Background Color
When creating a flipchart, you may always use the Fill tool from your main toolbox to quickly change the
background color of the current page.
You can also customize the background color by going to your Property Browser. If your Browsers are not
visible, select View, then Browsers. The Property Browser allows you to view and customize the properties of
flipchart pages as well as selected objects.
Look for the Page menu. Be sure you have not selected an object on the flipchart so you may view overall
flipchart properties. Select the three horizontal dots next to Background.
Use Fill to customize the background color, and choose from white or black, or select another option from the
palette by clicking either one of these squares.
You may also select from Image, Desktop Snapshot, or Desktop Overlay.
Within Fill, choose a solid fill or from several gradient styles.
Be sure to select Apply to save your choices, and then click OK.
Fill tool

51 ActivInspire User Guide_04/23
Page Turn Effects
Choose from a range of animations to give the finishing touch to any flipchart.
To apply Page Turn Effects to your entire flipchart, go to View, then Page
Turn Effects.
Hover your cursor over the thumbnails to preview effects. Choose your
effect and click Done.
Effects run when you navigate from one page to another with the Previous Page and Next Page buttons, or
when an action triggers a page navigation. Note that effects are disabled when you navigate with the Page
Browser, when in Design mode, when Spotlight and Revealer tools are in use, or when in Desktop Annotation
Mode.
To change the effect for a single page, go your Property Browser and look for the
Page menu.
Select the three horizontal dots next to Page Turn Effects. This will apply the
effect to run only when you navigate away from this page.
To switch effects off, return to Page Turn Effects and select None.

52 ActivInspire User Guide_04/23
Page Tools
Spotlight and Revealer are two of ActivInspire users’ favorite tools. However, sometimes you may like to have
them set to appear on some pages of your flipcharts, but not on others.
To customize these Page Tool settings, begin by going to your Property Browser.
If your Browsers are not visible, go to View, then Browsers.
Select any blank space on your flipchart page and expand the Tools menu.
Expand the Page Tools dropdown menu.
As Before is the default for all pages. This maintains the current state of the
Spotlight or Revealer tool. For example, if Revealer is switched on for page 1 of
your flipchart, it will automatically be switched on when you turn to page 2.
Selecting Revealer Tool or Spotlight Tool will activate that tool on when you
arrive at this page.
Tools Off switches the Revealer or Spotlight off when you arrive at this page.
For example, from the Page Tools dropdown menu on page 1 of your flipchart, you
could select Revealer Tool. However, on page 2 of your flipchart, you might select
Tools Off from the Page Tools dropdown menu. The Revealer Tool would then
appear on page 1, but not on page 2.

53 ActivInspire User Guide_04/23
Revealer Mode
ActivInspire makes it easy to add and customize the Revealer Tool on specific pages of your flipchart.
Begin by going to your Property Browser. If your Browsers are not visible, go to
View, then Browsers.
Select any blank space on your flipchart page and expand the Tools menu.
Expand the Page Tools dropdown menu.
As Before is the default for all pages. Select Revealer Tool to activate that tool
for this specific page.
From the Revealer Mode dropdown menu, you can choose which style of
Revealer you prefer.
To finish isolating the Revealer Tool to a specific page or pages of your
flipchart, go to the next page and change the Page Tools dropdown to
Tools Off.

54 ActivInspire User Guide_04/23
Spotlight Mode
ActivInspire makes it easy to add and customize the Spotlight Tool to specific pages of your flipchart.
Begin by going to your Property Browser. If your Browsers are not visible, go to
View, then Browsers.
Select any blank space on your flipchart page and expand the Tools menu.
Expand the Page Tools dropdown menu.
As Before is the default for all pages. Select Spotlight Tool to activate that tool for
this specific page.
From the Spotlight Mode dropdown menu, you can choose which style of
Spotlight you prefer.
To finish isolating the Spotlight Tool to a specific page or pages of your
flipchart, go to the next page and change the Page Tools dropdown to
Tools Off.

55 ActivInspire User Guide_04/23
Inserting Pages
Insert as many pages into your flipcharts as you wish.
To insert a blank page, go to Insert and select Page. Choose between Blank Page Before Current or Blank
Page After Current.
You also may use the menu within your Page Browser to duplicate pages. If your Browsers are not visible, go
to View, then Browsers.
Within the Page Browser, select your desired page. Use the menu or right-click to access more options.
Drag and drop thumbnails within the Page Browser to reposition pages.
Note that you also may copy and paste pages from one flipchart to another.

56 ActivInspire User Guide_04/23
Adding Questions
If you have access to ActivExpressions, you may choose to create self-paced question sets within your
flipcharts.
To begin, go to Insert, then choose Questions.
Within the Design View of the Question Manager, you can cut, copy, paste, import, export, and print questions.
Use the arrows to move through the pages of your flipchart to add questions exactly where you need them.
Select from seven question types and
click the Question Mark icon whenever
you wish to add another question.
The question type you choose will dictate the fields to complete. In this example, with a Multiple Choice
question, you may indicate the correct answer. Scroll down within the Question Manager to set additional
parameters.
Click Apply to save changes. Once you have finalized your question set, click Done. You may always return to
make additional changes.

57 ActivInspire User Guide_04/23
Inserting Multimedia
ActivInspire allows you to add images, sound, video files, and website links to your flipcharts with a few simple
clicks, adding even more engagement and interaction to your lessons and activities.
Add media using the Insert Media From File icon from your
toolbox, or go to Insert and select Media.
You will be prompted to locate and select the file from your
device. Click Open.
You may then manipulate it like any other object.
Note: With images, you may also copy and paste from other sources directly onto your flipchart.
To add a website link to your flipchart, go to Insert and select Link. Choose from File, Website, or Embedded
HTML.
Select Website to input a URL.
Decide how you would like the link to appear.
If you link the website to an existing object, you will see an icon of a circle with an arrow
when you hover over the object in Presentation Mode. This indicates the link is live. Clicking
the object will take you to directly to the website.
Insert Media From File icon

58 ActivInspire User Guide_04/23
Adding Videos
ActivInspire makes it easy to add videos to your flipcharts to maximize student learning.
For video files saved on your device, go to Insert, Media, then File. Locate your video file and click Open.
There are no restrictions on what file types you can insert, but we
recommend using file types playable by your device’s default video player,
such as mp4.
You can move the video window, resize it, and manipulate it in many of the
same ways you can with other objects.
To link to a video online, go to Insert, Link, then Website.
Enter or paste in the URL to the video and decide how you would like the link to appear. Click OK.
Now in Presentation mode, hovering over the link displays a black circle with a white play icon, indicating the
link is live. Clicking this link will open the video in your default browser.

59 ActivInspire User Guide_04/23
Adding Sound
ActivInspire makes it easy to add sound files into your flipcharts to maximize student learning.
For audio files saved on your device, go to Insert, Media, then File. Locate your audio file and click Open.
There are no restrictions on what file types you can insert, but we recommend using file types playable by your
device’s default video player, such as .wavs or .mp3s.
In Presentation Mode, clicking the speaker icon opens a controller and plays the sound
file.
In Design Mode, you may manipulate the sound file like any other object.
To create a link or apply a sound to an object within your flipchart, go to
Insert, Link, and choose File. Locate your file and click Open. Make
your selections regarding how the link will appear and where the file will
be stored and click OK.

60 ActivInspire User Guide_04/23
There are also a variety of sounds available within the Shared Resources that
come with ActivInspire software. To find and apply sounds, go to your
Resource Browser and select Shared Resources. Expand the Sounds
folder. To add a sound, simply drag it over to your flipchart page.

61 ActivInspire User Guide_04/23
Adding Text
Adding text to an ActivInspire flipchart is quick and easy. Text allows you to create labels, captions, passages,
and more within your lessons and activities.
To add text, select the Text tool on your main toolbar. If for some reason the icon is not present, go to Insert
and select Text.
Once you have selected the text tool, you can add text anywhere on your flipchart. Simply click and begin
typing.
A text toolbar also appears, so you can customize the text at any time.
ActivInspire will remember your preferences and apply them the next time you insert text.
Once you add text, you may select and manipulate it as you would with any other object.
Even with the Select tool in use, just double-click the text to access your text toolbar again.
Text tool

62 ActivInspire User Guide_04/23
Shapes
ActivInspire makes it easy to add shapes to your flipcharts. Access the Shapes tool from your main toolbox, or
go to Insert, then Shapes.
Another menu appears next to your toolbox. Click the tiny arrows at the bottom to expand the shapes menu.
Select the shape you wish to draw. Use the color palette at the top to adjust the shape’s line and
fill and the main color palette to adjust its outline. You can also adjust the width of the shape’s
outline.
The cursor changes to indicate your selected shape. From here, just click or press down and
drag to draw your shape.
ActivInspire will remember your preference and continue producing that shape until you change
to another shape or switch to a different tool.
Select the shape to move, edit, or manipulate it – either with the sizing
handles or with the options on the Marquee Handle. Use the Fill tool from the
main toolbox to change your shape’s color – both the outline and the interior.
Shapes tool

63 ActivInspire User Guide_04/23
Equation Editor
The Equation Editor in ActivInspire helps you create and add equations to a flipchart.
To access the Equation Editor, go to Insert, then Equation.
Note that the Equation Editor utilizes Java, so you may need to verify that you are running the correct version
for optimal performance.
Once selected, the cursor changes to the pi symbol, indicating Equation Editor will start wherever you click the
page. There are several buttons full of options within the Equation Editor. The equation will display as you
create it. Click OK when your equation is complete.
Select the equation to manipulate it as you would with any other object.
Double-click to open the Equation Editor and edit an existing equation. If you still have the Equation Editor tool
in use, just click the equation to open the Equation Editor, prefilled with the equation.

64 ActivInspire User Guide_04/23
Connectors
Use Connectors in ActivInspire to draw connections between objects in your flipcharts.
Access the Connector tool from your main toolbox, or go to Insert, then Connectors.
Another menu appears next to your toolbox. Select the Connector you wish to draw. You may
change the color and width too. Click or press down and drag to draw your Connector.
If you draw the Connector from one object to another, those objects will remain connected as
you move them around the flipchart page.
ActivInspire will remember your preference and continue producing that Connector until you
change to another Connector or switch to another tool.
Use the Select tool on a Connector to access the Object Edit Menu,
Translucency Slider, and Edit Shape Points.
Connector tool

65 ActivInspire User Guide_04/23
Timestamp
Use the Timestamp in ActivInspire for documentation purposes within your flipcharts, for example, the last time
you updated a template or lesson.
To access the Timestamp, go to Insert, then Timestamp. By default, the Timestamp appears with your most
recent text preferences.
Select the Timestamp to manipulate it as you would any other object.
You also can add a Timestamp to all new flipchart pages as they are created by going to File, Settings (on
Mac, View, Customize), then Flipchart Objects, and selecting Add Timestamp to all new pages created.
Once finished, click Done.

66 ActivInspire User Guide_04/23
Desktop Tools
Desktop Tools are a collection of commonly used ActivInspire tools that you may find useful when working in
other applications.
Access Desktop Tools from your main toolbox, or go to Tools, then Desktop Tools.
When using Desktop Tools, ActivInspire is minimized, and a floating toolbox appears. Drag the toolbox to
move Desktop Tools anywhere on your desktop. It will remain visible over other applications.
Click the icon to expand Desktop Tools.
Click Return to Flipcharts to return to your flipchart.
Desktop Tools
Return to
Flipcharts
ExpressPoll
Screen Recorder
More Tools
Camera
On-screen Keyboard
Resource Library

67 ActivInspire User Guide_04/23
Annotation Tools
The Annotation Tools in ActivInspire consist of the Pen, Highlighter, and Eraser tools, which are quite
possibly the most utilized tools of the program.
In addition to residing in your main toolbox, these tools can also be accessed under the Tools tab.
Use the Pen tool just as you would typically use a physical pen to mark, indicate, or draw on a regular surface.
Choose from the color palette on the main toolbox, or right-click to expand the palette or select your own
color. Change the width using the circles or the slider.
The same features apply to the Highlighter. You may change the width of the Eraser.
Select annotations to manipulate them as you would any other object.
Annotation Tools

68 ActivInspire User Guide_04/23
Magic Ink
Magic Ink allows you to reveal concealed images and can add an extra level of excitement and engagement to
your lesson.
Magic Ink works because ActivInspire flipcharts are
created in layers. The Magic Ink tool simply works as an
eraser on the very top-most layer, where you typically find
annotations.
To create the effect of Magic Ink, go to your Object Browser. This allows to see and
change the current layers within your flipchart.
Images typically reside in the middle layer. Bring the concealing image or object that
you wish to erase to the top layer by dragging and dropping.
Now you may use Magic Ink, located under Tools.
Magic Ink icon

69 ActivInspire User Guide_04/23
Pen Modifiers
Pen Modifiers in ActivInspire offer a quick way to create activities, graphic organizers, and more.
To access Pen Modifiers, first select the Pen tool. Go to Tools, then Pen Modifiers.
A new menu will appear next to your toolbox with
a variety of lines and shapes. Select any of them
to create annotations. You may change the color
and line width just as you do with the Pen tool.
Note that the fill of the shape Pen Modifiers is translucent.
You may also use the Select tool to select and manipulate any of these annotations as you would with other
objects.
Pen tool

70 ActivInspire User Guide_04/23
Handwriting Recognition
The Handwriting Recognition tool in ActivInspire is perfect for teachers and students alike to make annotations
more legible.
To enable Handwriting Recognition, use the Tools icon in your main toolbox, or go to Tools, then
Handwriting Recognition.
Once enabled, annotations will instantly convert to text. If a word has not been converted correctly, click on the
Alternatives icon for more options.
Note that this new object will take on the most recent text settings, but you may always adjust them.
You may also make annotations with the Pen and convert them to text later. Use the Select tool to isolate your
annotation, then click the Object Edit Menu button from the Marquee Handle. Select Convert to Text.
Tools icon
Select tool

71 ActivInspire User Guide_04/23
Shape Recognition
The Shape Recognition tool in ActivInspire is perfect for teachers and students alike to turn simple annotations
into authentic math lessons.
To enable Shape Recognition, use the Tools icon in your main toolbox, or go to Tools, then Shape
Recognition.
As soon as you finish drawing, the annotation will convert to a shape.
The shape can then be manipulated like any other object within your flipchart.
You may also make annotations with the Pen and convert them to shapes later. Use the Select tool to isolate
your annotation, then click the Object Edit Menu button from the Marquee Handle. Select Convert to Shape.
Tools icon
Select tool

72 ActivInspire User Guide_04/23
Revealer Tool
The Revealer tool built into the ActivInspire software is a great way to focus students’ attention and easily
chunk information in your lessons.
To access the Revealer, select the Tools icon from your toolbox, or go to Tools, then Revealer.
Reveal hidden objects by clicking and dragging the blind from the top, bottom, right, or left. Simply look for the
cursor.
Select the Revealer menu to either save the revealer’s position on your flipchart page or close the tool
altogether.
Tools icon

73 ActivInspire User Guide_04/23
Spotlight Tool
ActivInspire makes it easy to add and customize the Spotlight Tool to specific pages of your flipchart.
Begin by going to your Property Browser. If your Browsers are not visible, go to View, then Browsers.
Select any blank space on your flipchart page and expand the Tools
menu.
Expand the Page Tools dropdown menu.
As Before is the default for all pages. Select Spotlight Tool to activate
that tool for this specific page.
From the Spotlight Mode dropdown menu, you can choose which style
of Spotlight you prefer.
To finish isolating the Spotlight Tool to a specific page or pages of your flipchart,
go to the next page and change the Page Tools dropdown to Tools Off.

74 ActivInspire User Guide_04/23
Camera Tool
The camera tool allows you to easily adapt in the moment to meet your students’ needs.
To access the camera, go to Tools and select Camera. There are several options to choose from.
For example, to use Area Snapshot, you may drag the sizing handles to create an area, or input an area
using the Camera Snapshot menu. Then choose your snapshot’s destination.
Snapshots sent to the current page or a new page of your flipchart may be selected and manipulated just like
any other object.

75 ActivInspire User Guide_04/23
Sound Recorder
The Sound Recorder in ActivInspire is perfect for capturing audio from your lessons. You may both insert these
recordings into your flipchart and save them to your device.
To access the Sound Recorder, go to Tools, More Tools, then Sound Recorder.
When you are ready to begin recording, click Record. Pause and resume at any time.
To end the recording, click Stop. The recording is saved as a .wav
file and the audio icon appears on your flipchart page.
Play the file at any time by clicking the audio icon. In Design Mode,
Select to manipulate as you would any other object.
To change your settings to save the recording to your device, or to have the option to do both, go to File, then
Settings. For Mac, View, then Customize.
Select Recordings, and from the dropdown menu Sound
Recording, choose Save to Disk, or Both.
Click Done to apply changes.
Upon completing your next recording, you will be prompted to choose a location to save your sound file. If you
modified settings to Both, the audio icon will also appear in your flipchart.

76 ActivInspire User Guide_04/23
Screen Recorder
The Screen Recorder in ActivInspire is perfect for capturing actions on a flipchart, the desktop, or another
application. You could even use your recordings in a flipped classroom model, or to upload to YouTube for
students.
To access the Screen Recorder, you can use the Tools button on your main toolbox, or go to Tools, More
Tools, then Screen Recorder. Choose between Full Screen Recorder or Area Screen Recorder.
If you choose Full Screen Recorder, the recorder will automatically launch. With Area Screen Recorder,
drag to create the area you wish to record, then click Launch Recorder.
A Screen Recorder window appears. You may move this window if you wish. Select the dropdown menu to
change audio recording source.
Next, select the blue circle. Choose a location to save this recording and give your recording a title. Screen
recordings are saved as MP4s. Select Save.
The recording is now in progress. Select the red square to stop your recording.
You may create an additional recording or select the green play button to play the recording you just made.
You can also go to the location where you saved the file and double-click to open.
Screen Recorder on Windows
Screen Recorder on Mac

77 ActivInspire User Guide_04/23
Clock and Timer
The clock and timer tools built into ActivInspire help you gauge time for students’ activities, assessments, and
more.
To use the clock tool, select the Tools icon from your toolbox, then More Tools, and Clock. Or go to Tools,
More Tools, and Clock.
Choose to display analog clock, digital clock, or both.
Resize the clock using the sizing handles.
Select the Count Down or Count Up option to access the timer.
You may enter the amount of time, add a sound to play upon timeout,
and even add an action. Once you have made your selections, click
OK.
Use the pause icon on the toolbar to pause the timer and click again
to resume.
Close at any time by clicking the X.
Tools icon

78 ActivInspire User Guide_04/23
Tickertape
Use Tickertape in ActivInspire to create scrolling text on your front-of-class display. This is ideal for issuing
reminders to your students, providing directions, reinforcing key vocabulary, and more.
To access Tickertape, go to Tools, More Tools, then Tickertape.
Enter your message into the Tickertape dialogue box. You may also customize the font type, color, position,
and more. Use this menu to save and access previously saved Tickertapes as well.
Once you have made your selections, click OK.
The Tickertape Speed window will stay visible on your screen, allowing you to adjust the message’s speed with
the slider, pause or resume, or select the ellipsis icon to return to the Tickertape menu. To close the Tickertape
entirely, click the X on the Tickertape Speed window.

79 ActivInspire User Guide_04/23
Spellcheck Flipchart
Even teachers occasionally make mistakes, which is why you can always spellcheck your ActivInspire
flipcharts.
To access the Spellcheck Flipchart tool, use the Tools icon in your main toolbox, or go to Tools, More Tools,
then Spellcheck Flipchart.
The Spell Checker window appears and is similar to
spellcheckers you may be familiar with from Microsoft
programs. It will spellcheck your entire flipchart, regardless of
number of pages. Once you have reviewed your entire flipchart,
click Done.
You may also customize your spellchecker by
going to File, Settings, and choosing
Spellchecker from under the Settings tab. Once
you have selected your preferences, click Done.
Tools icon

80 ActivInspire User Guide_04/23
Teacher Lock
The Teacher Lock in ActivInspire is perfect for those times you need to step away from your device.
To access the Teacher Lock, use the Tools icon in your main toolbox, or go to Tools, More Tools, then
Teacher Lock.
The Teacher Lock dialogue box opens. Enter your password (the default is 1234) and click OK. Note that this
is also where you can change your password.
The Teacher Lock is now active. Many of ActivInspire’s options are now disabled. Click on the Teacher Lock
icon from your main toolbar and re-enter your password to disable the lock.
Tools icon
Teacher Lock icon

81 ActivInspire User Guide_04/23
Calculator
The calculator tool built into the ActivInspire software allows you to create robust lessons and facilitate
authentic math experiences in the classroom.
To access the calculator, select the Tools icon from your toolbox, or go to Tools, and select Maths Tools.
Choose calculator.
Drag the calculator to reposition it anywhere on
the page.
As you enter an operation, it appears in the top
window.
Hold and drag the operation onto the flipchart page. You may then manipulate it like any other object.
To close the Calculator, simply click the X.
Tools icon

82 ActivInspire User Guide_04/23
Dice Roller
The Dice Roller tool built into the ActivInspire software is the perfect way to randomize countless elements
within the classroom.
To access the Dice Roller, either use the Tools icon from your toolbox, or go to Tools, Maths Tools, and
select Dice Roller.
When the Dice Roller menu appears, you can drag the window to reposition it.
Select how many dice you would like to roll. You can choose up to 5.
Select the speed of the roll using the slider.
Select Roll to roll the dice.
Output to Flipchart will add the dice total to your
current flipchart page.
To close the Dice Roller, click the X.
Tools icon

83 ActivInspire User Guide_04/23
Ruler and Protractor
The math tools built into the ActivInspire software allow you to create robust lessons and facilitate authentic
math experiences in the classroom.
To access math tools, select the Tools icon from your toolbox, or go to Tools, and select Maths Tools.
Choose ruler or protractor.
To move the ruler or protractor around the page, drag the X icon.
Look for the arc to rotate the tool.
Resize the tool by dragging the sizing handles on either end.
Select the small menu icon on the tool for more options.
To draw lines along the ruler or protractor, select your Pen tool. Hold down the pen as you move it alongside
the tool’s edge.
Fill an angle by aligning the protractor with your angle, then drawing the pen along the arc.
Tools icon

84 ActivInspire User Guide_04/23
Select the tool’s menu, then Close to remove the tool from the page.
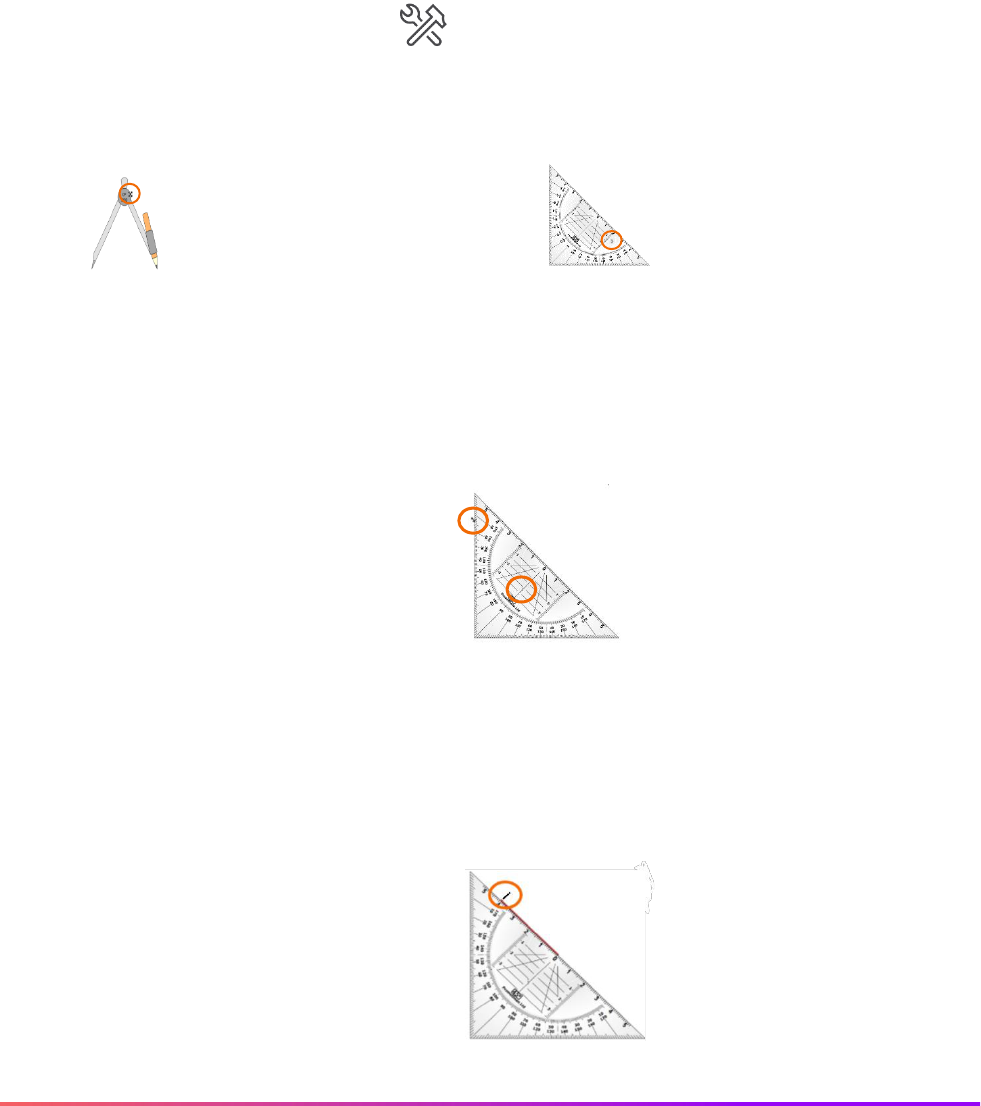
85 ActivInspire User Guide_04/23
Set Square and Compass
The math tools built into the ActivInspire software allow you to create robust lessons and facilitate authentic
math experiences in the classroom.
To access math tools, select the Tools icon from your toolbox, or go to Tools, and select Maths Tools.
Choose set square or compass.
Resize the tool by dragging the sizing handles on either end. Select the small menu icon on the tool for more
options.
To draw lines along the set square, select your Pen tool. Hold down the pen as you move it alongside the
tool’s edge.
Tools icon
To move the set square or
compass around the page,
drag the X icon.
Look for the arc to
rotate the tool.

86 ActivInspire User Guide_04/23
Drag the edge of the compass to adjust its radius. Hold down the tip of the pencil part of the compass and
rotate to draw a circle in either direction. You may change your pen color and width.
Select the tool’s menu, then Close to remove the tool from the page.

87 ActivInspire User Guide_04/23
XY Origin Tool
Using the XY origin tool in ActivInspire is a quick and easy way to help rotations come alive in your math
lesson, lessons about orbits, and more.
Rotate any object by selecting it and using the Rotate Object marquee handle to spin it around its center
point.
To change the rotation point, use the XY Origin Tool. Access it from the Tools icon from your toolbox, or go to
Tools, Maths Tools, and select XY Origin.
Add the origin point anywhere on the page.
The object will rotate around the new origin point when you click and drag the Rotate Object marquee handle.
To remove the XY origin tool, follow the same process to deselect it in the Maths Tools menu.
Tools icon

88 ActivInspire User Guide_04/23
Actions
ActivInspire makes it easy to apply Actions to objects, adding an extra level of interactivity and engagement to
your flipcharts.
Begin by selecting the object you wish to apply an Action to. Note: If you select
more than one object, you can apply the same Action to all selected objects.
To view the dozens of Actions available, go to your Action Browser. If your Browsers are
not visible, simply go to View, then Browsers.
Scroll through all Actions or use the dropdown to view five different categories.
Once an object is selected, choose the Action you wish to apply. Be sure to click Apply.
In Presentation Mode, Actions are denoted by a small play icon. You may test Actions as soon as you apply
them.
In Design Mode, Actions are denoted by a red outline. This is handy if you are not sure which Actions a
flipchart contains. Selecting the outlined object indicates which Action has been applied in the Action Browser.
To remove an Action, go to Design Mode, select the object, and choose Clear from the Action Browser. You
may switch back into Presentation Mode to verify that the Action has been removed.

89 ActivInspire User Guide_04/23
Applying Actions to Specific Tools
ActivInspire allows you to apply Actions to specific tools, such as Annotation Tools. This can be useful if you
would like students to complete an activity and focus on the page, rather than customizing tools from the
toolbar.
Select the object you wish to apply the action to – in this case, the highlighter image – and go to your Action
Browser. If your Browsers are not visible, go to View, then Browsers.
Before applying the Pen or Highlighter tool, you may customize its color and width from
your toolbar. Return to the Select tool after making your choices.
Once the object is selected, choose your tool from the Action Browser. Click Apply.
In Presentation Mode, a small play icon now appears when you hover over the object. You may test the Action
as soon as it is applied.
To remove this Action, go to Design Mode, select the object, and choose Clear from the Action Browser.

90 ActivInspire User Guide_04/23
Command Actions
ActivInspire includes dozens of Command Actions, allowing you to quickly enable tools within your flipchart to
issue commands.
Select the object you wish to apply the Command Action to and go to your Action
Browser. If your Browsers are not visible, go to View, then Browsers.
Command Actions is the second option within the dropdown menu.
Select a Command Action from the Action Browser and click Apply.
In Presentation Mode, a small play icon now appears when you hover over the object.
You may test the Command Action as soon as it is applied.
To remove a Command Action, go to Design Mode, select the object, and choose
Clear from the Action Browser.

91 ActivInspire User Guide_04/23
Page Actions
ActivInspire includes several Page Actions, allowing you to quickly navigate around the flipchart, insert or clear
a page, change the background, and more.
Select the object you wish to apply the Page Action to and go to your Action Browser. If your Browsers are
not visible, go to View, then Browsers.
Page Actions is the third option within the dropdown menu.
Select a Page Action from the Action Browser and click Apply.
In Presentation Mode, a small play icon now appears when you hover over the object. You may test the Page
Action as soon as it is applied.
To remove a Page Action, go to Design Mode, select the object, and choose Clear from the Action Browser.

92 ActivInspire User Guide_04/23
Object Actions
ActivInspire includes dozens of Object Actions to use for manipulating objects within your flipchart. Objects
include images, text, and shapes.
Select the object you wish to apply an Object Action to and go to
your Action Browser. If your Browsers are not visible, go to View,
then Browsers.
Object Actions is the fourth option within the dropdown menu.
Select an Object Action from the Action Browser and click Apply.
In Presentation Mode, a small play icon now appears when you hover over the object. You
may test the Object Action as soon as it is applied.
To remove an Object Action, go to Design Mode, select the object, and choose Clear from the Action
Browser.

93 ActivInspire User Guide_04/23
Document and Media Actions
ActivInspire includes Document and Media Actions, allowing you to quickly access
and present files and websites to enhance your flipcharts.
Select the object you wish to apply a Document or Media Action to and go to your
Action Browser. If your Browsers are not visible, go to View, then Browsers.
Document and Media Actions is the final option within the dropdown menu.
Select from the available actions and be sure to complete the Action Properties fields. Then click Apply.
In Presentation Mode, a small play icon now appears when you hover over the object. You may test the
Document or Media Action as soon as it is applied.
To remove a Document or Media Action, go to Design Mode, select the object, and choose Clear from the
Action Browser.

94 ActivInspire User Guide_04/23
Reorder
ActivInspire flipcharts are arranged in layers, allowing you to reorder objects to best suit your needs.
The best way to visualize these layers is by viewing your
Object Browser. If your Browsers are not visible, go to
View, then Browsers.
The Object Browser allows you to view all layers and
objects within those layers at once. Use it to reorder
objects by dragging and dropping within the same layer
or to different layers. For instance, drag and drop to reorder
text on top of an image.
You can also change the position of objects within the same layer by selecting an
object and using the Bring Forward or Send Backward buttons on the Marquee
Handle.
For even more options, select an object and click Object Edit Menu, third from the left on the Marquee
Handle. Choose Reorder for a full menu.

95 ActivInspire User Guide_04/23
Another Page
The Another Page action is perfect for instances when you want to jump from one page of your flipchart to
another with a single click.
To apply Another Page, select the object you wish to be
the trigger that takes you and your students to another
page.
Go to your Action Browser, located second from the right
within your Browsers. If your Browsers are not visible, go to
View, then Browsers.
Select Another Page from the list of actions and indicate
the desired destination page in the Page Number field.
Click Apply Changes.
In Presentation Mode, the object with Another Change applied will be denoted by a small play icon. Click the
icon to test the action.
To remove the Another Page action, begin in Design Mode. Select the object and choose Remove Existing
from the Action Browser. You may switch back into Presentation Mode to verify the action has been removed.

96 ActivInspire User Guide_04/23
Hidden
Hiding objects in ActivInspire is one of our users’ favorite ways to build activities for students.
To create an action where you click one object and
another appears or disappears, begin by selecting
the object you want to be the trigger.
Go to your Action Browser. If your Browsers are not
visible, go to View, then Browsers.
Select Hidden from the list of actions. Then click the
three dots next to Target. Choose which object or
group of objects you wish to appear and disappear
when the original object is clicked.
Click OK and then Apply Changes.
In Presentation Mode, the object with Hidden applied will be denoted by a small play icon. Click the icon to
toggle between hidden and visible.
To remove or modify a Hidden action, return to Design Mode, select the object, and choose Remove
Existing. Return to Presentation Mode to verify that the Hidden action has been removed.

97 ActivInspire User Guide_04/23
Rub and Reveal
One of ActivInspire users’ favorite tricks is what we call Rub and Reveal. Rub and Reveal quickly allows you to
add an extra level of engagement to your lesson.
To create the Rub and Reveal effect, select the Pen tool. From the color palette, select the same color as the
background of your flipchart. You may also change the width to make large, quick annotations.
Annotate over the areas of the flipchart you wish
to conceal. For example, concealing answers
for fill-in-the-blanks.
You and your students may make additional annotations on top of what you have concealed. To reveal, switch
to the eraser tool.
Erase all annotations to reveal the original content underneath.
Pen tool
Eraser tool
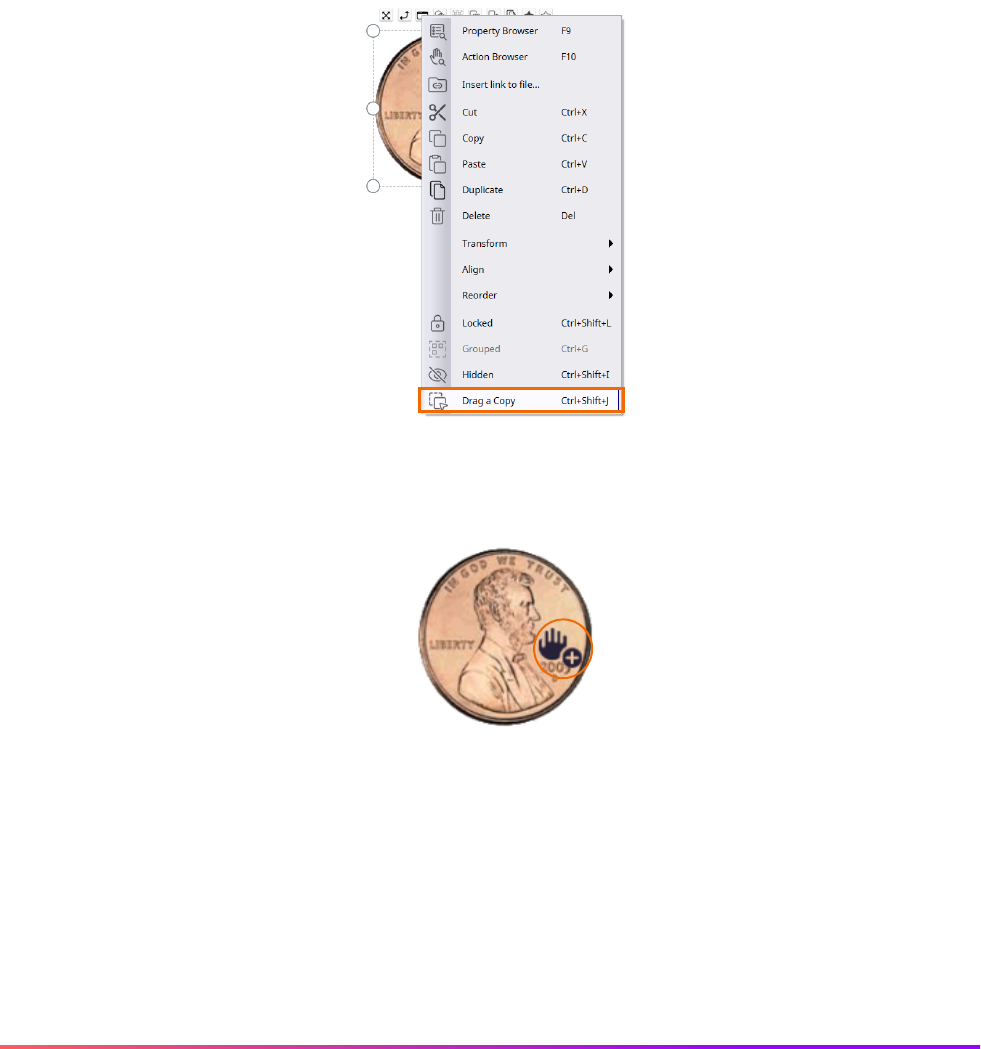
98 ActivInspire User Guide_04/23
Drag a Copy
Drag a Copy replicates any object on your flipchart and is a quick way to make engaging activities for your
students.
To apply Drag a Copy, you can be in either Presentation or Design Mode.
Simply right-click on an object and select Drag a Copy from the menu.
To verify it has been applied, go to Presentation Mode. You will see a tiny hand with a green plus sign. Now as
you drag on the object, a new one will appear, and you may move it anywhere on your flipchart.
To remove Drag a Copy, right-click the original object again, and deselect.

99 ActivInspire User Guide_04/23
Containers
Using containers in ActivInspire is a terrific way to create activities for your students. Any type of object can be
a Container, so long as it is larger than the objects it will contain.
To contain certain objects but reject others – for instance, in a sorting activity – begin in the Property
Browser. If your Browsers are not visible, go to View, then Browsers.
First, select the object you wish to be the container. Expand the menu titled Container.
Select the Can Contain dropdown and choose Specific Object.
Next, click the three horizontal dots next to Contain
Object.
Locate the desired object to be contained from the flipchart and click OK.
You may choose to add reward sounds as well.
To complete the Container, select the object to be contained. This will be the same object you selected for
the previous Contain Object step. (In this example, it is the image of the window.)

100 ActivInspire User Guide_04/23
From the Property Browser, under the Container menu, change Return if Not Contained to True. You may
also select objects not set to the square Container (in this example), such as the beach ball, and set Return if
Not Contained to True.
For this example, when you or your students drag the window to the square Container, it will be contained.
However, if you attempt to drag the beach ball to the square Container, it automatically returns to its starting
position.
Continue the same process to contain or reject the other objects on your flipchart.

101 ActivInspire User Guide_04/23
Keyword Containers
Keyword containers are perfect for creating sorting or categorization activities for your students. You may set
certain objects to be contained and others to be rejected.
Ensure the object that you wish to be your container is large enough for the contents to fit inside.
Select the object you wish to be a container. Go to your Property Browser and
expand the Container menu.
Expand the dropdown menu next to Can Contain and select Keywords. Click the
three horizontal dots next to Contain Words. Select Add and input your keyword.
Note that you may add a Contain Rule and Reward sound as well. When you are
finished, click OK.
Next, select one or more objects that you wish to apply this keyword to. You may
select multiple items by using the Control Key for Windows, or the Command key for
Mac.
Under the Property Browser, expand the Identification menu. Apply the keyword
here as well. Click Add and input the keyword. Click OK when you are finished.
With these objects still selected, scroll down to the Containers menu and select True
from the dropdown next to Return if Not Contained. Complete this process for all containers and objects to be
contained.

102 ActivInspire User Guide_04/23
Finally, go to your Object Browser. Ensure the containers are layered below the objects to be contained.
Simply drag and drop to rearrange them if necessary.
You can test your completed Keyword Containers in Presentation Mode.

103 ActivInspire User Guide_04/23
Rubber Stamp
The Rubber Stamp tool in ActivInspire makes it easy to quickly duplicate objects from your Resource Browser.
Begin in your Resource Browser. If your Browsers are not visible, go to View,
then Browsers.
Select a resource from either your own resources or the Shared Resources that
come with ActivInspire software. Once you have selected it, click the Rubber
Stamp.
Note that your cursor changes to indicate the Rubber Stamp. Now the selected object
will appear every time you click on the flipchart page.
To cease using the Rubber Stamp, simply click the Select tool.
Select tool

104 ActivInspire User Guide_04/23
Profiles
Profiles allow you to fully customize your ActivInspire experience. You can create and edit Profiles at any time.
Access Profiles through Settings on your main toolbox, or go to Edit, then Profiles.
Create, edit, and use different Profiles for a range of modalities – creating, teaching, student use, and more.
Use the dropdown menu to access and customize different profiles.
Use these icons to Retrieve a Profile, Save, Save As, Delete a Profile, or Reset the Current Profile to
Default. Once your changes are complete, click Done.
Switch Profiles any time by selecting Profiles from your toolbox.
Profiles button
Settings button

105 ActivInspire User Guide_04/23
Layout
ActivInspire makes it easy to customize the overall look and feel of your user experience. To change your
Layout, if on a Mac, begin by going to View, then Customize. If on Windows, go to File, then Settings. Then
select the Layout tab.
You may change the icon size, look and feel of the main toolbox and even its position – which is ideal for
younger grades. You also may modify your Browsers, Menubar, and more.
When all changes have been made, click Done. You may always return to Settings to make additional
changes.

106 ActivInspire User Guide_04/23
Commands
ActivInspire makes it easy to customize your Main Toolbox and Marquee Handles with tools you frequently
use. If on a Mac, begin by going to View, then Customize. If on Windows, go to File, then Settings. Then
select the Commands tab.
Choose from All Commands or expand the dropdown menu for categories.
Once you have selected a tool, determine whether you wish to add it to your Main Toolbox or Marquee
Handles by using the dropdown menu.
Once you choose a location, click Add. Use Move Up or Move Down to change its position within your Main
Toolbox or Marquee Handles.
When all changes have been made, click Done. You may always return to Settings to make additional
changes.

107 ActivInspire User Guide_04/23
User Defined Buttons
ActivInspire makes it easy to customize your main toolbox with items you frequently use. To create a User
Defined Button, if on a Mac, go to View, then Customize. If on Windows, go to File, then Settings. Then
select the User Defined Buttons tab.
First, click Add. Select Program/File from the dropdown menu.
Click Find to locate the file you wish to use. Under Command
line parameters you may enter the command line to start the
application to open the file. You may also add a tooltip. Once
finished, click Done.
The User Defined Button now displays on your Main Toolbox. If your toolbox is set to Roll In,
you may need to expand it to view this new button.
Click the User Defined Button to open the file or application you chose.
For another way to easily create a User Defined Button with objects you frequently use, simply drag the object
onto the third column of your Main Toolbox. Look for the small plus sign which indicates it will be added.
Click the User Defined Button to add that object to your flipchart.
You may always return to Settings to modify your User Defined Buttons.

108 ActivInspire User Guide_04/23
Settings
Once you are regularly utilizing ActivInspire in your classroom, there may come a time when you would like to
customize your tools and ActivInspire experience even further.
To adjust Settings, if using a Mac, go to View, then Customize. With Windows, go to File, then Settings.
Click the Settings tab to access a menu of customization options along the left side.
Once you have made your selections, click Done. Changes are reflected in real time.

109 ActivInspire User Guide_04/23
Settings: Clock Tool
The Clock Tool is one of ActivInspire users’ favorite ways to help manage activities within the classroom.
To customize the Clock Tool, if using a Mac, go to View, then Customize. With Windows, go to File, then
Settings.
Select the Settings tab. Clock Tool is the first option in the menu on the left.
You may customize both the analog and digital clocks. Once you have made your selections, click Done.
To view changes, go to Tools, More Tools, and select Clock. You may always return to Settings to make
additional changes.

110 ActivInspire User Guide_04/23
Settings: Design Mode
If you are a fan of ActivInspire, chances are you spend a fair amount of time in Design Mode. To customize
your Design Mode experience if using a Mac, go to View, then Customize. If using Windows, go to File, then
Settings.
Select the Settings tab. Choose Design Mode from the menu on the left.
Once you have made your selections, click Done. To view changes, go to Design Mode. You may always
return to Settings to make additional changes.

111 ActivInspire User Guide_04/23
Settings: Effects
The Revealer and Spotlight tools rank among ActivInspire users’ favorites. To customize these, on a Mac, go
to View, then Customize. With Windows, go to File, then Settings.
Select the Settings tab. Choose Effects from the menu on the left.
You may customize both the Revealer and Spotlight tools. Once you have made your selections, click Done.
To view changes, go to Tools, then Revealer or Spotlight. You may always return to Settings to make
additional changes.
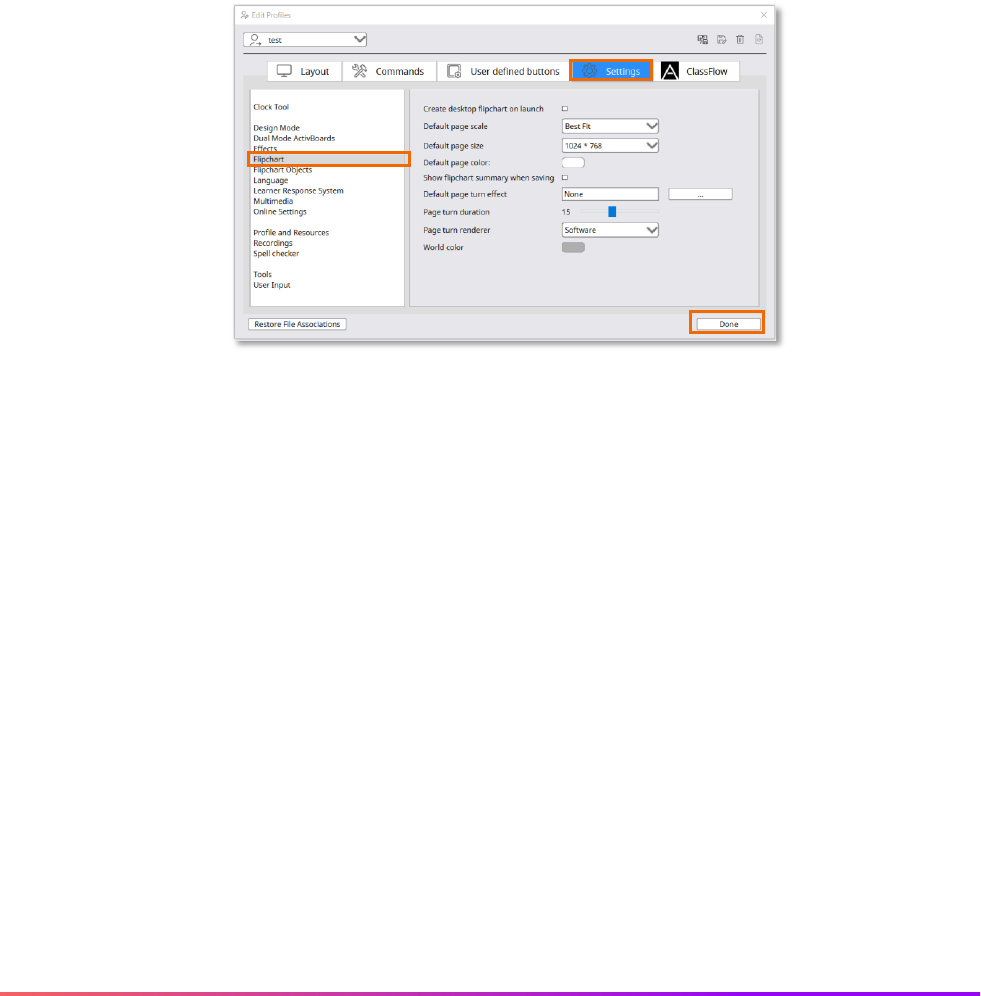
112 ActivInspire User Guide_04/23
Settings: Flipchart
ActivInspire makes it easy to specify and customize the default settings for your flipcharts. If using a Mac,
begin by going to View, then Customize. If using Windows, go to File, then Settings.
Select the Settings tab. Choose Flipchart from the menu on the left.
Once you have made your selections, click Done. Changes are reflected in real time, and you may always
return to Settings to make additional changes.

113 ActivInspire User Guide_04/23
Settings: Flipchart Objects
ActivInspire makes it easy to customize the way objects appear within your flipcharts, as well as modify your
Resource Library settings. If using a Mac, begin by going to View, then Customize. If using Windows, go to
File, then Settings.
Select the Settings tab. Choose Flipchart Objects from the menu on the left.
Once you have made your selections, click Done. Changes are reflected in real time, and you may always
return to Settings to make additional changes.

114 ActivInspire User Guide_04/23
Settings: Language
ActivInspire makes it easy to change your language settings with just a few clicks. If using a Mac, begin by
going to View, then Customize. If using Windows, go to File, then Settings.
Select the Settings tab. Choose Language from the menu on the left.
Select your preferred language from the Application language dropdown menu.
Once you have made your selection, you will be informed that this setting will take effect the next time you
open ActivInspire.
Click OK, then click Done.

115 ActivInspire User Guide_04/23
Settings: Learner Response System
If you are utilizing ActiVotes or ActivExpressions in your classroom, you may wish to further customize their
settings. If using a Mac, begin by going to View, then Customize. If using Windows, go to File, then Settings.
Select the Settings tab. Choose Learner Response System from the menu on the left.
Once you have made your selections, click Done. Changes are reflected in real time, and you may always
return to Settings to make additional changes.
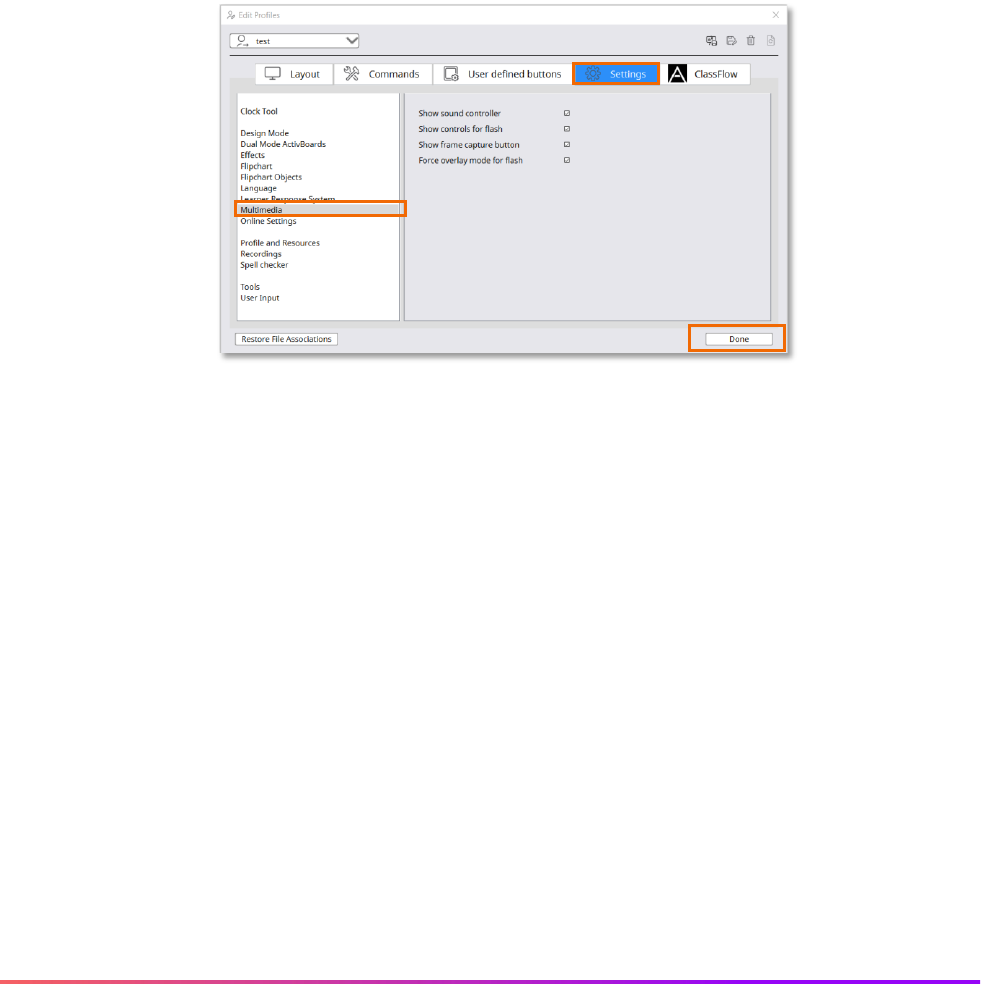
116 ActivInspire User Guide_04/23
Settings: Multimedia
ActivInspire makes it easy to customize your Multimedia settings. If using a Mac, begin by going to View, then
Customize. If using Windows, go to File, then Settings.
Select the Settings tab. Choose Multimedia from the menu on the left.
Once you have made your selections, click Done. Changes are reflected in real time, and you may always
return to Settings to make additional changes.

117 ActivInspire User Guide_04/23
Settings: Online Settings
ActivInspire makes it easy to customize your Online Settings. If using a Mac, begin by going to View, then
Customize. If using Windows, go to File, then Settings.
Select the Settings tab. Choose Online Settings from the menu on the left.
Home URL refers to the website that is displayed when you open your web browser from ActivInspire. The
Web Update URL refers to the website ActivInspire contacts when you check for updates.
Once you have made your selections, click Done. Changes are reflected in real time, and you may always
return to Settings to make additional changes.

118 ActivInspire User Guide_04/23
Settings: Profile and Resources
ActivInspire stores your Profiles and Resources in default folders, but you may easily customize these
locations. If using a Mac, begin by going to View, then Customize. If using Windows, go to File, then
Settings.
Select the Settings tab. Choose Profile and Resources from the menu on the left.
Once you have made your selections, click Done. Changes are reflected in real time, and you may always
return to Settings to make additional changes.

119 ActivInspire User Guide_04/23
Settings: Recordings
ActivInspire makes it easy to change the video and sound recording settings to best fit your needs. If using a
Mac, begin by going to View, then Customize. If using Windows, go to File, then Settings.
Select the Settings tab. Choose Recordings from the menu on the left.
Once you have made your selections, click Done. Changes are reflected in real time, and you may always
return to Settings to make additional changes.

120 ActivInspire User Guide_04/23
Settings: Spell Checker
ActivInspire makes it easy to change the Spell Checker settings to best fit your needs. If using a Mac, begin by
going to View, then Customize. If using Windows, go to File, then Settings.
Select the Settings tab. Choose Spell checker from the menu on the left.
Once you have made your selections, click Done. Changes are reflected in real time, and you may always
return to Settings to make additional changes.

121 ActivInspire User Guide_04/23
Settings: Tools
ActivInspire makes it easy to customize the appearance and usage of some of the most commonly used tools,
including Annotation and Fill Tools, Math Tools, Shape Tools, and more. If using a Mac, begin by going to
View, then Customize. If using Windows, go to File, then Settings.
Select the Settings tab. Choose Tools from the menu on the left.
Once you have made your selections, click Done. To view changes, simply employ the tool you’ve edited.
Changes are reflected in real time, and you may always return to Settings to make additional changes.

122 ActivInspire User Guide_04/23
Settings: User Input
ActivInspire makes it easy to customize the way the Keyboard and Handwriting Recognition tools function. If
using a Mac, begin by going to View, then Customize. If using Windows, go to File, then Settings.
Select the Settings tab. Choose User Input from the menu on the left.
Once you have made your selections, click Done. Changes are reflected in real time, and you may always
return to Settings to make additional changes.

123 ActivInspire User Guide_04/23
Connect Devices
ActivInspire integrates with another beloved Promethean software, ClassFlow. ClassFlow is perfect for
incorporating student devices and easily sharing the contents of your flipchart with connected students.
Select the Connect Devices button within your ActivInspire window.
If you do not yet have a free ClassFlow account, you may register
for one. If you have already created an account, sign in.
Once logged in, your unique five-digit Class Code appears. Students connect by
going to the provided URL.
We recommend using browsers Google Chrome or Safari with ClassFlow.
When a student arrives at this URL, they enter your class code and click Join. Next,
they simply input their name and select Join Anyway.
The scenic landscape images are an indication they have
successfully connected. This holding screen remains until you
send content to your students.

124 ActivInspire User Guide_04/23
Simply click the Send Page to ClassFlow Students button to share your immediate flipchart
page out to student devices.

125 ActivInspire User Guide_04/23
Help and Support
To contact Promethean Support, visit support.prometheanworld.com.
To learn more about ActivInspire and other Promethean solutions:
• Follow us on Twitter @Promethean
• Subscribe to our YouTube channel, PrometheanVideo
• Visit our Learn Promethean website to explore courses, video tutorials, resources, and more
